Configure Access Restrictions and Trusted Proxy IPs
To use automation for managing the PCE environment, use API Keys created by an admin user and automate PCE management tasks. Learn how you can restrict the use of API keys and the PCE web interface by IP address. You can block API requests and users coming in from non-allowed IP addresses.
Configure Access Restrictions
Use the Illumio web console UI to configure access restrictions. You can also configure access restrictions programmatically using the REST API calls described in "Access Restrictions and Trusted Proxy IPs" in REST API Developer Guide.
You must have the global Org Owner role to view or change access restrictions.
A maximum of 50 access restrictions can be defined.
To configure access restrictions:
Log in to the PCE web console as a user with the Global Org Owner role.
Open the menu and choose Access Management - Access Restrictions.
The Access Restriction page opens with a list that shows which IP addresses are allowed and where the restrictions have been applied.
To add a new restriction, click Add.
The Add Access Restriction page opens.
Provide the required attributes:
Provide a name.
In Restriction Applies To, choose User Session, API Key, or Both. Access restrictions can be applied to these different types of user authentication.
List a maximum of eight IPv4 addresses or CIDR blocks.
Click Edit to edit the restriction.
View the access restrictions applied to local users. The default is blank, no restrictions.
You can assign access restrictions to local and external users. To add a local user:
Click Add.
In Access Restriction, choose the type of access restriction.
Click Add.
View the local user's detail page. To modify the user settings, click Edit User.
Use the Edit User dialog to apply restrictions.
If an Org Owner assigns an access restriction to another Org Owner, a warning is displayed, as this can result in the Org Owner user losing access to the PCE.
View the list of API keys in the API Keys page and the Event page.
Configure Trusted Proxy IPs
This section tells how to use the Illumio web console UI to configure trusted proxy IPs. You can also configure trusted proxy IPs programmatically using the REST API calls as described in "Access Restrictions and Trusted Proxy IPs" in REST API Developer Guide.
When a client is connected to the PCE's haproxy server, this connection can traverse one or more load balancers or proxies. Therefore, the source IP address of a client connection to haproxy might not be the actual public IP address of the client.
Log in to the PCE web console as a user with the Global Org Owner role.
Select Settings > Trusted Proxy.
In the Trusted Proxy IPs page, click Edit.
A list of trusted proxy IPs is displayed. Proxy configuration can have up to eight Trusted Proxy IPs.
To remove any of the proxies from the list, select the checkbox in front of the proxy address and click Remove.
To edit Trusted Proxy IPs, click Edit.
In the Edit Trusted Proxy IPs dialog box, you can add a proxy IP address to the list, or delete any of the existing addresses by hovering over the number in front of the address and then clicking the Trash Can icon that shows up.
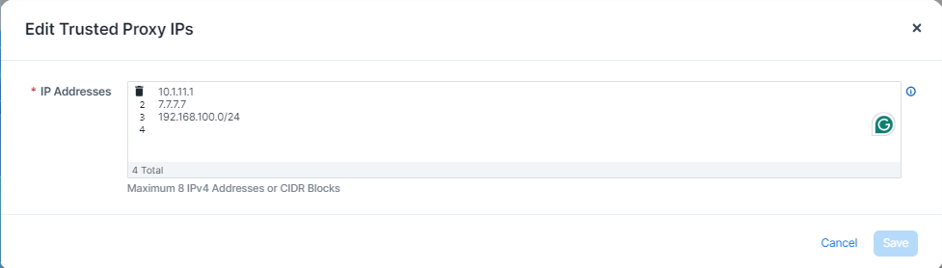
Once you have added or deleted the proxy addresses as needed, click Save.
Manage API Keys
You can add and edit API keys using the PCE console.
Creating API Keys
In the Web console, type "
API keys" in the Search field.In the API Keys page, click Add.
In the "Create API Key" pop-up dialog, add the
Key Name
Description of the key
Org ID
Click Create.
The confirmation dialog appears to show the data for the created API key.
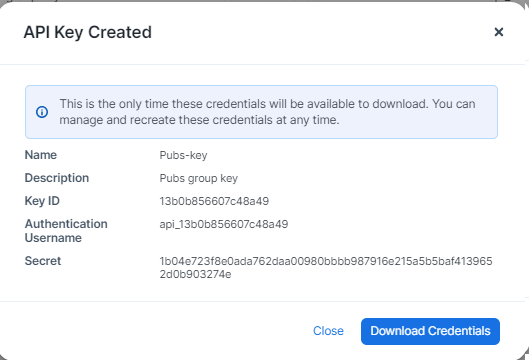
To download the credentials, click on Download Credentials.
You can download the credentials only after the key is created. You can, however, manage the credentials at any time.
The credentials will be downloaded in the default download directory on you hard drive, with the name
API-Key-<your-key-name>. The credential format is a TXT file.{"key_id":"13b0b856607c48a49","auth_username":"api_13b0b856607c48a49","secret":"1b04e723f8e0ada762daa00980bbbb987916e215a5b5baf4139652d0b903274e"}
Editing Expiration of API Keys
To edit the expiration of the Service account API keys using the PCE console:
Select Settings > API Keys.
On the API Key Settings page, click Edit.
By default, API Key for Service Account expires in:
Select from the dropdown list:
Never expires,1 day,30 days,60 days, or90 days.If you change this setting, expiration of the existing API keys will not be impacted.
Keep expired API keys for:
Select from the dropdown list:
1 day,30 days,60 days,90 days, orcustom.