Path for the Custom Certificate: Invalid Certificate File
Symptom: An error is generated in the Policy Compute Engine (PCE) ta-illumio.log file when attempting to add Illumio Data Inputs. Saving any information for the Data Inputs is not allowed.
Error from the /opt/splunk/var/log/TA-Illumio/ta-illumio.log file:
2018-10-24 16:33:48,844 - Illumio_MODINPUT - ERROR - Path for the custom certificate:
Invalid certificate file
A Splunk error, due to PCE certificate trust, is also displayed:
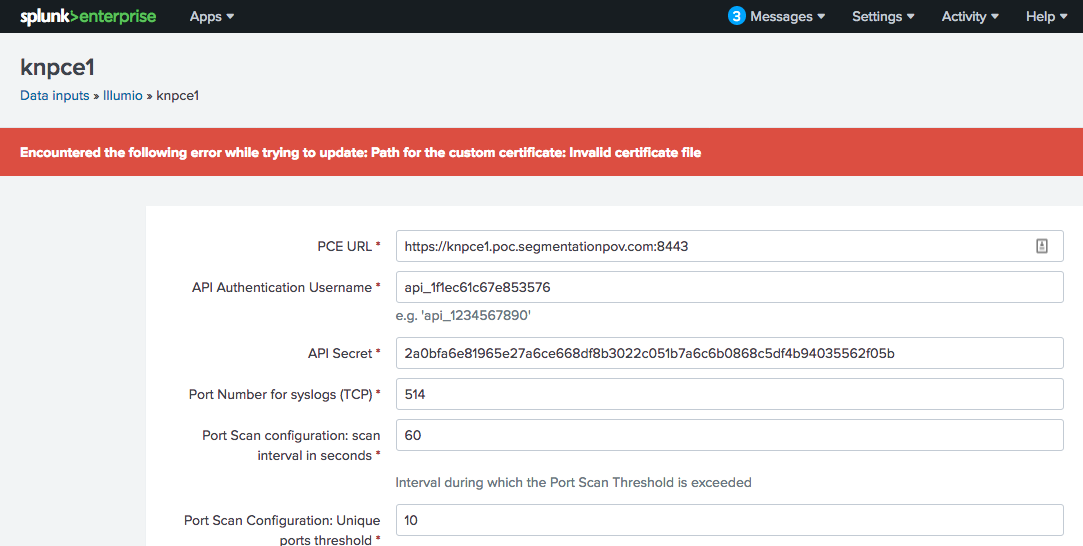 |
Cause: This error is an indication that a PCE certificate was not trusted, even though the certificate has already been added to the local system certificate store.
Fix: Adding Illumio Data Inputs allows the Illumio App for Splunk to connect to a configured PCE to extract data for PCE health and workloads information. When the Illumio App for Splunk attempts a connection to the PCE, it can fail due to a certificate trust even when a local browser trusted the PCE certificate, since it was already added to the local system certificate store. Splunk uses a Python library that is local to the Splunk application, so it carries its own local certificate authority file that it trusts.
There are two ways to add a secure trust to the PCE:
Add both intermediate and root certificate authority to the local Python
cacert.pemfile:In Windows:
C:\Program Files\Splunk\Python-2.7\Lib\site-packages\requests\cacert.pemIn Linux:
/opt/splunk/lib/python2.7/site-packages/requests/cacert.pem
You can also create a certificate file that includes the PCE server certificate, intermediate certificate, and root CA certificate in that order, and then place the file in the Splunk home directory. The certificate should be in PEM format. Use the following steps:
Use a text editor to cut and paste the certificate chain and avoid extraneous characters. The Splunk home directory is as follows:
Windows Splunk home directory:
C:\Program Files\Splunk\Linux Splunk home directory:
/opt/splunk/
Export the certificates using any browser, and then cut and paste them together. The following is an example of what should be in a certificate file:
-----BEGIN CERTIFICATE----- < Server Certificate base64 encoded >
-----END CERTIFICATE-----
-----BEGIN CERTIFICATE-----
< Intermediate Certificate base64 encoded >
-----END CERTIFICATE-----
-----BEGIN CERTIFICATE-----
< Root CA Certificate base64 encoded >
-----END CERTIFICATE-----
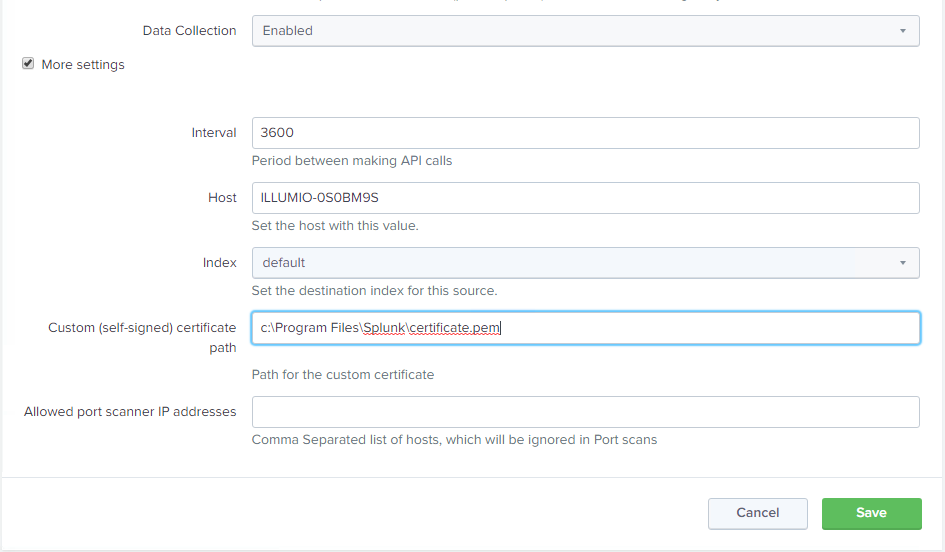
To set the path in the Illumio Data Inputs, navigate to Settings > Data Inputs > Illumio, select the input, check the More settings checkbox, and provide the path to the certificate in the Custom (self-signed) certificate path field.