Create a Container Cluster in the PCE
To provide visibility and enforcement to your containerized environment, you first need to create a container cluster in the PCE. Each container cluster maps to an existing Kubernetes or OpenShift cluster.
Create a Container Cluster
To create a new container cluster:
Log into the PCE web console as a user with Global Organization Owner privileges.
From the PCE web console menu, navigate to Infrastructure > Container Clusters.
Click Add.
Add a Name.
Save the Container Cluster.
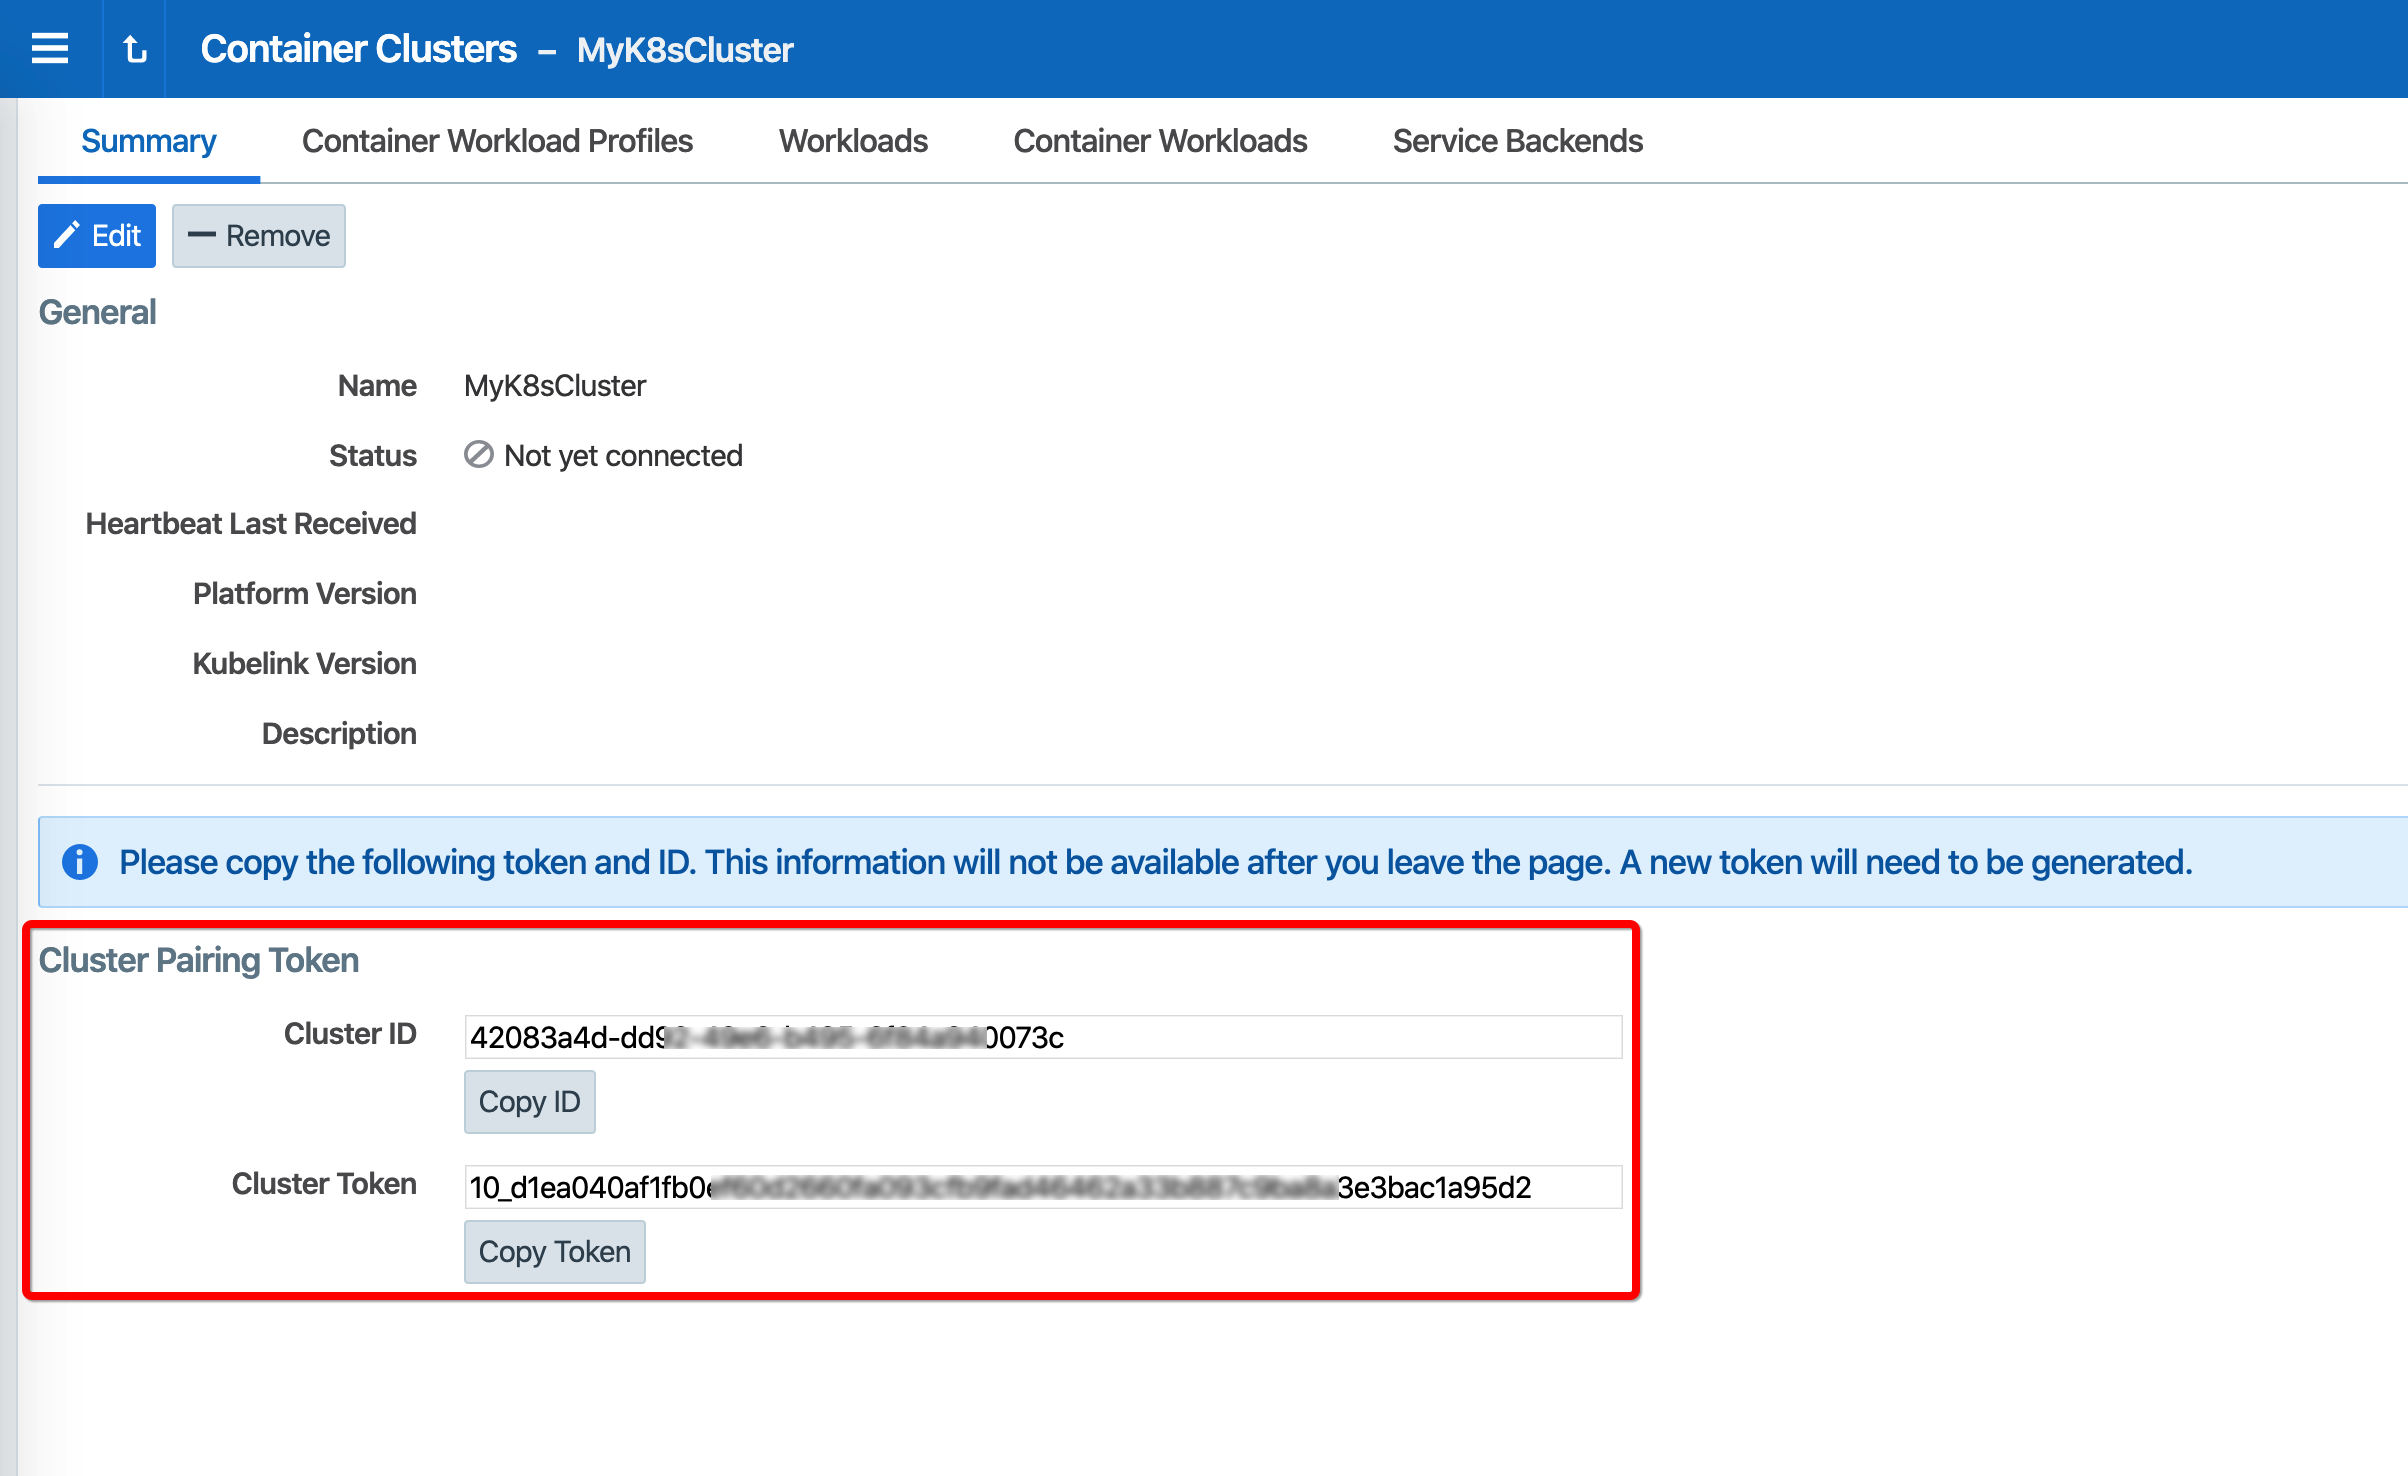
You will see a summary page of the new Container Cluster. From the Cluster Pairing Token section, copy the values of the Cluster ID and Cluster Token.
After copying and saving the values (in a text editor or similar tool), open the Container Workload Profiles page.
Configure a Container Workload Profile Template
When configuring a new Container Cluster, it is recommended to set the default settings shared by all the Container Workload Profiles. Illumio provides a Container Workload Profile template that can be used for that purpose. By defining the default Policy State and minimum set of labels common to all namespaces in the cluster, you will save time later on when new namespaces are discovered by Kubelink. Each new profile created will inherit what was defined in the template.
Important
Illumio does not provide a method to redefine at once all the labels associated with each profile. Hence, it is strongly recommended to use the provided template to define the default values for all profiles that are part of the same cluster.
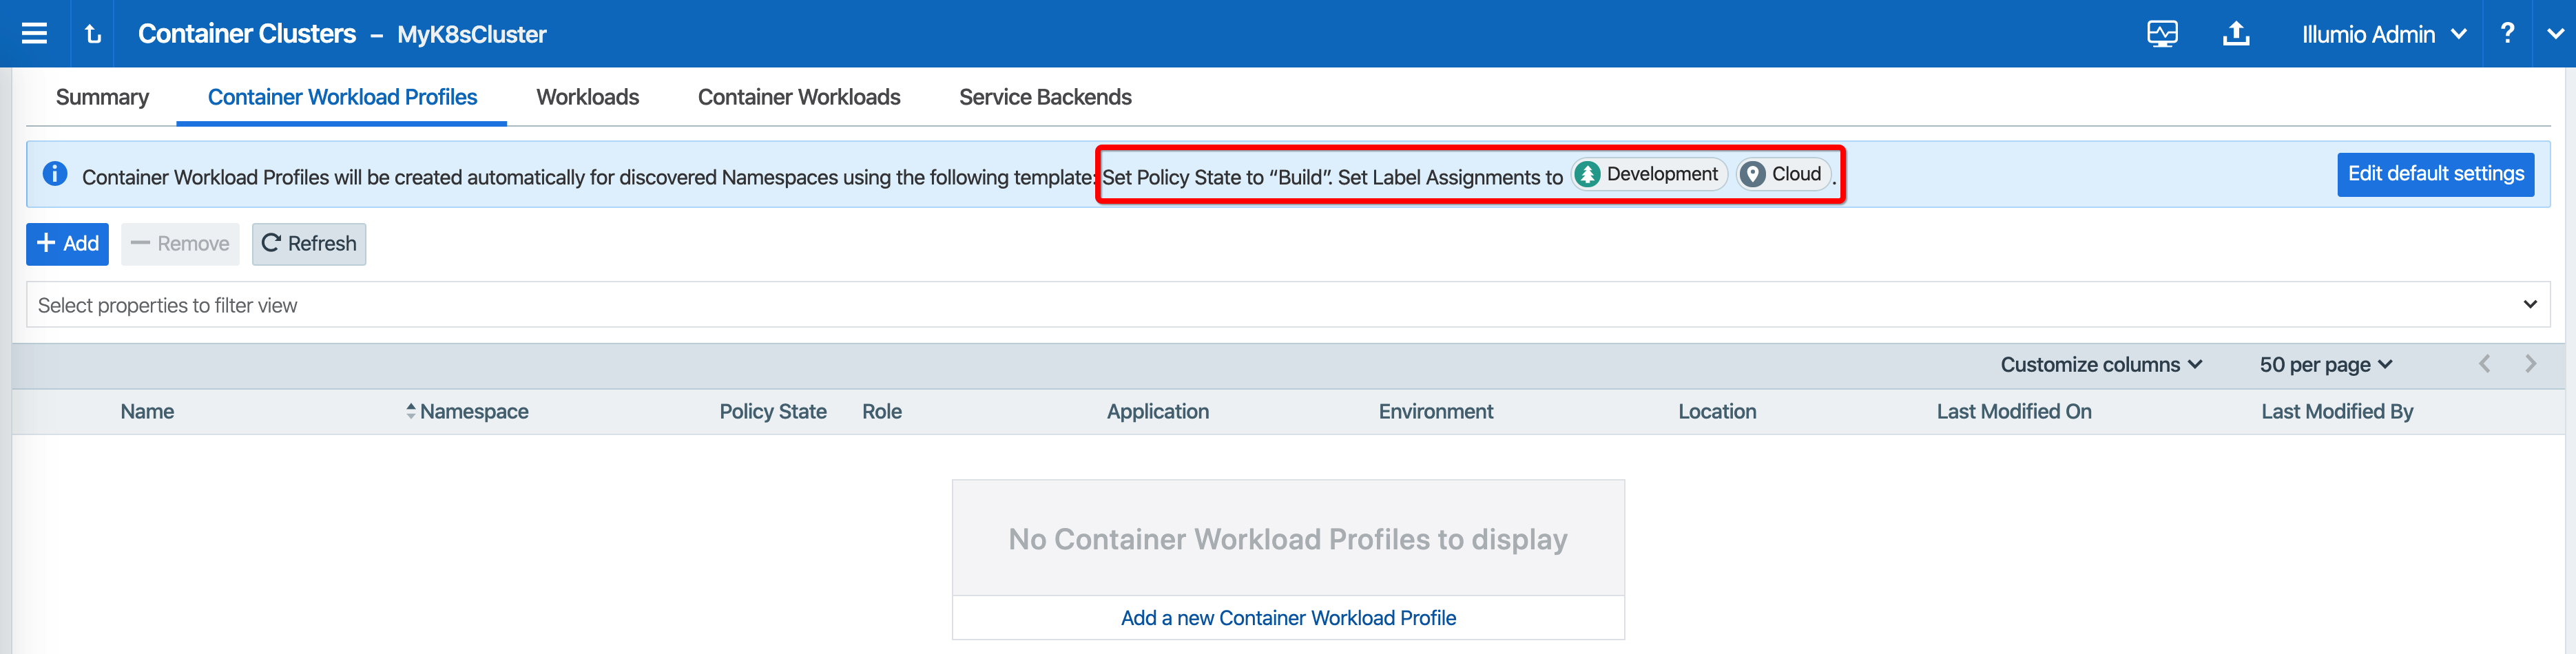
To define the default parameters for all profiles using a template, under Container Workload Profiles, click Edit default settings and select values for all the fields.
For information about assigning default labels in the template, see the "Labels Restrictions for Kubernetes Namespaces" topic.
After you click OK, the following information is displayed:
Create Illumio Namespace
Create Illumio Namespace
Illumio Core for containers is deployed in a dedicated namespace illumio-system, by default. This namespace has the minimum privileges in the cluster required to run Illumio Core and can tie into the Kubernetes and OpenShift RBAC models.
To create the illumio-system namespace for Kubernetes, use the following command:
kubectl create namespace illumio-system
Note
Illumio provides a yaml manifest file to create the namespace in the Kubelink tarball illumio-kubelink-namespace.yml. You can create this namespace by applying this manifest file to your Kubernetes cluster, using the following command:
kubectl apply -f illumio-kubelink-namespace.yml
To create the illumio-system project for OpenShift, use the following command:
oc new-project illumio-system
Authenticate Kubernetes Cluster with Container Registry
Note
Depending on your deployment, the steps in the Authenticate Kubernetes Cluster with Container Registry, Create a ConfigMap to Store Your Root CA Certificate, and Configure Calico in Append Mode topics are optional.
When storing container images in a private container registry, it is often required and strongly recommended to authenticate against the registry to be able to pull an image from it. In order to do this, the Kubernetes or OpenShift cluster must have the credentials configured and stored in a secret file to be able to pull container images.
To configure a secret to store your container registry credentials, use the following command:
kubectl create secret docker-registry <container-registry-secret-name>
 -n illumio-system --docker-server=<container-registry> --docker-username=<username>
 --docker-password=<password>
To verify that the secret has been created, use the following command:
kubectl get secret -n illumio-system | grep <container-registry-secret-name>
Important
The above commands are valid for deployments with your own private container registry, but may not be valid for a cloud-managed private container registry. For more information, refer to your Cloud Service Provider documentation.
Create a ConfigMap to Store Your Root CA Certificate
This section describes how to implement Kubelink with a PCE using a certificate signed by a private PKI. It describes how to configure Kubelink and C-VEN to accept the certificate from the PCE signed by a private root or intermediate Certificate Authority (CA) and ensure that Kubelink can communicate in a secure way with the PCE.
Prerequisites
Access to the root CA to download the root CA certificate.
Access to your Kubernetes cluster and can run
kubectlcommands.Correct privileges in your Kubernetes cluster to create resources like a ConfigMaps, secrets, and Pods.
Access to the PCE web console as a Global Organization Owner.
Download the Root CA Certificate
Before you begin, ensure that you have access to the root CA certificate. The root CA certificate is a file that can be exported from the root CA without compromising the security of the company. It is usually made available to external entities to ensure a proper SSL handshake between a server and its clients.
You can download the root CA certificate in the CRT format on your local machine. Below is an example of a root CA certificate:
$ cat root.democa.illumio-demo.com.crt
-----BEGIN CERTIFICATE-----
MIIGSzCCBDOgAwIBAgIUAPw0NfPAivJW4YmKZ499eHZH3S8wDQYJKoZIhvcNAQEL
---output suppressed---
wPG0lug46K1EPQqMA7YshmrwOd6ESy6RGNFFZdhk9Q==
-----END CERTIFICATE-----
You can also get the content of your root CA certificate in a readable output format by using the following command:
$ openssl x509 -text -noout -in ./root.democa.illumio-demo.com.crt
Certificate:
    Data:
        Version: 3 (0x2)
        Serial Number:
            fc:34:35:f3:c0:8a:f2:56:e1:89:8a:67:8f:7d:78:76:47:dd:2f
    Signature Algorithm: sha256WithRSAEncryption
        Issuer: C=US, ST=California, L=Sunnyvale, O=Illumio,
        OU=Technical Marketing, CN=Illumio Demo Root
        CA 1/[email protected]
        Validity
            Not Before: Jan 20 00:05:36 2020 GMT
            Not After : Jan 17 00:05:36 2030 GMT
        Subject: C=US, ST=California, L=Sunnyvale, O=Illumio,
        OU=Technical Marketing, CN=Illumio Demo Root
        CA 1/[email protected]
        Subject Public Key Info:
            Public Key Algorithm: rsaEncryption
                Public-Key: (4096 bit)
                Modulus:
                    00:c0:e5:48:7d:97:f8:5b:8c:ef:ac:16:a8:8c:aa:
                    68:b8:48:af:28:cd:17:8f:02:c8:82:e9:69:62:e2:
                    89:2b:be:bd:34:fc:e3:4d:3f:86:5e:d7:e6:89:34:
                    71:60:e6:54:61:ac:0f:26:1c:99:6f:80:89:3f:36:
                    b3:ad:78:d1:6c:3f:d7:23:1e:ea:51:14:48:74:c3:
                    e8:6e:a2:79:b1:60:4c:65:14:2a:f1:a0:97:6c:97:
                    50:43:67:07:b7:51:5d:2c:12:49:81:dc:01:c9:d1:
                    57:48:32:2e:87:a8:d2:c0:b9:f8:43:b2:58:10:af:
                    54:59:09:05:cb:3e:f0:d7:ef:70:cc:fc:53:48:ee:
                    a4:a4:61:f1:d7:5b:7c:a9:a8:92:dc:77:74:f4:4a:
                    c0:4a:90:71:0f:6d:9e:e7:4f:11:ab:a5:3d:cd:4b:
                    8b:79:fe:82:1b:16:27:94:8e:35:37:db:dd:b8:fe:
                    fa:6d:d9:be:57:f3:ca:f3:56:aa:be:c8:57:a1:a8:
                    c9:83:dd:5a:96:5a:6b:32:2d:5e:ae:da:fc:85:76:
                    bb:77:d5:c2:53:f3:5b:61:74:e7:f3:3e:4e:ad:10:
                    7d:4f:ff:90:69:7c:1c:41:2f:67:e4:13:5b:e6:3a:
                    a3:2f:93:61:3b:07:56:59:5a:d9:bc:34:4d:b3:54:
                    b5:c6:e5:0a:88:e9:62:7b:4b:85:d2:9e:4c:ee:0b:
                    0d:f4:72:b1:1b:44:04:93:cf:cc:bb:18:31:3a:d4:
                    83:4a:ff:15:42:2d:91:ca:d0:cb:36:d9:8d:62:c0:
                    41:59:1a:93:c7:27:79:08:94:b2:a2:50:3c:57:27:
                    33:af:f0:b6:92:44:49:c5:09:15:a7:43:2a:0f:a9:
                    02:61:b3:66:4f:c3:de:d3:63:1e:08:b1:23:ea:69:
                    90:db:e8:e9:1e:21:84:e0:56:e1:8e:a1:fa:3f:7a:
                    08:0f:54:0a:82:41:08:6b:6e:bb:cf:d6:5b:80:c6:
                    ea:0c:80:92:96:ab:95:5d:38:6d:4d:da:38:6b:42:
                    ef:7c:88:58:83:88:6d:da:28:62:62:1f:e5:a7:0d:
                    04:9f:0d:d9:52:39:46:ba:56:7c:1d:77:38:26:7c:
                    86:69:58:4d:b0:47:3a:e2:be:ee:1a:fc:4c:de:67:
                    f3:d5:fe:e6:27:a2:ef:26:86:19:5b:05:85:9c:4c:
                    02:24:76:58:42:1a:f8:e0:e0:ed:78:f2:8f:c8:5a:
                    20:a9:2d:0b:d4:01:fa:57:d4:6f:1c:0a:31:30:8c:
                    32:7f:b0:01:1e:fe:94:96:03:ee:01:d7:f4:4a:83:
                    f5:06:fa:60:43:15:05:9a:ca:88:59:5c:f5:13:09:
                    82:69:7f
                Exponent: 65537 (0x10001)
        X509v3 extensions:
            X509v3 Subject Key Identifier:
                3D:3D:3D:61:E6:88:09:FE:34:0F:1D:5E:5E:52:72:71:C7:DE:15:92
            X509v3 Authority Key Identifier:
                keyid:3D:3D:3D:61:E6:88:09:FE:34:0F:1D:5E:5E:52:72:71:C7:DE:15:92

            X509v3 Basic Constraints: critical
                CA:TRUE
            X509v3 Key Usage: critical
                Digital Signature, Certificate Sign, CRL Sign
    Signature Algorithm: sha256WithRSAEncryption
         28:24:86:91:a6:4a:88:e4:8d:6b:fc:67:2a:68:08:67:35:e5:
         a6:77:ff:07:4b:89:53:99:2e:6d:95:df:12:81:28:6a:8e:6f:
         5a:98:95:5b:4a:21:ae:f0:20:a4:4e:06:b2:4e:5a:67:c1:6a:
         06:f1:0f:c1:f7:7e:f2:e0:b3:9d:d8:54:26:6a:b2:1c:19:b8:
         b5:5c:c7:03:6b:f7:70:9e:72:85:c9:29:55:f9:f4:a4:f2:b4:
         3b:3d:ce:25:96:67:32:1e:8d:e2:00:22:55:4b:05:4f:ee:0e:
         67:ac:db:1b:61:da:5f:9c:10:1c:0c:05:66:c0:5b:5f:b9:95:
         59:a9:58:5b:e7:69:ac:b0:bd:b3:c2:a3:35:58:01:a4:ff:c0:
         8d:ac:1c:19:21:41:50:fb:8e:e0:f5:a9:ad:ec:de:cb:53:04:
         a9:d8:ac:76:8a:09:0d:7c:c6:1a:bc:06:74:bb:10:1c:aa:07:
         f6:cb:b2:1b:0c:0c:65:03:45:2b:51:d5:6e:a0:4d:91:ce:c5:
         ed:8d:a9:e7:f6:37:7d:ab:1b:a4:a2:a3:3b:76:17:5b:d9:3a:
         9c:c1:df:cc:cd:a0:b0:a9:5c:74:61:d7:a0:1d:04:67:68:ee:
         a6:7b:1e:41:a4:02:fc:65:9e:e3:c1:c2:57:b2:2e:b0:ff:a9:
         86:82:35:4d:29:b2:fe:74:2e:b8:37:5d:2b:e8:69:f2:80:29:
         19:f1:1e:7a:5d:e3:d2:51:50:46:30:54:7e:b8:ad:59:61:24:
         45:a8:5a:fe:19:ff:09:31:d0:50:8b:e2:15:c0:a2:f1:20:95:
         63:55:18:a7:a2:ad:16:25:c7:a3:d1:f2:e5:be:6d:c0:50:4b:
         15:ac:e0:10:5e:f3:7b:90:9c:75:1a:6b:e3:fb:39:88:e4:e6:
         9f:4c:85:60:67:e8:7d:2e:85:3d:87:ed:06:1d:13:0b:76:d7:
         97:a5:b8:05:76:67:d6:41:06:c5:c0:7a:bd:f4:c6:5b:b2:fd:
         23:6f:1f:57:2e:df:95:3f:26:a5:13:4d:6d:96:12:56:98:db:
         2e:7d:fd:56:f5:71:b7:19:2b:c9:de:2d:b9:c8:17:cc:20:de:
         7c:19:7a:aa:12:97:1c:80:b7:d3:67:d3:b7:a7:96:f0:c9:4d:
         f5:8b:0e:10:3b:b9:4e:09:90:5a:3b:51:c9:48:a2:ca:9f:db:
         72:44:87:59:db:49:fa:75:44:b5:f6:7f:c5:26:e1:01:ae:7b:
         6f:4a:75:d1:b5:b3:68:c0:31:48:f8:5c:06:c0:f1:b4:96:e8:
         38:e8:ad:44:3d:0a:8c:03:b6:2c:86:6a:f0:39:de:84:4b:2e:
         91:18:d1:45:65:d8:64:f5
Create a ConfigMap in Kubernetes Cluster
After downloading the certificate locally on your machine, create a ConfigMap in the Kubernetes cluster that will copy the root CA certificate on your local machine into the Kubernetes cluster.
To create the ConfigMap, use the following command:
$ kubectl -n illumio-system create configmap root-ca-config \
	--from-file=./certs/root.democa.illumio-demo.com.crt
The --from-file option points to the path where the root CA certificate is stored on your local machine.
To verify that the ConfigMap was created correctly, use the following command:
$ kubectl -n illumio-system create configmap root-ca-config \
> --from-file=./certs/root.democa.illumio-demo.com.crt
configmap/root-ca-config created
$
$ kubectl -n illumio-system get configmap
NAME                                 DATA   AGE
root-ca-config                       1      12s
$
$ kubectl -n illumio-system describe configmap root-ca-config
Name:         root-ca-config
Namespace:    illumio-system
Labels:       <none>
Annotations:  <none>

Data
====
root.democa.illumio-demo.com.crt:
----
-----BEGIN CERTIFICATE-----
MIIGSzCCBDOgAwIBAgIUAPw0NfPAivJW4YmKZ499eHZH3S8wDQYJKoZIhvcNAQEL
---output suppressed---
wPG0lug46K1EPQqMA7YshmrwOd6ESy6RGNFFZdhk9Q==
-----END CERTIFICATE-----

Events:  <none>
$
root-ca-config is the name used to designate the ConfigMap. You can modify it according to your naming convention.
Configure Calico in Append Mode
In case your cluster is configured with Calico as the network plugin (usually for Kubernetes and not for OpenShift), both Calico and Illumio Core will write iptables rules on the cluster nodes.
Calico - Needs to write iptables rules to instruct the host how to forward packets (overlay, IPIP, NAT, and so on).
Illumio Core - Needs to write iptables rules to secure communications between nodes and/or Pods.
You should establish a hierarchy to make the firewall coexistence work smoothly because Illumio Core and Calico will write rules at the same time. By default, both solutions are configured to insert rules first in the iptables chains/tables and Illumio Core will remove other rules added by a third-party software (in the Exclusive mode).
To allow Calico to write rules along with Illumio without flushing rules from one another, you should:
Configure Illumio to work in Firewall Coexistence mode (default for workloads that are part of a container cluster).
Configure Calico to work in Append mode (default is Insert mode).
To configure Calico to work in Append mode with iptables:
Edit the calico DaemonSet.
kubectl -n kube-system edit ds calico-node
Locate the
spec: > template: > spec: > containers:section inside theYAMLfile and change ChainInsertMode by adding the following code block:- name: FELIX_CHAININSERTMODE value: Append
Save your changes and exit.
Kubernetes will restart all Calico Pods in a rolling update.
For more information on changing Calico ChainInsertMode, see Calico documentation.