Manage Enforcement Boundaries
The topics in this section explain how to set up and manage Enforcement Boundaries in your data center.
Prerequisites and Limitations
Prerequisites
VENs must be installed on the workloads (i.e., they must be “managed”); Enforcement Boundaries are not supported for NEN-controlled or other unmanaged workloads.
The VEN must be at release 21.2.0 or later.
Workloads must be in the Selective Enforcement state for Enforcement Boundaries to apply to them.
Limitations for Virtual Services
Enforcement Boundaries do not apply to virtual services directly. Virtual services are enforced at the workload level. As a result, Enforcement Boundaries do not directly affect virtual services; instead, they impact the workloads that virtual services comprise.
FQDN-based Rules and Enforcement Boundaries
In Illumio Segmentation for Data Centers, the PCE doesn't prevent you from creating IP lists containing FQDNs. In the PCE, you can create a rule for a destination and an IP list. For example, you create the following IP list and rule in the PCE:
IP list 1:
10.2.1.0/24Rule 1:
*.dev.illumio.comRule scope: IP list 1 ¬ 80 TCP ¬ Environment: Production
Result: Workloads in the Production environment will allow
80/tcptraffic outbound to both10.2.1.0/24and*.dev.illumio.com(whatever are the IP addresses that FQDNs matching the pattern resolve to).
FQDN-based rules are not fully supported in Enforcement Boundaries. The PCE doesn't prevent you from adding FQDNs to an IP list impacted by an Enforcement Boundary. You can use the IP list in an Enforcement Boundary. However, the PCE drops the FQDN component when an Enforcement Boundary results in an outbound deny rule to an IP list with FQDNs and the PCE writes a policy error to its log file.
Based on the example above, the Enforcement Boundary only denies traffic not previously allowed by the rule to 10.2.1.0/24 and not to FQDNs matching the *.dev.illumio.com pattern. Instead, the PCE generates the error message “partial policy delivered.”
Workflow for Deploying an Enforcement Boundary
To implement an Enforcement Boundary in your data center, complete the following tasks:
Install VENs on the workloads you want to protect with an Enforcement Boundary.
An Enforcement Boundary will only block traffic for managed workloads in the PCE. For information about installing a VEN on a host, see "Workload Setup Using PCE Web Console". See also VEN Installation and Upgrade Guide for detailed information about installing VENs on hosts.
Assign the correct labels to each workload.
For example, to block traffic from your development environment to your production environment, you must correctly assign the Environment label to all necessary workloads.
Tip
Using an Enforcement Boundary to fulfill the security mandate for traffic between development and production is more efficient than deploying a full allowlist model, as you only need to roll out the Environment label, rather than defining all four label types for your workloads and in your rule set scopes.
Create rulesets and rules for the workloads you want to protect with an Enforcement Boundary.
See Rulesets and Rules for information.
Warning
Before creating an enforcement boundary, you must create the necessary rulesets and rules because traffic crosses the boundary and when you create it before putting rules in place, the PCE will drop the workload traffic until the rules are in place.
For the workloads you want to block traffic, move them into the Selective Enforcement state.
See Place a Workload in Selective Enforcement State for information.
Create an Enforcement Boundary that specifies the labels or IP lists (any IP range or subnet) to identify which workloads will be impacted by the boundary. Additionally, the boundary specifies specific services (or all services) to block traffic for.
See Add an Enforcement Boundary for information.
Important
If you have not created any rules when you add an Enforcement Boundary, the PCE web console displays a message that the boundary has zero rules. Please correct this issue as soon as possible.
After you save a new Enforcement Boundary, the PCE calculates the impact of the new boundary, and the PCE web console page refreshes to display the Blocked Connections tab for that boundary.
The Blocked Connections tab lists all the traffic that crosses the new boundary.
Review the list of traffic that currently crosses the new boundary and determine which connections need exceptions to the boundary. You can add rules for those exceptions at this point; then, remove them later as you refine your managed environment as you progress to a Zero Trust Security model.
See Review Traffic Blocked by a Boundary and Add Rules for information.
Provide the new Enforcement Boundary and any rules you added for traffic crossing the boundary.
See Provisioning for information.
Place a Workload in a Selective Enforcement State
From the PCE web console menu, choose Workloads and VENs > Workloads.
The Workloads page appears.
From the Enforcement state drop-down list, choose Selective.
A confirmation dialog box appears listing the impacted workloads.
Click OK.
To apply the enforcement state change to these workloads, provision the state change. See Provisioning for information.
Add an Enforcement Boundary
From the PCE web console menu, choose Enforcement Boundaries.
Click Add.
The Create Enforcement Boundaries page appears.
Enter a name for the Enforcement Boundary. Names can contain up to 255 characters.
Specify the destinations and providers of the connection. For a definition of “providers” and “destinations,” see Rules.
In the Providing Services field, select services to block or select Port or Port Range and enter the port numbers.
The drop-down list contains a list of all services you have created in the PCE. See Services for the steps to add services to the PCE.
Tip
When selecting a providing service, you can select a specific service (or set of services) from the drop-down list. Alternatively, you can select “All Services” from the drop-down list, effectively blocking all traffic from the traffic source. For example, you might want to block all traffic from your development environments reaching production, and you'd select “All Services” for that Enforcement Boundary. See the example below.
Click Save. A progress bar appears while the PCE saves the boundary.
After you save a new Enforcement Boundary, the PCE calculates the impact of the new boundary, and the PCE web console page refreshes to display the Blocked Connections tab for that boundary.
The Blocked Connections tab lists all the traffic that crosses the new boundary. See Review Traffic Blocked by a Boundary and Add Rules for the steps to complete the Enforcement Boundary creation workflow.
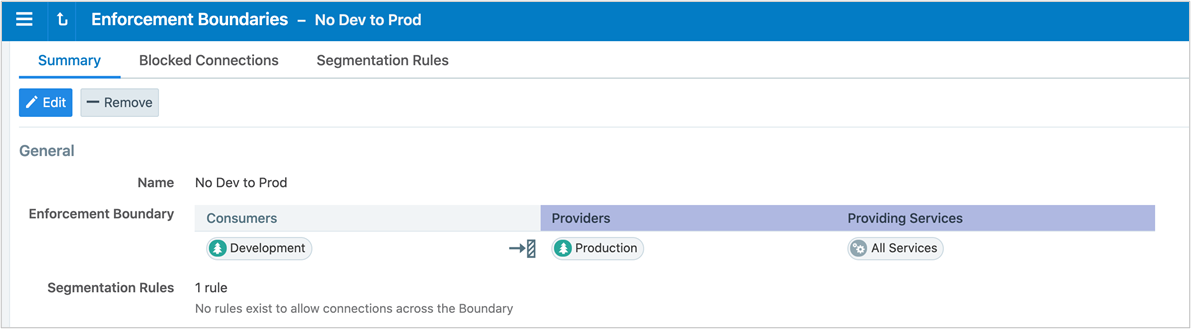
Example: Summary page for an Enforcement Boundary that blocks traffic between development and production
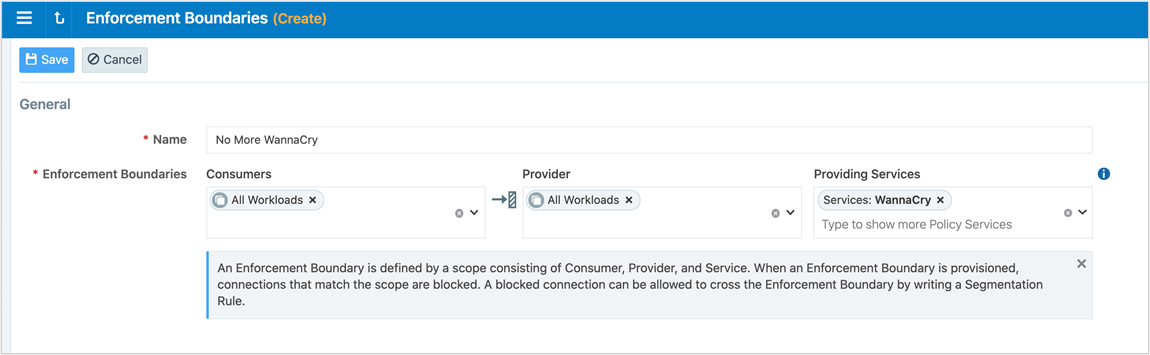
Example: Enforcement Boundary that blocks traffic originating from the WannaCry service
The following boundary blocks communication for the four ports that are part of the WannaCry service for all workloads.
Review Traffic Blocked by a Boundary and Add Rules
When you add an Enforcement Boundary in the PCE for your managed environment, that boundary can affect large amounts of workloads (assuming all those workloads are in Selective Enforcement state.) Therefore, Illumio recommends you use care not to break any applications that have traffic that currently traverses the new boundary.
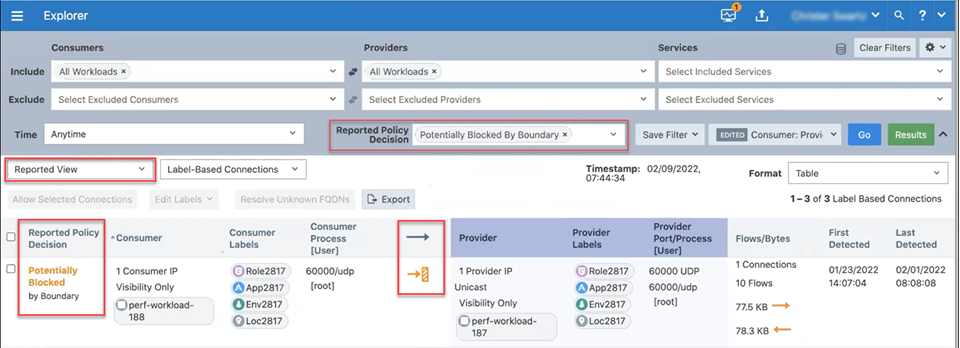
View Traffic Blocked by Boundary in Explorer
The Reported and Draft views of Explorer display traffic blocked by Enforcement Boundaries. You can distinguish when Enforcement Boundaries are blocking traffic from Explorer and use it for troubleshooting.
In particular, you can view information in Explorer about Enforcement Boundaries and where allowed traffic passes through a boundary:
In selective enforcement, you can see whether Enforcement Boundaries block traffic flows.
In full enforcement, you can see whether the Enforcement Boundaries block traffic flows.
In visibility-only mode, you can see whether Enforcement Boundaries potentially block traffic flows.
Additionally, you can filter traffic flows that Enforcement Boundaries block in both Draft and Reported views.
Note
The ability to pinpoint the exact allow rule that is blocked by an Enforcement Boundary is not supported in the Explorer Reported view. To view this information, switch to the Draft view of Explorer. In Draft view, you can locate the allow rule blocked by an Enforcement Boundary.
View Blocked Connections in the Enforcement Boundary Page
To help evaluate traffic that traverses the boundary, the PCE web console includes a tab for blocked traffic on the Boundary page. This tab essentially runs an Explorer query that returns all the traffic that would be blocked once you provision the new Enforcement Boundary.
Important
After you save a new Enforcement Boundary, the PCE calculates the impact of the new boundary, and the PCE web console page refreshes to display the Blocked Connections tab for that boundary. At this point in the boundary creation workflow, review the list of traffic currently crossing the new boundary and determine which connections require exceptions to the boundary. You can also perform this task for existing Enforcement Boundaries at any time.
To review traffic blocked by a new boundary and add rules for exceptions:
From the Enforcement Boundary Blocked Connections page, review the list of traffic that traverses the boundary and requires an exception to the boundary.
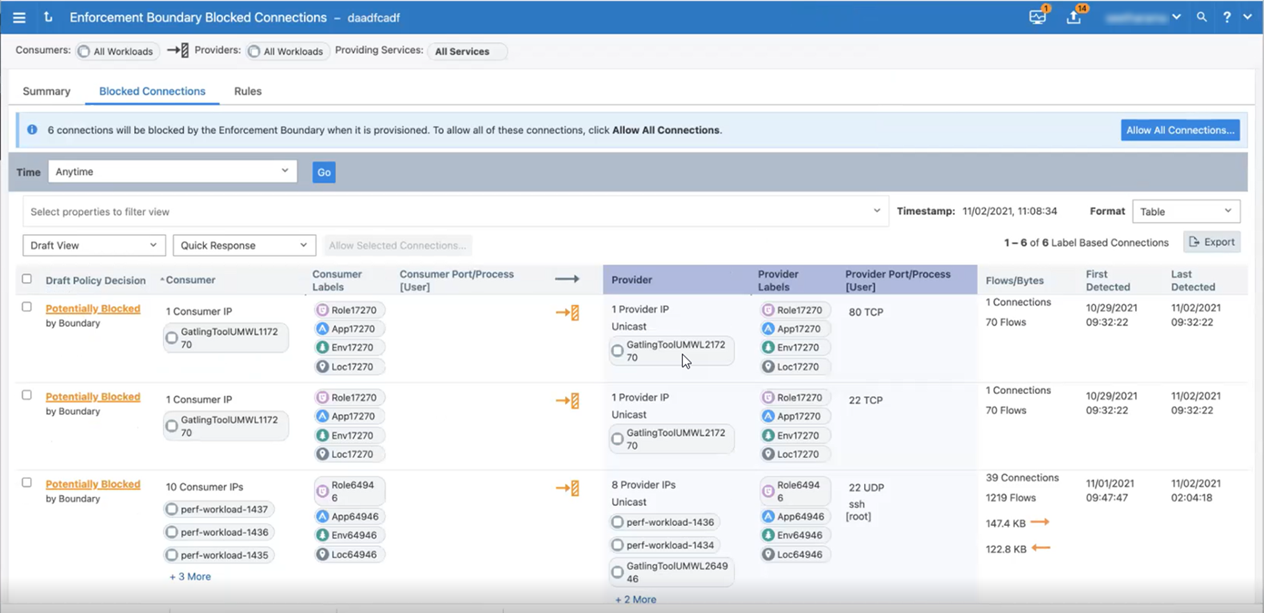
The PCE creates default rules for this traffic that currently traverses the Enforcement Boundary.
To accept the default rules created by the PCE, click the Allow All Connections button after reviewing the list of traffic flows traversing the boundary.
Note
If you have more than 50 traffic flows blocked by the boundary so that the list of connections spans multiple pages in the PCE web console, clicking Allow All Connections accepts the rules in all pages.
—OR—
To review and accept rules for only specified traffic flows, select the check boxes and click the Allow Selected Connections button.
The page refreshes and displays the proposed rules to create exceptions to the Enforcement Boundary. All new rules display the status “Addition Pending” in the Provision Status column.
To modify and optimize the proposed rules for traffic traversing the boundary, click the Pencil icon at the end of the row for the rule you want to optimize. The values for that row become editable. Make changes to the rule as needed and click the Save icon.
For example, you may want to consolidate rules for similar protocols into a single rule. When you collapse two rules into one, the PCE automatically removes the original duplicate rule.
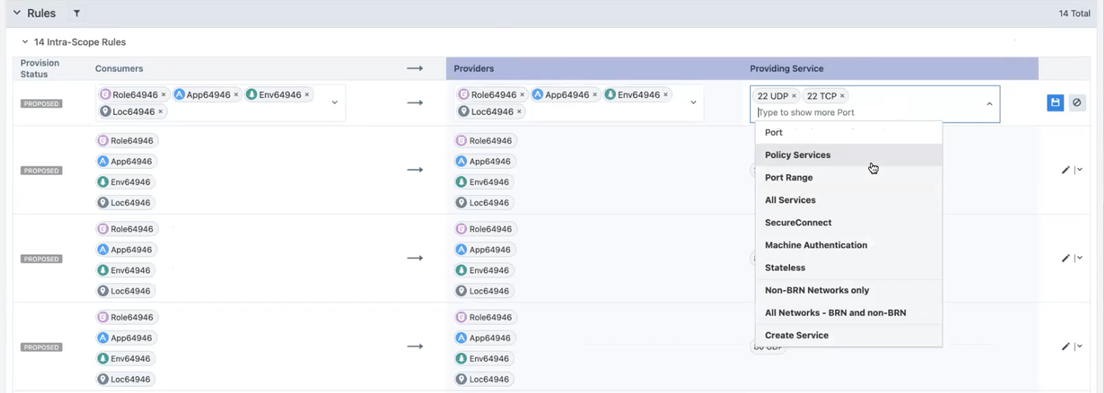
When you are done reviewing and optimizing the proposed rules, click the Save button at the top of the page.
The page refreshes, and the Rules tab for the Enforcement Boundary appears. All rules that will traverse the boundary are listed.
To provision all pending policy changes, click the Provision button at the top of the page. The provisioning process begins.
See Provisioning for information.
Disable an Enforcement Boundary
You can temporarily disable an enforcement boundary, such as for troubleshooting. You can enable it again when needed.
From the PCE web console menu, choose Enforcement Boundaries.
Select one or more enforcement boundaries you want to disable.
Click Disable.
The status of the enforcement boundary changes to Disabled.
When you are ready to re-enable the enforcement boundary, select it and click Enable.
Remove an Enforcement Boundary
From the PCE web console menu, choose Enforcement Boundaries.
Select the enforcement boundary you want to remove.
Click Remove.
A confirmation dialog box appears.
Click Remove again to delete the enforcement boundary from the PCE permanently.
The Enforcement Boundaries page reappears. An icon appears beside the enforcement boundary indicating that the deletion is pending.
Provision the change. See Provisioning for information.