Workloads in the PCE
This section describes how to manage workload by using the Workload pages in the PCE web console.
Overview of Workload Attributes
Workloads have the following attributes:
Workload enforcement and visibility state
Connectivity and policy sync state
Workload labels
Attributes
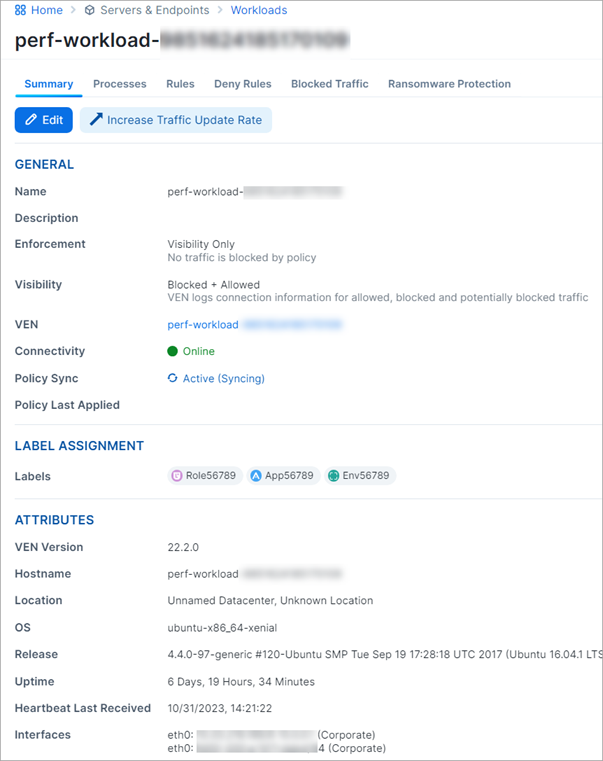
Workload Summary
The workload summary displays information about the workload, including the user-specified attributes at the time of pairing and information that the Illumio Core has automatically detected about the workload, specifically:
The name of the workload
A description (if provided)
The visibility the VEN uses
The dates when the policy was revised and last applied
The workload's VEN connectivity status; see "VEN-to-PCE Communication" in VEN Administration Guide.
The workload's VEN policy sync status; see "VEN Policy Sync" in VEN Administration Guide.
Any labels applied to the workload
Workload system attributes (such as VEN version number, hostname, and uptime)
Workload Enforcement States
Policy state determines how the rules affect a workload's network communication. The Illumio Core includes four policy states for workloads. The Policy State column is not displayed on the workload list page if a workload is unmanaged.
Note
The PCE representation of the enforcement state is the desired state to be applied on the next policy update. If there is an issue applying the enforcement state, a Policy Sync error will be shown for the workload.
Idle
A pairing profile can be used to pair workloads in the idle state.
Note
SecureConnect (IPv6 compatibility) is not supported on workloads in the Idle state. When you activate SecureConnect for a rule that applies to workloads in both Idle and Non-idle policy states, the traffic between these workloads can be impacted.
Visibility Only
In the Visibility Only state, the VEN inspects all open ports on a workload and reports traffic flow between it and other workloads to the PCE. In this state, the PCE displays the traffic flow to and from the workload, providing insight into the data center and its applications. No traffic is blocked in this state. This state is useful when firewall policies are not yet known. This state can be used to discover the application traffic flows in the organization and then generate a security policy that governs required communication.
Selective Enforcement
Segmentation rules are enforced only for selected inbound services when a workload is within the scope of a Selective Enforcement Rule.
Full Enforcement
Segmentation Rules are enforced for all inbound and outbound services. Traffic that is not allowed by a Segmentation Rule is blocked.
Visibility Level
You can choose from three levels of visibility for workloads. These modes allow you to specify how much data the VEN collects from a workload when in the Full Enforcement state:
Off: The VEN does not collect any information about traffic connections. This option provides no Illumination detail and demands the least amount of system resources from a workload.
This property is only available for workloads that are in the Full Enforcement state.
Blocked: The VEN only collects the blocked connection details (source IP, destination IP, protocol and source port and destination port), including all packets that were dropped. This option provides less Illumination detail but also demands fewer system resources from a workload than high detail.
Blocked + Allowed: The VEN collects connection details (source IP, destination IP, protocol and source port and destination port). This applies to both allowed and blocked connections. This option provides rich Illumination detail but requires some system resources from a workload.
Workload Processes
The Processes tab of the Workload detail page shows the processes currently running on the workload. For each process running on the workload, the following information is listed:
V-E Score
Process name
Process path
Ports used by the process
Protocol (for example, TCP or UDP)
Note
On the Workload Processes tab, when you delete the binary for that process while the process is running, the PCE appends the process name with “(deleted).”
The UDP - PCE UI processes tab shows both server and client UDP processes and ports.
On the Services tab for a workload, both UDP client and server processes show up along with their port numbers. For TCP, only listening ports/processes are presented.
For UDP, only listening ports/processes should be presented. The information is coming from service reports sent by VEN once every 24 hours.
Customers depend on this information to understand the provider processes in their data center and write policies to allow traffic from needed workloads.
Workload Rules
The Illumio Core has two types of rules:
Inbound Rules: Show all the services on the workload and the interface endpoints that are allowed to communicate with these services.
Outbound Rules: Show all the interface endpoints that the services on that workload are allowed to communicate with.
To apply rules to a workload, create a ruleset and then ensure that the ruleset and workloads share the same labels.
Note
The workload rules are listed against individual IP addresses in an ipset. The PCE limits the size of the returned data. The PCE web console displays an error message whenever the PCE exceeds a certain number of rules, and that count is the number of peer-to-peer rules calculated for that workload.
Workloads Blocked Traffic
The Blocked Traffic tab shows you all traffic that attempted to communicate with your workload but was blocked due to policy. For information, see Blocked Traffic.
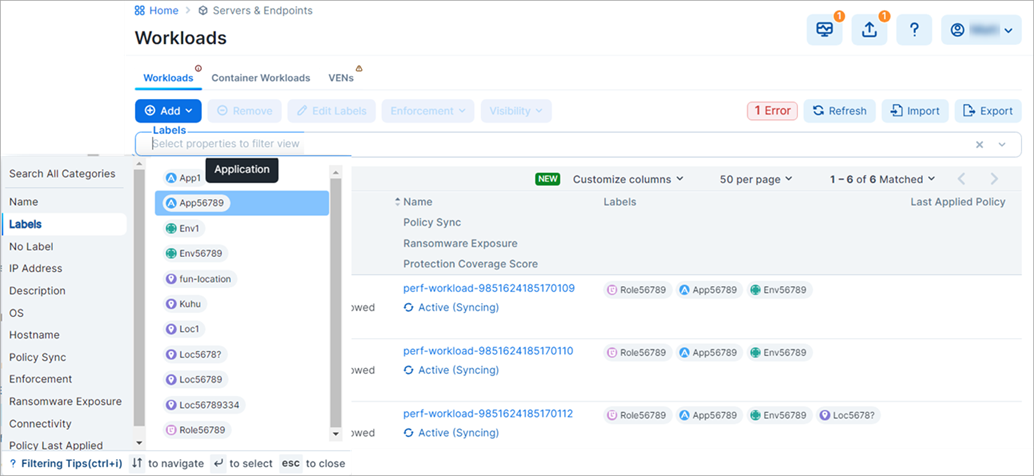
Filter the Workloads List
You can filter by one or any combination of workload labels and properties.
Use the filter at the top of the Workloads and VENs page to perform a label-based search. For example, you can filter the list to view all workloads with the Application label “App56789.”
You can filter workloads based on their properties, such as workload name, IP address, description, hostname, OS family, VEN connectivity, when a policy was last applied to or received by the workload, and when the last heartbeat was received.
Click the Refresh button to refresh the content of the page with the latest information without clearing the filters or the results.
Use a Wildcard to Filter Workloads
The Workloads filter supports a wildcard character for the Name and Hostname properties to help sort and organize large numbers of workloads.
To filter the list of workloads on the Workloads page, select either the Name or Hostname property from the drop-down list and enter the search terms using the asterisk ( * ) character as a wildcard. The asterisk can represent any number of characters.
For example, you can enter “db-*auto” using the Name property to find workloads with names that include “db,” “-auto,” and any number of characters in between (for example, “db-prod-auto,” “db-dev-auto,” or “db-12-auto”).
At least one non-wildcard character must be included before or after the wildcard character. An error message is displayed when you include only the wildcard character in the search field.
Note
The auto-complete feature is disabled when the wildcard character is used.
Use Clone Alerts to Filter Workloads
You can filter workloads according to whether a clone has been detected. Workloads in the detected state of the clone are identifiable by a red banner (similar to workloads in suspension) at the top of the workload list page.
The VEN communicates with the PCE using HTTPS over Transport Layer Security (TLS). Additionally, a clone token is generated. When an agent token is mistakenly or maliciously reused on another workload, the clone token detects the condition and disambiguates the hosts. The clone token is periodically rotated, while the agent token is never rotated.
To filter by clone alerts:
On the left navigation, go to Servers & Endpoints > Workloads.
Look for an alert banner indicating some workloads are in a "clone detected" state. This banner will appear only if you pair one or more VENs and then clone the VEN(s).
Click the filter link on the banner. The list now shows only the "clone detected" workloads.
Click on one of the "clone detected" workloads. An alert for that workload is displayed on the detail page.
If you stop, unpair, or repair the cloned VEN, you can come back and see that the messages and alerts are removed from the Workloads List page.
Enforce a Workload Policy State
On the left navigation, go to Servers & Endpoints > Workloads.
Click the link for a workload for which you want to change the Enforcement state.
Click Edit.
From the Enforcement drop-down list, select Idle, Visibility Only, Selective, or Full depending on how you want to allow or block traffic connections.
Click Save.
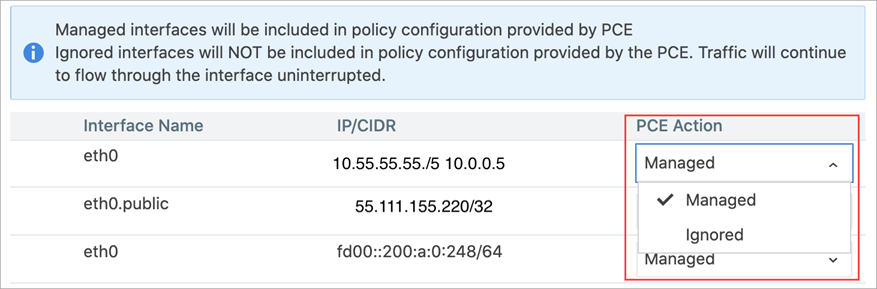
Set Workload Interfaces to Ignored
You can set interfaces from being Managed to Ignored in the PCE web console. You can use this option when you want the workload to ignore visibility and enforcement on the interconnected interfaces of database clusters such as, Oracle RAC. During pairing, you can set one or more interfaces to Ignored, which causes the first downloaded firewall to ignore those interfaces. After you set an interface to Ignored, that interface is not be included in the policy configuration and traffic flows uninterrupted through it without any change in latency. You can see which interfaces are marked as Ignored on the Workloads’ Summary page.
On the left navigation, go to Servers & Endpoints > Workloads.
Click a workload to open the details.
Click Edit.
In the Network Interfaces section, change interfaces from Managed to Ignored using the PCE Action drop-down list.
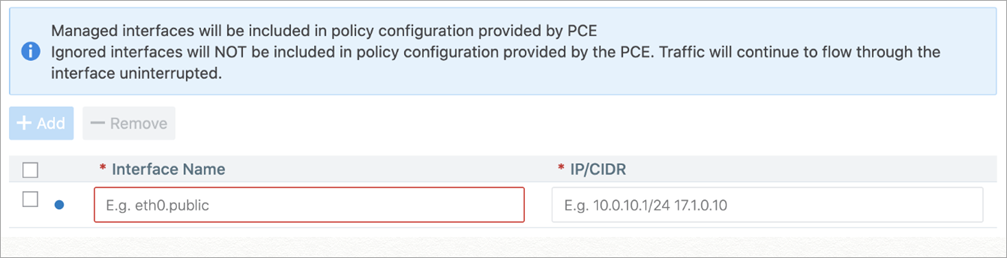
Warning
DO NOT ignore PCE-generated interfaces such as
eth123.publicfor cloud workloads.In case you are editing an unmanaged workload, you will not have the option to ignore the workload using the PCE Action drop-down. That drop-down menu does not exist for unmanaged workloads. You can still provide information on the Interface Name and the IP/CIDR address.
Click Save.
Update Workload Labels in Bulk
This section describes how to perform bulk operations on labels using the Import / Export feature available in the Workloads List Page. With this feature, you can:
Export a CSV or JSON file containing information about the Illumio labels assigned to your workloads. There's also an option to export other information about your workloads.
Import changes to your workload labels using either the CSV file that you exported from the PCE or a CSV file of your own. You can use the Import feature to do the following:
Create new labels of existing label types and assign them to workloads. (Labels you create using Import are assigned to the workloads you specify in the CSV file. You can't use Import to create an unassigned label.)
Change a label assigned to a workload
Un-assign a label from a workload
About the Export File
File format | You can export the file in these formats:
|
Columns |  NoteThe By default, the exported CSV file has the following columns:
|
Rows | With the exception of the header row, each row in the import file corresponds to a workload on the PCE. 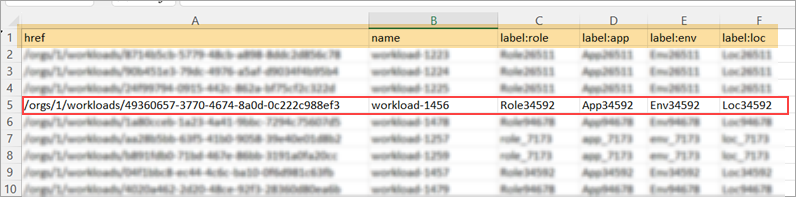 |
CSV file requirements | Whether you're using a file exported from the PCE or your own *.csv file, the file you intend to import to the PCE must meet the following requirements:
|
Customizing the file
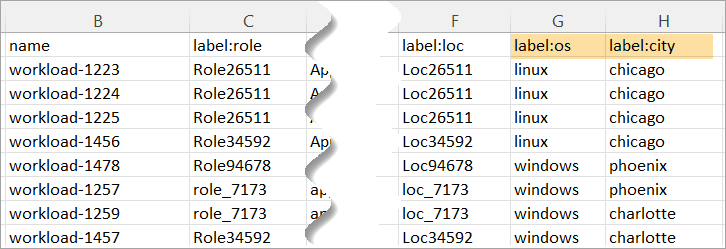
If custom label types are defined in Settings > Label Settings on the PCE, the exported file will include columns corresponding to those Label Types. For example, if your organization defined custom label types for os and city, the exported file will include corresponding columns.

Here's how to prepare the CSV file to create, assign, update, and unassign labels during the import step.
STEP 1: Export Workload Information
Tip
You can skip the Export step if you plan to prepare your own CSV file for importation to the PCE. See STEP 2: Prepare the CSV File for Import.
You can use the Export feature to create and download a file to your local computer for one or both of the following reasons:
Prepare for importing bulk updates. In the exported file, you'll specify the updates that you want to make to Workload labels as described in STEP 2: Prepare the CSV file for import. You'll import the file to the PCE as described in STEP 3: Update Workload Labels Using Import.
Capture workload information. Export data about your workloads in a text file for informational purposes.
In the left navigation, click Servers & Endpoints > Workloads.
On the Workload list page, click Export in the upper right corner.
In the Export Workloads dialog box, configure settings:
Export:
All Workloads: Select if you want the exported file to include all Workloads. If no filters are applied, only this option is available.
Filtered Workloads: This option is available only if one or more filters are applied to the list of workloads. Select if you want the exported file to include only the filtered list of Workloads. Otherwise, select All Workloads.
Columns:
All Columns: Select if you want the exported file to include all columns in the Workload List Page, including hidden columns. Note: While the exported file includes all columns, only updates that you make to data in the label columns will take effect when you import the file to the PCE. Changes to data in other columns, if any, are ignored.
Labeling Columns: Select if you want the exported file to include only the label columns in the Workload List Page.
File Format:
CSV: Select CSV if you plan to use this file to import label updates to the PCE. Only CSV files can be imported to the PCE.
JSON: Not used for updating labels. This option simply exports workload data in a JSON file. JSON files can't be imported to the PCE.
Click Export. The file is sent to your Downloads folder.
STEP 2: Prepare the CSV File for Import
Here's how to prepare the CSV file to create, assign, update, and unassign labels during the import step.
Open the CSV file located in your Downloads folder and modify it in any of the following ways:
Assign a new or change an existing label
In the appropriate label column and workload row, enter a label name or change an existing label name for each workload that you want to have the new or a changed label.
Unassign labels
In the appropriate label column and workload row, replace the name of the label you want to unassign with any combination of alphanumeric or special characters. Later, in STEP 3: Update Workload Labels Using Import, you'll enter the same string in the option Remove existing label if the imported label matches the string listed below. Also, unassigning a label from a given workload doesn't delete the label for use with other workloads in the PCE.
Note
Simply deleting the label name from the CSV file and then importing the file to the PCE does not unassign the label from the workload. As described in the above step, you must replace the label name in the CSV file with a string that you'll also enter in the Import a CSV to edit workload labels dialog box as described in STEP 3: Update Workload Labels Using Import. If the strings don't match when you perform the import, an error occurs and the label isn't unassigned.
Save the CSV file.
STEP 3: Update Workload Labels Using Import
The Import feature sends a CSV file to the PCE to update workload labels on your PCE. You can upload a CSV exported from the PCE (STEP 1: Export Workload Information) or prepare and upload your own CSV file.
Prepare the CSV file for import (STEP 2 above).
If you are not already, log in to the PCE.
In the left navigation, go to Servers & Endpoints > Workloads.
On the Workload list page, click Import in the upper right corner.
In the Import a CSV to edit workload labels dialog box, click Choose File and then select the CSV file you want to import to the PCE.
Select one or both of the following options:
Create labels if they don't already exist
This option allows you to create new labels of an existing label type and assign them to workloads you specified in the CSV file. Available label types are defined in Settings > Label Settings.
Remove existing label if the imported label matches the string listed below
This option allows you to unassign a label from workloads you specified in the CSV file in STEP 2: Prepare the CSV File for Import. Enter the same string in this field that you entered in the CSV file as described in STEP 2. If the strings don't match when you perform the import, an error occurs and the label isn't unassigned.
Note
Simply entering a string in this field and then importing the CSV file to the PCE does not unassign the label from the workload. You must enter the same string in this field that you entered in the CSV file. If the strings don't match when you perform the import, an error occurs and the label isn't unassigned. Also, unassigning a label from a given workload doesn't delete the label for use with other workloads in the PCE.
Click Preview Changes.
Review the proposed changes in the Preview Changes message.
Optional. Click Review if you want to see the impact of your changes before you complete the import process. Any new labels you created appear in the New Labels list. A copy button allows you to copy the details into your buffer. Click Back to return to the Preview Changes message.
Click Save. The file is imported to the PCE.
Click Refresh to see the label changes reflected in the workloads list.
If you entered a string in the CSV file for removing an existing label, delete the string from the file and then save the file. Otherwise, if you import the file again, the PCE will interpret the string as a label you want to add to a workload.