Install and Configure the Illumio LW-VEN Service
This section details how to install and configure the Illumio LW-VEN Service.
STEP 1: (Recommended) Back Up the Existing Firewall Configuration
Before you install the Illumio LW-VEN Service, Illumio recommends that you back up your legacy Window's existing firewall configuration in case it becomes necessary to revert back to it. For example, reversion would be necessary if you uninstall the Illumio LW-VEN Service.
STEP 2: Create or Find a Pairing Profile with the Appropriate Settings
Important
Note that this solution differs from the standard VEN pairing process in that it doesn't use the pairing script available in the pairing profile. Only a properly-encoded pairing key is required to pair the LW-VEN installed on your legacy Windows server with the PCE.
All pairing keys are generated from a Pairing Profile and are encoded with settings from that profile. The pairing key you obtain or generate for this solution must have been generated from a pairing profile with the appropriate settings for your type of Windows server.
Minimum required pairing profile settings
Operating System | Supported Enforcement Modes | Supported Enforcement Node Type |
|---|---|---|
Win 2003 Server SP1 & SP2 |
| Server VEN |
Win 2008 Server SP1 & SP2 |
| Server VEN |
To create a new pairing profile, go to Servers & Endpoints > Pairing Profiles and configure settings using this image and the table above as a guide.
For more information about creating a pairing profie, see "Configure a Pairing Profile" in the VEN Installation and Upgrade Guide.
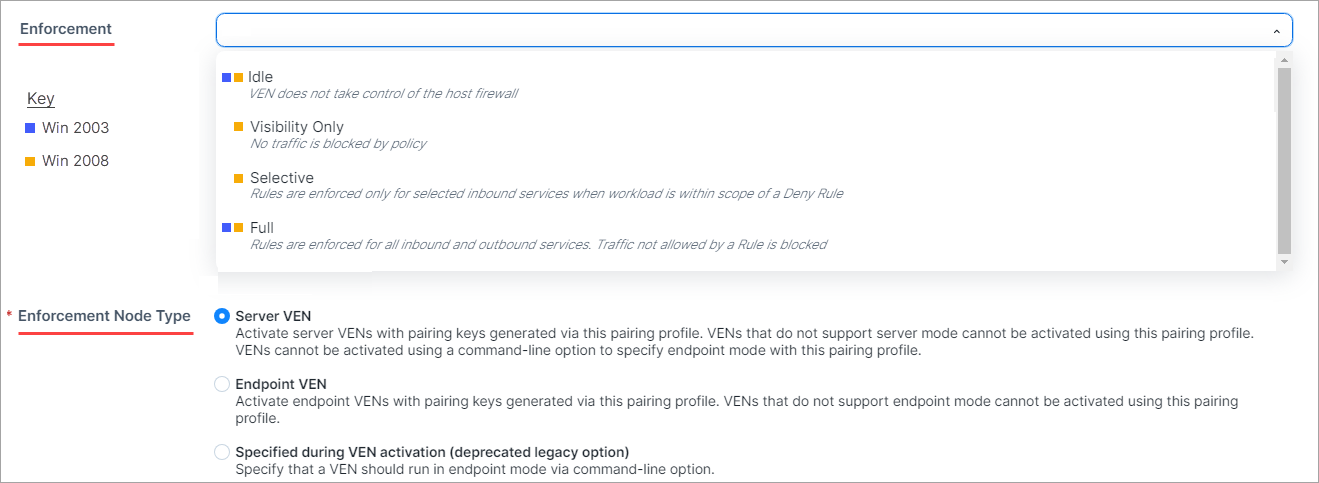
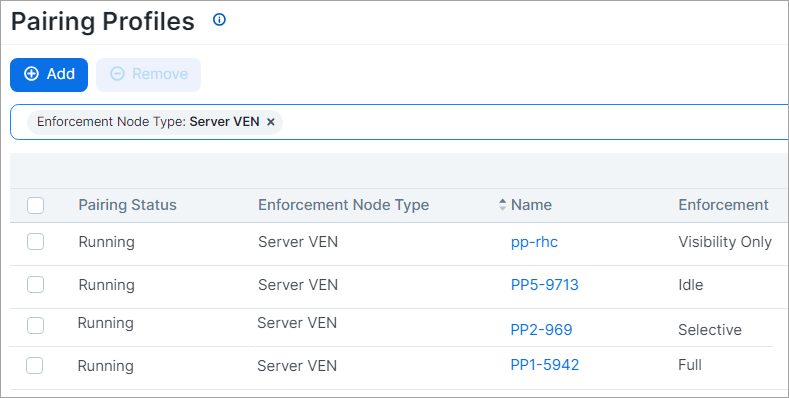
To identify an existing pairing profile with the appropriate settings for your server type, go to Servers & Endpoints > Pairing Profiles and find a profile with Enforcement Node Type: Server VEN and the Enforcement mode(s) appropriate for your Windows Server.
You can filter the list by Enforcement Node Type.
STEP 3: Obtain or Generate a Pairing Key in the PCE Web Console
Choose one of the following options to obtain a pairing key.
Important
As detailed in STEP 2: Create or Find a Pairing Profile with the Appropriate Settings, make sure that the pairing key you obtain or generate for this solution was generated from a pairing profile with the appropriate settings for your type of Windows server.
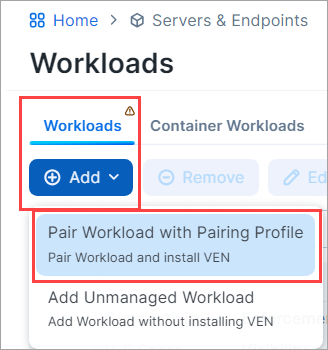
Expand the Servers & Endpoints section in the left navigation.
Click Workloads.
Click Add, and then choose Pair Workload with Pairing Profile.
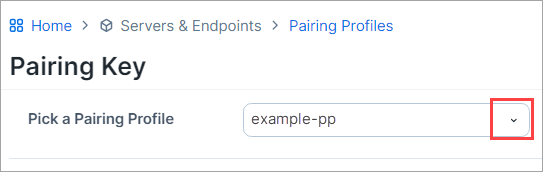
In the Pick a Pairing Profile drop-down list, select the pairing profile you identified previously that has the appropriate settings for your legacy Windows server (see STEP 2: Create or Find a Pairing Profile with the Appropriate Settings).
Scroll down to Pairing Scripts and copy and preserve the Key for use in STEP 4.

Important
Don't copy the pairing script available in the pairing profile. Pairing scripts are not used with this solution.
Expand the Servers & Endpoints section in the left navigation.
Click Pairing Profiles.
Click an existing pairing profile that has the appropriate settings for your legacy Windows server (see STEP 2: Create or Find a Pairing Profile with the Appropriate Settings).
Click Generate Key.
Scroll down to Pairing Scripts and copy and preserve the Key for use in STEP 4.
Expand the Servers & Endpoints section in the left navigation.
Click Pairing Profiles.
Click Add and configure the settings appropriate for your legacy Windows server as described in Option 2.1 - Create a new Pairing Profile.
Click Save.
Open the Pairing Profile you just created.
Scroll down to Pairing Scripts and copy and preserve the Key for use in STEP 4.
Important
Don't copy the Pairing Script. The script is not used in this solution.
STEP 4: Install, configure, and pair the Illumio Legacy Windows VEN Service on a legacy Windows server
Important
You must disable the User Access Control (UAC) feature if it is enabled on the legacy Windows Server machines on which you plan to install the Illumio Legacy Windows VEN Service. Otherwise, you will not be able to install the LW-VEN on the machine. UAC is a Windows security feature that prevents unauthorized changes to the operating system.
You must install and activate the Illumio Legacy Windows VEN Service from a dedicated local admin account.
Only the Illumio LW-VEN Service account user can run the LW-VEN service and issue
illumio-lwven-ctlcommands.
Obtain the
IllumioLWVENInstaller.exefile and place it on the Windows server. (Recommended location:C:\Users\Administrator). The installer is available on the Illumio Support portal.Perform one of the following installation + activation options:
Launch the file from a command line or by double-clicking the file.
Install
Select Destination Location
32-bit machines: (
C:\Program Files\Illumio LW-VEN Service)64-bit machines: (
C:\Program Files(x86)\Illumio LW-VEN Service)
Select Additional Tasks
Make sure the path option is selected, and then click Next.
Ready to Install
Click Install.
Complete the Setup Wizard
Select "Launch illumio-lwven-ctl activate"
Click Finish. The
certs.pemfile is added immediately after you click Finish.
Activate and configure
Complete the Setup Wizard
Select Launch illumio-lwven-ctl activate
Click Finish. The
certs.pemfile is added immediately after you click Finish.
Enter hostname: port for PCE address: Enter the subdomain(s) and domain of your PCE's web address and port (for example, example.illum.io:8443).
Enter pairing key for LW-VEN: Paste the pairing key that you obtained in STEP 3 and then press Enter.
Messages appear:
Pairing to
<pcehost:port>Activation Complete
You are prompted to enter the user account password, which is necessary to run the Illumio LWVEN Service.
Enter the following command at a command prompt:
C:\Users\Administrator > illumio-lwven-ctl activate --management-server <pcehost:port > --activation-code <pairing-key> [--passsword <account-password>]
Note
For a fully automated activation process, make sure to include the --password option and specify the user account password. Otherwise, you are prompted to enter a password to complete the activation.
Messages appear:
Resolving:
<pcehost>Pairing to PCE
<pcehost:port>POST /org/0/agents/activateActivation Complete
Go to Servers & Endpoints > Workloads > VENs
Click the name of the LW-VEN you added.
Confirm the following on the LW-VEN's details page:
NODE section:
Hostname: (your-Windows-Server-Computer-Name)
Enforcement Node Type: See STEP 2: Create or Find a Pairing Profile with the Appropriate Settings.
HOST section:
OS: LW-VEN 1.0.0
You can perform the following operations on the LW-VEN (For details, see the VEN Administration Guide):
Edit the LW-VEN
Generate a support bundle (see Support report).
Mark the LW-VEN Suspended
Note
This should be necessary only if you issue the
illumio-lwen-ctl suspendcommand and receive a message indicating that the LW-VEN failed to inform the PCE of its suspension.Unpair the LW-VEN
Note
If you unpair the LW-VEN through the PCE UI by clicking Unpair on the LW-VEN's detail page, only the Open All Ports option is supported.
STEP 5: Enable Flow Reporting
Notice
This feature is available in LW-VEN releases 1.1.0 and later.
The LW-VEN can enable the native Windows Firewall log on your legacy Windows server and then send traffic flow information to the PCE. After ingesting the log information, the PCE displays it in its Map and Traffic views to help you gain insights about – and create policy for – your business applications.
How LW-VEN Flow Reporting works
Enable Windows Firewall logging on your legacy Windows server by issuing a command on the LW-VEN.
The LW-VEN parses the firewall log every 10 minutes and pushes the extracted information to the PCE.
The PCE ingests the information from the LW-VEN and makes it available in its Visualization tools (Map, Traffic, and Mesh views).
Use the information to create, update, verify, and troubleshoot Illumio policy rules for your legacy Windows server.
Limitations
Depending on the amount of traffic passing through the firewall, enabling firewall logging may impact the server's performance. If this occurs, try enabling flow reporting for only brief periods of time only as necessary (minimum 1 hr) and then disable it.
Rules exceeding 1000 ports are split into multiple rules.
Applying a policy with a large port range may cause the windows firewall to become unresponsive and take a long time to respond to any firewall command.
5.1 Enable, disable, or check status
From a command prompt on the Windows server, navigate to;
C:\Program Files (x86)\Illumio LW-VEN
Issue the following command and the appropriate option to enable, disable, or check status:
illumio-lwven-ctl flow-reporting [enable|disable|status]
5.2 View traffic flows and create policy
Visualize traffic. The PCE's visualization tools allow you to see the traffic flowing to and from your Windows server so you can configure and troubleshoot the Illumio policies you need to protect your applications. For details, see the Visualization Guide.
Create policy. Illumio Core relies on security policies to secure communications between workloads. Security policies are configurable sets of rules that protect network assets from threats and disruptions. For guidance designing an Illumio security policy, including creating rulesets and rules, see the Security Policy Guide.
STEP 6: Create Security Policy
In the PCE web console, create label-based policies for your Windows Server 2003 SP1 & SP2 and Windows Server 2008 SP1 & SP2 workloads. For information on how to create policies, see the Security Policy Guide.