Use Container Workload Profiles
The Illumio PCE administrator can change a Kubernetes namespace from unmanaged to managed by modifying the Container Workload Profile. Each profile can be modified even if the Illumio C-VEN is not yet installed on the Kubernetes nodes. If the C-VEN is deployed on the cluster nodes and Container Workload Profile is in the managed state, the Pods and services are displayed in Illumination and they inherit the labels assigned to the Kubernetes namespace. The Pods are represented in Illumio Core as Container Workloads. If Kubernetes services exist in the respective namespace, Illumio Core represents each service as an Illumio Core Virtual Service object.
This section describes how to change a namespace from unmanaged to managed and how to use edit labels and use custom annotations to add more context to your applications. This section also describes how to set enforcement boundaries for your containerized workloads.
Log in to the PCE UI and navigate to Infrastructure > Container Clusters.
Select the Container Cluster you want to manage.
Select the Container Workload Profiles tab.
You will see a list of all namespaces in the cluster. Select the namespace you want to manage.
Click Edit:
Enter a Name (optional).
Select a Management state (any state, except unmanaged).
Select an Enforcement mode for how policy rules will be enforced.
Select a Visibility state.
Assign Labels (optional).
Click Save.
Configure New Container Workload Profiles
A Container Workload Profile is beneficial when you want to assign labels to resources that are deployed in a namespace and also define the state of the policy created for the scope of labels assigned. A new Container Workload Profile can be created in either of the following ways:
Dynamically created through the creation of a new namespace in the Kubernetes or OpenShift cluster. This is a reactive option in which the Illumio Core Administrator assigns labels and a policy state after the creation of the namespace.
Manually pre-created to assign labels and a policy state to a namespace that will be created later on. This is a proactive option in which the Illumio Core Administrator assigns labels and a policy state before the creation of the namespace. This option offers the best-in-class security mechanism and authenticates each namespace created in the cluster by leveraging the concept of pairing key (same concept that Illumio Core provides in a pairing profile).
Tip
For a best-in-class security deployment, Illumio recommends to proactively create pairing profiles and assign labels and a policy state to them. The pairing key for each profile can be provided to the DevOps team for namespaces deployments later on.
When a Container Cluster is created for the first time in the PCE, Kubelink will report the existing namespaces or projects in the cluster. These namespaces will inherit what was defined as part of the Container Workload Profile Template for that cluster.
Dynamic Creation of a Profile
When the team managing Kubernetes or OpenShift clusters creates a namespace in a cluster, this namespace is reported immediately to the PCE via Kubelink. The new namespace will be listed under Container Workload Profiles and the following scenarios can occur:
A Container Workload Profile Template exists for this cluster - The new namespace will inherit what was defined in the template, as far as Policy state and labels are concerned.
A Container Workload Profile Template does not exist for this cluster - The new namespace will remain blank until further edited by an Illumio Core Administrator.
The example below shows a new namespace "namespace1" created in a cluster where a Container Workload Profile Template exists with a policy state set to "Build" and a partial label assignment as "Development | Cloud":
Note
The namespace is created by the Kubernetes or OpenShift administrator (outside the scope of Illumio Core).
For example, to edit the "namespace1" namespace:
Click on it and then click Edit.
Enter a Name.
Assign missing Labels wherever relevant or modify the existing ones.
After you are done, click Save.
The updates are displayed in the Container Workload Profiles list.
Manual Pre-creation of a Profile
To pre-create a profile:
In the Container Workload Profiles page, click Add.
Enter a Name.
Select the desired Management state.
Select the Enforcement state.
Choose a Visibility state. Note that Enhanced Data Collection is an optional feature that you must contact Illumio Support to enable.
Assign Labels to the profile.
Click Save.

Click Copy Key and provide this key to the DevOps team, which will be used as an annotation in a namespace manifest file to authenticate this resource with the PCE.
You can view the newly-created Container Workload Profile. The status is in "Pending" state with the hourglass icon displayed next to it.
To edit the namespace configuration file to include the pairing key in order to authenticate this namespace with the PCE:
Navigate to
metadata: > annotations:. Ifannotations:does not exist, create anannotations:section undermetadata:.Add the
com.illumio.pairing_key:Illumio label key field under theannotations:section.Enter the pairing key obtained during the new Container Workload Profile creation.
Save the file and exit.
Apply the change using
kubectlcommands.
An example is show below.
apiVersion: v1
kind: Namespace
metadata:
  name: namespace2
  annotations:
    com.illumio.pairing_key:
    abc8aaffdb2101e13a9da02bf492badb8d09d5ce338af116d076aef77558afcd
The updates are displayed in the Container Workload Profiles list.
Set Enforcement
Set an Enforcement Boundary to establish how policy rules affect traffic to and from namespace workloads. Enforcement boundaries can be one of:
Visibility Only - Rules are enforced an any traffic
Selective - Rules are enforced only for selected traffic
Full - Rules are enforced for all traffic
An enforcement boundary can be applied only to Managed workloads, which means Idle workloads cannot have an enforcement state applied to them.
You can change Enforcement for multiple profiles of the same current Enforcement level by selecting the checkboxes for the desired profiles (or by selecting the checkbox in the table heading row to select all profiles), and then hovering over the Enforcement button, which then shows a list of new Enforcement states and how many profiles will be changed to that state. Note that when you change Enforcement to Selective, then Visibility mode must by Blocked & Allowed, which is automatically done for you.
Labels Restrictions for Kubernetes Namespaces
At a high level, creating policy for containerized applications functions in the same basic way as for other types of applications running on bare-metal servers and virtual machines protected by the Illumio Core. Container workloads are assigned multi-dimensional labels to identify their roles, applications, environments, locations (RAEL), or other custom label types. These labels can then be used to apply security policies to specific parts of the containerized application environment. The PCE converts these label-based policies into rules that can be applied to the container workloads.
In previous releases, the PCE supported two options for assigning labels to container workloads:
When creating or editing a container workload profile in the PCE web console or by using the Illumio Core REST API, an Illumio administrator assigned labels for the resources in that Kubernetes namespace.
The Illumio administrator did not assign labels in the container workload profile. The DevOps/SRE team could use custom annotations in the service and deployment manifest files (YAML) to apply labels to the pods and services running in a namespace. On receiving this information from Kubelink, the PCE applied these labels to the container workloads, as long as the labels matched existing labels in the PCE.
These two ways of assigning labels for container workloads are sufficient for most container segmentation uses cases; however, this approach lacks the flexibility with label assignment for namespaces requested by Illumio customers. However, there is an alternative in addition to those two options that still allows developers/DevOps teams to assign their own labels for Kubernetes pods and services, but at the same time restricts the list of labels that they can assign. Illumio administrators now have a way to control which labels can be assigned by the developers managing their Kubernetes environments.
Options for Assigning Labels with a Container Workload Profile
You assign labels with container workload profiles in a number of ways:
By creating a new container workload profile; see Manual Pre-creation of a Profile.
By editing a container workload profile that was dynamically created in the PCE when Kubelink imported a new Kubernetes namespace; see Dynamic Creation of a Profile.
By specifying label assignments in the default settings for the container workload profile template; see Configure New Container Workload Profiles.
Previously, four standard label types were predefined (Role, Application, Environment, and Location) for setting labels with a container workload profile. Now you can define custom label types and values in addition to these four predefined labels. You also have the following options:
Do not allow a label for a specific label type (the “None” option).
Allow developers to assign any label from Kubernetes for a specified label type (the “Use Container Annotations” option); so long as the labels match ones in the PCE.
In previous releases, when the PCE administrator left the labels unassigned in the GUI or through the REST API, labels specified in annotations were used. Now the “Use Container Annotations” option is selected by default for all labels in a container workload profile (provided the default settings for the cluster are not configured).
Specify a list of labels that are allowed for that label type.
Fix a label to a specific label for that label type (the “Assign Label” option).
Example: Assigning Labels with a Container Workload Profile
The following example shows how you can use each of the four standard predefined options:

The Role label annotation (com.illumio.role) is ignored when passed at runtime and reported by Kubelink to the PCE when "Role" label is set to "None".
Adding, Editing, or Removing Labels
To add one or more labels:
Click a profile name, then click Edit.
To apply the same label edits to multiple profiles, click the checkboxes for the desired profiles (or click the topmost checkbox in the table heading to select all profiles), then click Edit Labels.
Under the Labels heading, add a label type by clicking the field under the Label Type heading and then choose a label type from the list.
Choose a Label Assign Type:
Use Container Annotations - Use label values for container annotations. See the topic "Using Annotations" for more information.
Assign Label - Explicitly set labels from the values configured for this label type.
No Label Allowed - Prevent this label type from being used in this profile.
Specify labels for this label type by clicking the field under Labels Allowed/Label Assign, and choosing a label from the list.
Any label type defined from annotations or explicit assignments must also have a label value specified in order to add the label definitions to the profile.
Click Save when finished.
To remove label types (and their associated label values):
Click the profile name.
Click Edit.
Under the Labels heading, choose one or more types to delete from this profile by clicking the checkboxes in front of the Label Type name.
Click Remove.
To remove or change label values:
Click the desired profile name.
Click Edit.
In the Labels table, remove a label value by clicking the small "x" near the label name under the Labels Allowed/Label Assign column.
You can replace or add label values by clicking the Select Label or Select Labels field under Labels Allowed/Label Assign column, and then choosing the new label (or in the case of Annotations, multiple labels).
Click Save.
Possible Labels for the Example
Developers can specify any label for Applications, so long as the label matches a preexisting label in the PCE.
For Environment, a list of two labels (env1 and env2) is available. Developers can set either of these labels in Kubernetes. If a developer sets another value for the Environment label as a Kubernetes annotation, the PCE considers it invalid and, as a result, a label is not assigned to that label key. Because the wrong label is assigned, the policy will not allow expected traffic from other services or applications with the Environment label env1.
The Location label is fixed as the loc1 label. If a developer assigns another Location label (for example, loc3, which is a label in the PCE) or the developer leaves the Location label empty, the PCE overrides what the developer has specified in the annotation and the PCE assigns loc1 for the Location label.
The label assignments for that namespace appears in the Container Clusters list in the PCE web console.
For this example, you can see the label assignments mirrored in the Kubernetes annotation for the namespace:
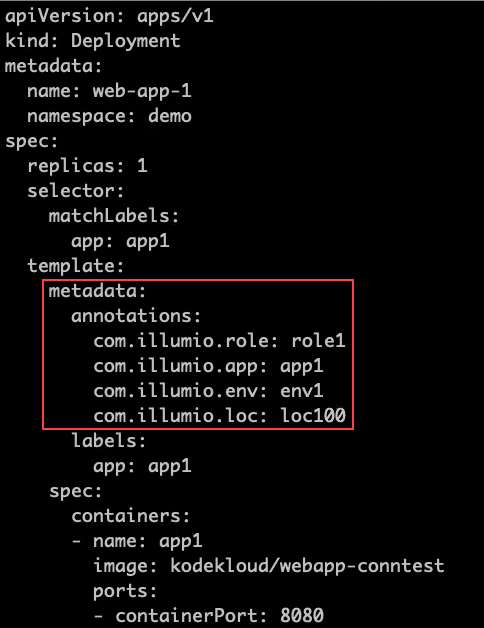
Kubernetes Annotation for Namespaces
where developers set role1, app1, env1, and loc100 for the labels in the annotations.
Kubelink passes this data to the PCE at runtime. The PCE ignores the Role label because it's not allowed in the profile. The PCE accepts the Application and Environment labels. It ignores the loc100 label and uses loc1 instead.
In the Container Workloads tab, you can see how the label assignments are applied for the pod in this example.
Note
If a developer sets another value for the Environment label as a Kubernetes annotation, the PCE considers it invalid and, as a result, a label is not assigned to that label key. Because the wrong label is assigned, the policy will not allow expected traffic from other services or applications.
For example, if developers leave the Environment label empty or specify env100 in the Kubernetes annotations, the following labels are used for the namespace, and there are no policy for applications or services with the Environment label env1.
Effect of Upgrading the PCE to Core 21.1.0 or Later
After upgrading your PCE to Core 21.1.0 or later, the labels assignments for your Kubernetes namespaces are not impacted operationally. However, you will see changes in the PCE web console and in the REST API.
The values set in the PCE in the previous Core release are unchanged and the “Assign Label” option is selected in the PCE web console and through the REST API.
The values left open so that container annotations were used for label assignments are updated to the “Use Container Annotations” option and the label assignments won't be restricted by any settings in the PCE web console or through the REST API.