Install and Configure the Illumio LW-VEN Service
This section details how to install and configure the Illumio LW-VEN Service.
Procedure
Perform the following steps.
STEP 1: (Recommended) Back Up the Existing Firewall Configuration
Before you install the Illumio LW-VEN Service, Illumio recommends that you back up your legacy Window's existing firewall configuration in case it becomes necessary to revert back to it. For example, reversion would be necessary if you uninstall the Illumio LW-VEN Service.
STEP 2: Create or Find a Pairing Profile with the Appropriate Settings
Important
Note that this solution differs from the standard VEN pairing process in that it doesn't use the pairing script available in the pairing profile. Only a properly-encoded pairing key is required to pair the LW-VEN installed on your legacy Windows server with the PCE.
All pairing keys are generated from a Pairing Profile and are encoded with settings from that profile. The pairing key you obtain or generate for this solution must have been generated from a pairing profile with the appropriate settings for your type of Windows server.
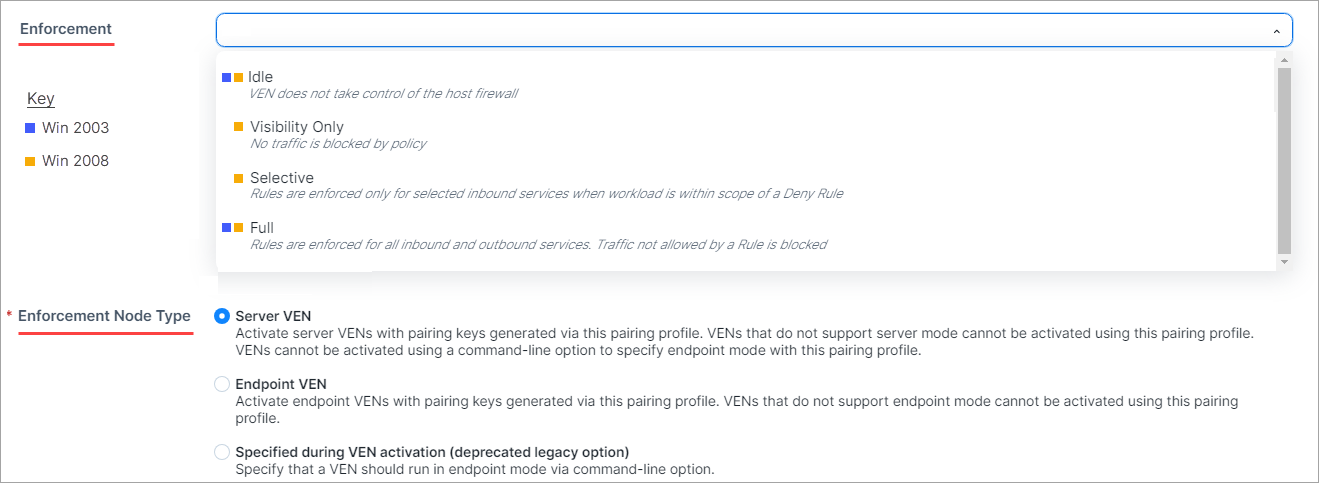
Minimum required pairing profile settings
Operating System | Supported Enforcement Modes | Supported Enforcement Node Type |
|---|---|---|
Win 2003 Server SP1 & SP2 |
| Server VEN |
Win 2008 Server SP1 & SP2 |
| Server VEN |
Option 2.1 - Create a new Pairing Profile
To create a new pairing profile, go to Servers & Endpoints > Pairing Profiles and configure settings using this image and the table above as a guide.
For more information about creating a pairing profie, see sdfsdff.
Option 2.2 - Find an existing Pairing Profile with the proper settings
To identify an existing pairing profile with the appropriate settings for your server type, go Servers & Endpoints > Pairing Profiles and find a profile with Enforcement Node Type: Server VEN and the Enforcement mode(s) appropriate for your Windows Server.
You can filter the list by Enforcement Node Type.

STEP 3: Obtain or Generate a Pairing Key in the PCE Web Console
Choose one of the following options to obtain a pairing key.
Important
As detailed in STEP 2: Create or Find a Pairing Profile with the Appropriate Settings, make sure that the pairing key you obtain or generate for this solution was generated from a pairing profile with the appropriate settings for your type of Windows server.
Option 3.1 - Copy a Pairing Key from an existing Pairing Profile
Expand the Servers & Endpoints section in the left navigation.
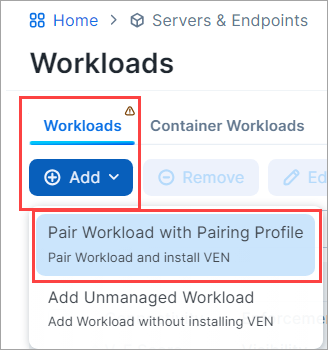
Click Workloads.
Click Add, and then choose Pair Workload with Pairing Profile.
In the Pick a Pairing Profile drop-down list, select the pairing profile you identified previously that has the appropriate settings for your legacy Windows server (see STEP 2: Create or Find a Pairing Profile with the Appropriate Settings.).

Scroll down to Pairing Scripts and copy and preserve the Key for use in STEP 4.

Important
Don't copy the pairing script available in the pairing profile. Pairing scripts are not used with this solution.
Option 3.2 - Generate a new Pairing Key from an existing Pairing Profile
Expand the Servers & Endpoints section in the left navigation.
Click Pairing Profiles.
Click an existing pairing profile that has the appropriate settings for your legacy Windows server (see STEP 2: Create or Find a Pairing Profile with the Appropriate Settings.)
Click Generate Key.
Scroll down to Pairing Scripts and copy and preserve the Key for use in STEP 4.
Option 3.3 - Create a new Pairing Profile
Expand the Servers & Endpoints section in the left navigation.
Click Pairing Profiles.
Click Add and configure the settings appropriate for your legacy Windows server as described in Option 2.1 - Create a new Pairing Profile.
Click Save.
Open the Pairing Profile you just created.
Scroll down to Pairing Scripts and copy and preserve the Key for use in STEP 4.
Important
Don't copy the Pairing Script. The script is not used in this solution.
STEP 4: Install, configure, and pair the Illumio Legacy Windows VEN Service on a legacy Windows server
Important
You must disable the User Access Control (UAC) feature if it is enabled on the legacy Windows Server machines on which you plan to install the Illumio Legacy Windows VEN Service. Otherwise, you will not be able to install the LW-VEN on the machine. UAC is a Windows security feature that prevents unauthorized changes to the operating system.
You must install and activate the Illumio Legacy Windows VEN Service from a dedicated local admin account.
Only the Illumio LW-VEN Service account user can run the LW-VEN service and issue
illumio-lwven-ctlcommands.
NODE section:
Hostname: <;your-Windows-Server-Computer-Name>
Enforcement Node Type: See STEP 2: Create or Find a Pairing Profile with the Appropriate Settings.
Version: 1.0.0
HOST section:
OS: LW-VEN 1.0.0
Obtain the
IllumioLWVENInstaller.exefile and place it on the Windows server. (Recommended location:C:\Users\Administrator). The installer is available on the Illumio Support portal.Perform one of the following installation + activation options.
Go to Servers & Endpoints > Workloads > VENs
Click the name of the LW-VEN you added.
Confirm the following on the LW-VEN's details page:
You can perform the following operations on the LW-VEN (For details, see the VEN Administration Guide):
Edit the LW-VEN
Generate a support bundle (see Support report).
Mark the LW-VEN Suspended
Note
This should be necessary only if you issue the
illumio-lwen-ctl suspendcommand and receive a message indicating that the LW-VEN failed to inform the PCE of its suspension.Unpair the LW-VEN
Note
If you unpair the LW-VEN through the PCE UI by clicking Unpair on the LW-VEN's detail page, only the Open All Ports option is supported.
STEP 5: Create Security Policy
In the PCE web console, create label-based policies for your Windows Server 2003 SP1 & SP2 and Windows Server 2008 SP1 & SP2 workloads. For information on how to create policies, see the Security Policy Guide.