Rules
Rules can allow communication between multiple applications or entities in different scopes or the same scope. To write a rule, you need to define three things: A service, a Source of the service, and a Destination of the service. You also need to select the type of rule:
Intra-scope rule: Allow communication within a group. The ruleset scope applies to both Sources and Destinations.
Extra-scope rules: Allow communication between groups.
Custom iptables rules: Allows custom iptables configurations in a ruleset. These rules are managed by the PCE and applied on each managed Linux workload VEN that matches the labels for the scope and receivers.
About Rules
Illumio supports the delegation of rule writing using role-based access control (RBAC). Application administrators can only edit rules where the scope of the ruleset matches the scopes where they have administrator privileges. They cannot create or manage rulesets if the scope includes “All.”
Rule types allow the application administrator to write rules that allow other applications to communicate with the applications that they manage without requiring global administrator privileges. This feature allows users to group rules required for inter-application and intra-application communication for a specific application into one ruleset.
You can combine multiple types of rules (intra-scope, extra-scope, and custom iptables) in a single ruleset.
From 18.2.0 version on, you can use multiple services or ports and protocols in a rule. This approach helps reduce the number of rules in your PCEs, which helps improve the PCE performance.
Note
You cannot provision drop actions from the PCE in a NAT table for custom IP tables. Doing so results in a firewall generation failure.
Intra-scope Rules
Note
The ability to create intra-scope rules is only enabled when the PCE is configured to display it.
Intra-scope rules allow authorized users to write rules that allow communication between providers and consumers within a specific scope. This rule type is typically used to allow communication between workloads that belong to the same application. For intra-scope rules, the labels used in the scope must match the labels used for both the provider and the consumer. If you don't specify a Label, “All” is used by default.
For example, you can create a rule where all Database workloads with the labels HRM | US | Dev can accept MySQL connections from all Web workloads with the labels HRM | US | Dev.
Extra-scope Rules
Note
The ability to create extra-scope rules is only enabled when the PCE is configured to display it.
Extra-scope rules allow authorized users to write rules that allow communication between applications. Specifically, you can write rules that allow providers within a scope to be accessed by consumers that can be in or outside the specified scope. For extra-scope rules, the labels used in the scope must match the labels used by the provider. If you don't specify a label, “All” is used by default.
For example, you can create a rule where all Database workloads with the labels HRM | US | Dev can accept connections on MySQL from all workloads with the label Web, irrespective of other labels.
The MySQL might not belong to the application HRM (for example, the consumers are “Global” and are not restricted by the labels in the scope).
Note
If the RBAC user's scope coverage type is “Providers and Consumers,” the user cannot select an IP list as the consumer. To select an IP list as a consumer in a rule, the scope coverage type must be “Providers Only.”
Custom iptables Rules
Note
The ability to create iptables rules is only enabled when the PCE is configured to display it.
You might have configured iptables directly on your Linux workloads as needed for your application workloads as part of your host configuration. However, when you pair a workload and put a policy into the Visibility Only or Full enforcement mode, the VEN assumes control of the iptables to enact the policy and does not apply any pre-programmed iptables to the policy.
Custom iptables rules in Illumio Core provide the ability for you to program the custom iptables rules needed for your applications as part of the rules managed by the PCE. Custom iptables rules help preserve any configured iptables from native Linux host configurations by allowing you to include them with the rules for your policy.
To clarify:
iptables refer to a Linux host configuration before the VEN is installed.
Rules refer to statements written by the PCE to determine permitted traffic, typically by assuming control of iptables and programming the new rules.
iptables rules refer to iptables that are inserted as rules onto the VENs and managed by the PCE.
Custom rules follow the iptables -A (append) command pattern:
-t<table>-A<chain> <rule>
Example:
-t filter -A INPUT -p tcp -s 10.10.10.10 --sport 8888 -j ACCEPT
Custom iptables rules consist of a list of iptables statements and the entities that receive the rules. Each rule can consist of a list of iptables rules, which allows users to group a sequence of rules for a specific function. The custom iptables rules are programmed after the Illumio PCE generates the iptables rules, but prior to the last default rule.
Before they is sent to the VEN, the custom iptables rules are checked for any unsupported tokens (such as names of firewall chains already in use by Illumio, matches against IP sets, and semicolons). If an unsupported token is included, the rule cannot be saved or provisioned.
If the VEN fails to apply a custom iptables rule because of a missing package or an incorrectly formatted rule:
The error is reported to the PCE and is logged in the organization events
The error is displayed in the VEN policy sync status
The new policy is not used and the last known successful policy is used instead
For policy distribution and enforcement, the VEN creates a custom chain that contains the rules for each table or chain in the iptables. Each custom chain is appended to the end of its corresponding chain in the correct table. When the VEN requests the policy, the iptables command is sent, including the chain where it should be placed.
For security reasons, custom iptables rules only support rules in the mangle, nat, and filter tables.
The following table describes the permitted actions for each iptables type:
Table Name | Chain Names | Custom Rules Support |
|---|---|---|
| prerouting, output | No |
| prerouting, input, output, forward, postrouting | Yes |
| prerouting, output, postrouting | Yes |
| input, output, forward | Yes |
| input, output, forward | No |
Note
If the RBAC user's scope coverage type is “Providers and Consumers,” the user cannot manage custom iptables rules. To allow access to custom iptables rules, the scope coverage type must be “Providers Only.”
Permitted Rule Writing Combinations
The following table explains the valid rule combinations between providers and consumers.
If Provider is | And Service is | Consumer can be |
|---|---|---|
Workload, All workloads, label, label group | Any service | Workload , IP list (including Any (0.0.0.0/0 and ::/0), label, label group, user groups, All workloads |
IP list | Any service | Workload, label, label group, user groups, All workloads |
Uses virtual services | Not applicable (the service is derived from the virtual service) | Workload, label, label group, IP lists, All workloads, uses virtual service, uses virtual services and workloads |
Uses virtual services and workloads | Any service | Workload, label, label group, IP lists, All workloads, uses virtual service, uses virtual services and workloads |
Workload, All workloads, label, or label groups | Any service | User groups and one or more of the following: workload, All workloads, label, label groups |
Stateless Rules
By default, all rules you write in the PCE are stateful, which means that the host's firewall keeps track of a connection for the entire duration of the session.
For workloads, you can specify stateless packet filtering for a rule (“stateless”: true). This means that the VEN instructs the host's firewall to not maintain persistent connections for all sessions. You can create this type of a stateless rule for datacenter core services, such as DNS and NTP.
Caveats
In a stateless rule, you can add the following policy objects as consumers:
An individual workload
A label (one each of a specific type, up to four total)
Any IP list plus All workloads
Be aware also of the following when enabling stateless rules:
Linux traffic does not get logged in the PCE
Windows traffic gets logged in the PCE if connections are established
Traffic is allowed in the opposite direction
If you attempt to add any other consumers, you receive an error.
The Illumio Core limits the number of stateless rules to 100, to ensure that both stateful and stateless rules coexist on the host in a way that optimizes system and network performance. If you need more than 100 stateless rules in your Illumio policy, contact your Illumio Professional Services Representative for more information.
Warning
Existing active connections on workloads allowed by a stateless rule (for example, an SSH session) are terminated when workloads receive new rules from the PCE. Those connections need to be reestablished by the clients. For this reason, Illumio recommends that you use stateless rules for services that use high-frequency short-lived connections, such as DNS and SNMP.
Rule Search
When you have a large number of rules organized in rulesets, you can't easily search for rules across rulesets. Segmentation rule search solves this issue by making it simple to search for specific rules.
For example, when you want to know how many rules there are for SNMP (UDP 161) and you have around 200,000 rules organized across 700 rulesets, it is time-consuming to narrow down that search without using this feature.
You can search for and analyze rules that allow communication over a specific port and protocol.
Segmentation Rule Search allows you to quickly find rules that apply to a set of providers and consumers.
Providers and consumers can be represented by a workload, an IP address, or a set of labels.
Using this feature helps you identify rules that are getting applied to your workloads due to unnecessarily broadly applicable rulesets or human errors.
To search for rules:
From the PCE web console menu, choose Policy > Rulesets & Rules.
The Rulesets and Rules page appears.
Choose the Rule Search tab.
Search for Active or Draft rules.
Perform a Basic or Advanced search of your rules:
Basic: Searches all attributes
Advanced: Searches by source, destination, or both.
Note
When you perform an advanced search by workload name, the search results do not display the IP list rules when the iplist contains workload IP addresses because the Illumio Core does not resolve CIDRs and ranges within an IP list.
From the Results drop-down list, choose to either have the exact match of the selected search filters to be displayed or a match to any of the selected filters (All Results).
Click the Customize columns drop-down list to select the attributes you want to be displayed in the search results.
Filter options to further narrow your search.
Click Run.
In the Ruleset column, you can click a ruleset name and make changes to the rules.
Click Download to download the results of your search in JSON format.
Rule Search by Port
The following guidelines and uses cases are provided to clarify how Rule Search works when you search for rules by the port(s) they specify.
General Guidelines
Single-port searches generally work as expected. See Row 1 in the Use Case table.
When searching for a port range, the port ranges in the search and in the rule must match exactly. See Row 3 in the Use Case table.
When searching for rules that specify multiple ports, only rules that specify all of the ports are found. See Row 5 in the Use Case table.
Use Cases: Search for Rules by Port
Row | Use case | Examples (A) Search specifies port(s) | Examples (B) Rule specifies port(s) | Is the rule found? |
|---|---|---|---|---|
1 | (A) Search for rules that specify only a single port and (B) There's a rule that specifies the same single port | 80 | 80 | Yes |
2 | (A) Search for rules that specify only a single port and (B) There's a rule that specifies a port range that encompasses the searched-for port | 80 | 50-100 | No |
3 | (A) Search for rules that specify a port range and (B) There's a rule that specifies the same port range | 50-100 | 50-100 | Yes |
4 | (A) Search for rules that specify a port range and (B) There's a rule that specifies only a single port within the searched-for range | 50-100 | 80 | No |
5 | (A) Search for rules that specify multiple ports and (B) There's a rule that specifies the same multiple ports | 50, 100 | 50, 100 | Yes |
6 | (A) Search for rules that specify only a single port and (B) There's a rule that specifies multiple ports, including the searched-for port | 50 | 50, 100 | Yes |
7 | (A) Search for rules that specify multiple ports and (B) There's a rule that specifies some, but not all, of the searched-for ports | 50, 80 | 50, 100 | No |
Rules for Application Policies
Illumio allows or denies traffic between applications using policies that you write. To write application policies, you must create rules for the policy.
Illumio has the following types of rules for application policies:
Override Deny Rules
This rule type is typically used to deny communication between sources and destinations that might inadvertently be given to allow rules by another administrator. Override Deny rules take precedence over all other types of rules.
Allow Rules
You can write rules that allow communication between sources and destinations.
Deny Rules
You can write rules that deny communication between sources and destinations.
Custom IPtables Rules
You can write rules for Linux workloads.
Policy Check
The Policy Check feature allows you to determine if a rule allowing communication between workloads or between a workload and another IP address already exists. On the Policy Check page, you select two workloads or IP addresses to determine if a rule exists to allow communication between them. Policy check can use a network profile to account for rules affecting outbound traffic to non-corporate interfaces on endpoints. Servers cannot have non-corporate interfaces.
Note
You can do a policy check between two workloads, or between a single workload and a single IP address.
For example, you have created several rulesets for your workloads and applications, and you want to know whether your organization has an existing rule for that traffic before you start writing new rules that duplicate those existing rules.
To perform a policy check:
From the PCE web console menu, choose Troubleshoot > Policy Check.
In the Source field, type or select a workload or IP address.
In the Destination field, type or select a workload or IP address.
In the Destination Port and Protocol field, enter a port and protocol when the connection is running over TCP or UDP, or just a protocol when the connection is running over GRE or IPIP.
In the Network Profile field, choose either Corporate, Non-Corporate Networks (Endpoints Only), or Any.
If an IP address is specified in both Consumer and Provider fields, the Network Profile value must by Corporate -- that is, searching within the internal corporate network only.
Click Check Rules.
If a connection is allowed between the selected two workloads or IP addresses, the page will display at least one rule that allows the connection.
When a rule does not exists, the page displays “No Rules exist to allow that connection.”
About Rules
Rules allow communication between multiple applications or entities in different scopes or the same scope.
Illumio supports the delegation of rule writing using role-based access control (RBAC). Application administrators can only edit rules where the ruleset's scope matches the scopes for which they have administrator privileges. They cannot create or manage rulesets if the scope includes “All.”
Rule types allow the application administrator to write rules allowing other applications to communicate with the applications they manage without requiring global administrator privileges. This feature allows users to group rules required for inter-application and intra-application communication for a specific application into one ruleset.
You can combine multiple types of rules (intra-scope, extra-scope, and custom iptables) in a single ruleset.
You can use multiple services or ports and protocols in a rule. This approach helps reduce the number of rules in your PCEs, which helps improve the PCE performance.
Note
You cannot provision drop actions from the PCE in a NAT table for custom IP tables. Doing so results in a firewall generation failure.
Types of Rules
To write a rule, you need to define three things: A service, a source of the service, and a destination of the service. You also need to select the type of rule:
Intra-scope rule: Allow communication within a group.
Extra-scope rules: Allow communication between groups.
Custom iptables rules: Allows custom iptables configurations in a ruleset. These rules are managed by the PCE and applied on each managed Linux workload VEN that matches the labels for the scope and receivers.
Intra-scope Rules
Note
The ability to create intra-scope rules is only enabled when the PCE is configured to display it.
Intra-scope rules allow authorized users to write rules that allow communication between sources and destinations within a specific scope. This rule type is typically used to allow communication between workloads that belong to the same application. For intra-scope rules, the labels used in the scope must match the labels used for both the source and the destination. If you don't specify a Label, “All” is used by default.
For example, you can create a rule allowing all Database workloads with the labels HRM | US | Dev to accept MySQL connections from all Web workloads with the labels HRM | US | Dev.
Extra-scope Rules
Note
The ability to create extra-scope rules is only enabled when the PCE is configured to display it.
Extra-scope rules allow authorized users to write rules that allow communication between the scoped application and external entities. Specifically, you can write rules that enable Sources within a scope to be accessed by Destinations in or outside the specified scope. For extra-scope rules, the labels used in the scope must match the labels used by the source. If you don't specify a label, “All” is used by default.
Label Matching: Destination labels must match those used in the scope, while source labels can be outside. For example, use "All Workloads" and "All Services" between application groups to learn about the roles and services that must be allowed without restricting communications too soon.
Once you know the exact services and workload roles, switch to "Specific Workloads" and "Specific Services" to tighten security and allow only necessary communications.
MySQL might not belong to the HRM application (for example, the destinations are “Global” and are not restricted by the labels in the scope).
Note
If the RBAC user's scope coverage type is “Sources and Destinations,” the user cannot select an IP list as the Destination. To select an IP list as a Destination in a rule, the scope coverage type must be “Sources Only.” For more information, see "Role-Based Access Control" in PCE Administration Guide.
Note
Understanding and correctly applying Intra-Scope and Extra-Scope rules in Illumio is crucial for effective application microsegmentation and security.•
Start with broad rules and refine them over time to maintain both security and operational efficiency.
Custom iptables Rules
Note
The ability to create iptables rules is only enabled when the PCE is configured to display it.
Illumio supports custom iptables rules to keep configurations from native Linux host setups. This allows users to include custom iptables rules within the policy, ensuring new rules do not override existing Linux configurations.
Suppose you can configure iptables directly on your Linux workloads for your application workloads as part of your host configuration. However, when you pair a workload and put a policy into the Visibility Only or Full enforcement mode, the VEN assumes control of the iptables to enact the policy and does not apply any pre-programmed iptables to the policy.
Custom iptables rules in Illumio Core enable you to program the custom iptables rules needed for your applications as part of the rules managed by the PCE. Custom iptables rules help preserve any configured iptables from native Linux host configurations by allowing you to include them with the rules for your policy.
iptables refer to a Linux host configuration before the VEN is installed.
Rules refer to statements the PCE wrote to determine permitted traffic, typically by assuming control of iptables and programming the new rules.
iptables rules refer to iptables inserted as rules onto the VENs and managed by the PCE.
Custom rules follow the iptables -A (append) command pattern:
-t<table>-A<chain> <rule>
Example:
-t filter -A INPUT -p tcp -s 10.10.10.10 --sport 8888 -j ACCEPT
Custom iptables rules consist of a list of iptables statements and the entities that receive the rules. Each rule can consist of a list of iptables rules, which allows users to group a sequence of rules for a specific function. The custom iptables rules are programmed after the Illumio PCE generates the iptables rules but before the last default rule.
Before they are sent to the VEN, the custom iptables rules are checked for unsupported tokens (such as names of firewall chains already in use by Illumio, matches against IP sets, and semicolons). The rule cannot be saved or provisioned if an unsupported token is included.
If the VEN fails to apply a custom iptables rule because of a missing package or an incorrectly formatted rule:
The error is reported to the PCE and is logged in the organization's events.
The error is displayed in the VEN policy sync status.
The new policy is not used and the last successful policy is used instead.
For policy distribution and enforcement, the VEN creates a custom chain that contains the rules for each table or chain in the iptables. Each custom chain is appended to the end of its corresponding chain in the correct table. When the VEN requests the policy, the iptables command is sent, including the chain where it should be placed.
For security reasons, custom iptables rules only support rules in the mangle, nat, and filter tables.
The following table describes the permitted actions for each iptables type:
Table Name | Chain Names | Custom Rules Support |
|---|---|---|
| prerouting, output | No |
| prerouting, input, output, forward, post routing | Yes |
| prerouting, output, post-routing | Yes |
| input, output, forward | Yes |
| input, output, forward | No |
Note
If the RBAC user's scope coverage type is “Sources and Destinations,” the user cannot manage custom iptables rules. To allow access to custom iptables rules, the scope coverage type must be “Sources Only.” For more information, see "Role-Based Access Control" in PCE Administration Guide.
For more information about APIs, see "Custom IP Tables Rules Reference" in REST API Developer Guide.
Rules for Application Policies
Illumio allows or denies traffic between applications using policies that you write. To write application policies, you must create rules for the policy.
You can define and manage rules to control and secure communication within and between application groups.
Illumio has the following types of rules for application policies:
Override Deny Rules
Note
Override Deny rules require VEN release 22.3.0 or later.
These rules block all traffic, no matter what other rules are below them in the policy.
Because they have the highest precedence, they can't be overridden by another rule, such as any implemented Allow rules. If an administrator creates an Allow rule by mistake, the Override Deny Rule that denies such communication acts as a safeguard.
They are used to stop traffic completely, especially during a security breach.
Create an Override Deny rule:
Go to Policies and click Add.
Select Override Deny Rule and then click Add Rule.
In Sources, select one or more sources.
In Destinations, select one or more destinations.
In Destination Services, select one or more services.
Click Save.
Override Deny rule implementation.
There are various implementations for Override Deny rules, such as:
Blocking all traffic between your Production and Development environments except over
splunk-data (007 TCP)Additionally, blocking all traffic between all workloads over SSH with no possible exceptions (highest precedence)
To satisfy these requirements, proceed as follows:
Add a Deny rule specifying Production as the source and Development as the destination, blocking all services.
Add an Allow rule specifying the same source and destination, permitting traffic over
splunk-data (9997TCP).Add an Override Deny rule blocking all traffic between all workloads over SSH. Because this rule has the highest precedence, it cannot be overridden by an Allow rule.
Allow Rules
Allow rules have the second highest priority, after Override Deny rules.
They allow traffic to and from specific workloads. They act like security guards, permitting only registered or authorized traffic, and are used to define explicitly permitted traffic.
Deny Rules
Deny rules temporarily block specific traffic, often during initial setup. They are useful for blocking known problematic traffic while determining what should be allowed.
In the Allow List model transition, Deny rules are gradually replaced with Allow rules, which specify precisely which traffic is permitted.
Implementing Deny Rules During the Transition to Allow Rules
Start with deny rules to block risky traffic.
Monitor traffic patterns to understand what needs to be allowed.
Create the Allow rules for essential, trusted traffic.
Gradually remove deny rules as the Allow rules are established.
Once the Allow rules are fully enforced, all traffic is denied by default unless explicitly allowed by an Alow rule. Full enforcement of Allow rules ensures a secure and controlled network environment.
Policy Check and Rule Search
This section explains how to use the Policy Check feature and search for rules.
Policy Check
The Policy Check feature allows you to determine if a rule allowing communication between workloads or between a workload and another IP address already exists. On the Policy Check page, you select two workloads or IP addresses to determine if a rule exists to allow communication between them. Policy checks can use a network profile to account for rules affecting outbound traffic to non-corporate interfaces on endpoints. Servers cannot have non-corporate interfaces.
Note
You can do a policy check between two workloads or a single workload and IP address.
For example, you have created several rulesets for your workloads and applications, and you want to know whether your organization has an existing rule for that traffic before you start writing new rules that duplicate those existing rules.
To perform a policy check:
From the PCE web console menu, choose Troubleshoot > Policy Check.
In the field, type or select a Workload, Container Workload, or IP address.
In the field, type or select a Workload, Container Workload, or IP address.
In the Destination Port and Protocol field, enter a port and protocol when the connection runs over TCP or UDP, or just a protocol when the connection runs over GRE or IPIP.
Choose Corporate, Non-Corporate Networks (Endpoints Only) or Any in the Network Profile field.
If an IP address is specified in both the Destination and Source fields, the Network Profile value must be " Corporate, that is, searching within the internal corporate network only.
Click Check Rules.
If a connection between the selected two workloads or IP addresses is allowed, the page will display at least one rule that allows the connection.
When a rule does not exist, the page displays “No Rules exist to allow that connection.”
Rule Search
You can't easily search for rules across rulesets when you have many rules organized in rulesets. Segmentation rule search solves this issue by making it simple to search for specific rules.
For example, it is time-consuming to narrow that search without using this feature when you want to know how many rules there are for SNMP (UDP 161) and have around 200,000 rules organized across 700 rulesets.
You can search for and analyze rules that allow communication over a specific port and protocol.
Segmentation Rule Search lets you quickly find rules that apply to sources and destinations.
A workload, an IP address, or a set of labels can represent sources and destinations.
Using this feature helps you identify rules that are getting applied to your workloads due to unnecessarily broadly applicable rulesets or human errors.
To search for rules:
From the PCE web console menu, choose Policies.
The Policies page appears with a tab Rule Search.
Choose the Rule Search tab.
Search for Active or Draft rules.

Perform a Basic or Advanced search of your rules:
Basic: Searches all attributes
Advanced: Searches by source, destination, or both.
Note
When you perform an advanced search by workload name, the search results do not display the IP list rules when the iplist contains workload IP addresses because the Illumio Core does not resolve CIDRs and ranges within an IP list.
From the Exact Results drop-down list, choose to either have the exact match of the selected search filters displayed or a match to any of the selected filters (All Results).
Filter by Sources
You can filter rule search by the following categories: Labels and Label Groups, IP Addresses, IP Lists, Virtual Services, Workloads, and User Groups.
Filter by Destinations and Rule Attributes
You can filter rule search by these categories: Labels and Label Groups, IP Address, IP Lists, Note, Rule Options, Port and/or Protocol, Port Range, Process Name, Windows Services, Policy Services, Status, Created At, Created B y, Virtual Servers, Virtual Services, Workloads, and Ruleset Name.
Click Run.
Click Download to download the results of your search in JSON format.
Rule Search by Port
The following guidelines and uses cases are provided to clarify how Rule Search works when you search for rules by the port(s) they specify.
General Guidelines
Single-port searches generally work as expected. See Row 1 in the Use Case table.
When searching for a port range, the port ranges in the search and in the rule must match exactly. See Row 3 in the Use Case table.
When searching for rules that specify multiple ports, only rules that specify all of the ports are found. See Row 5 in the Use Case table.
Use Cases: Search for Rules by Port
Row | Use case | Examples (A) Search specifies port(s) | Examples (B) Rule specifies port(s) | Is the rule found? |
|---|---|---|---|---|
1 | (A) Search for rules that specify only a single port and (B) There's a rule that specifies the same single port | 80 | 80 | Yes |
2 | (A) Search for rules that specify only a single port and (B) There's a rule that specifies a port range that encompasses the searched-for port | 80 | 50-100 | No |
3 | (A) Search for rules that specify a port range and (B) There's a rule that specifies the same port range | 50-100 | 50-100 | Yes |
4 | (A) Search for rules that specify a port range and (B) There's a rule that specifies only a single port within the searched-for range | 50-100 | 80 | No |
5 | (A) Search for rules that specify multiple ports and (B) There's a rule that specifies the same multiple ports | 50, 100 | 50, 100 | Yes |
6 | (A) Search for rules that specify only a single port and (B) There's a rule that specifies multiple ports, including the searched-for port | 50 | 50, 100 | Yes |
7 | (A) Search for rules that specify multiple ports and (B) There's a rule that specifies some, but not all, of the searched-for ports | 50, 80 | 50, 100 | No |
Rule Writing
This section explains how to write various rules.
Permitted Rule Writing Combinations
The following table explains the valid rule combinations between sources and destinations.
If Source is | And Service is | Destination can be |
|---|---|---|
Workload, All workloads, label, label group | Any service | Workload, IP list (including Any (0.0.0.0/0 and ::/0), label, label group, user groups, All workloads |
IP list | Any service | Workload, label, label group, user groups, All workloads |
Uses virtual services | Not applicable (the service is derived from the virtual service) | Workload, label, label group, IP lists, All workloads, uses virtual service, uses virtual services and workloads. |
Uses virtual services and workloads | Any service | Workload, label, label group, IP lists, All workloads, uses virtual service, uses virtual services and workloads. |
Workload, All workloads, label, or label groups | Any service | User groups and one or more of the following: workload, All workloads, label, label groups. |
Stateless Rules
By default, all rules you write in the PCE are stateful, meaning the host's firewall keeps track of a connection for the entire session duration.
For workloads, you can specify stateless packet filtering for a rule (“stateless”: true). This means the VEN instructs the host's firewall not to maintain persistent connections for all sessions. You can create this stateless rule for data center core services like DNS and NTP.
Caveats
In a stateless rule, you can add the following policy objects as Destinations:
An individual workload
A label (one each of a specific type, up to four total)
Any IP list plus "All" workloads
Be aware also of the following when enabling stateless rules:
Linux traffic does not get logged in the PCE.
Windows traffic gets logged in the PCE if connections are established.
Traffic is allowed in the opposite direction.
You will receive an error if you attempt to add any other Destinations.
The Illumio Core number of stateless rules is limited to 100 to ensure that both stateful and stateless rules coexist on the host in a way that optimizes system and network performance. If you need more than 100 stateless rules in your Illumio policy, contact your Illumio Professional Services Representative for more information.
Warning
Existing active connections on workloads allowed by a stateless rule (for example, an SSH session) are terminated when workloads receive new rules from the PCE. Clients need to re-establish those connections. For this reason, Illumio recommends using stateless rules for services that use high-frequency, short-lived connections, such as DNS and SNMP.
Rule-Based Labeling
Rule-based labeling allows you to assign labels to one or more workloads when their attributes match the conditions you specify in easily-configurable rules. This simplifies the task of labeling multiple workloads.
Before you begin
Label assignment:
You can assign system default and user-defined labels to matching workloads.
You can assign only one label of a given type to a workload.
Rule-Based Labeling assigns labels to workloads but doesn't replace existing labels already assigned to workloads. For example, if a matching workload has an existing Location label of New York and your labeling rule specifies a Location label of London, the existing New York Location label is preserved and the London Location label is bypassed.
Depending on how many workloads match labeling rules, it may take a few minutes for the labels to be assigned to all of them. You can navigate to other areas of the PCE UI while the load process continues in the background. When matching and loading has finished, a notification appears wherever you are in the PCE user interface.
An event is created when a rule-based label is assigned to a workload. The name format of the event differs depending on how the label is assigned:
When assigned from the PCE UI:
label_mapping_rules_run.assign_labelsYou can see the difference between a system job and an assignment from the PCE UI in the
generated_byfield.It displays either
systemfor the system, or the user's e-mail when assigned from the PCE UI.
It's impossible to remove a label from the list of labels (Policy Objects > Labels) if used in a labeling rule.
Typical Labeling Rule Workflow
Here is a typical workflow for adding rules, launching a search for matching workloads, and assigning labels.
Step 1: Add a Labeling Rule
Labeling rules work by identifying workloads in your environment that match certain conditions you specify and then assigning one or more labels to those workloads. See Add a Labeling Rule.
Step 2: Find and review matching workloads
After adding labeling rules, let the Rule Labeling feature search your environment for workloads that match the rule conditions, and then review the generated list of workloads. See Find and Review Matching Workloads.
Step 3: Assign labels to matching workloads
Once the feature finds matching workloads, you can assign the labels you specified in Step 1: Add a Labeling Rule. See Assign labels to matching workloads.
Work with Labeling Rules
This section describes how to add, remove, reorder, edit, and enable/disable labeling rules. It also includes procedures for finding and matching workloads and exporting a list of labeling rules to a CSV file.
Add a Labeling Rule
Labeling rules work by identifying workloads in your environment that match conditions you specify and then assigning one or more labels to those workloads.
Identify the workloads you want to label by examining the workloads on the Workloads page and then take note of the attributes you'll need to specify in later steps.
Go to Policy Objects > Labels.
Click the Labeling Rules tab.
Click Add.
Specify the matching condition. (For terminology and matching logic, see How Label Matching Works.)
Add an attribute.
Add an operator.
Add one or more values.
Select one or more labels in the Label field.
Click Save.
Find and Review Matching Workloads
This procedure describes how to search your environment for workloads that match the rule conditions.
Go to Policy Objects > Labels.
Click Apply Rules and then choose Review and Assign Labels.

The Workloads that match criteria side panel opens showing the workloads in your environment that match your rules (if any).
Note
Depending on the number of workloads that match labeling rules, it may take several minutes for the PCE to load the workloads that match your rules. You can close the Workloads that match criteria side panel while the load process continues in the background. A progress message appears on the main page while the operation is underway. When matching and loading has finished, a notification appears wherever you are in the PCE user interface.
Review the list to ensure it includes the workloads you want your rules to match. If the list doesn't include the workloads you intended, click Close, recheck the condition(s) you specified in the rule(s), and then modify the rules if necessary. You may need to return to the Workloads page and re-examine the workloads to make sure you've specified the correct workload attributes in your rule(s).
If the list of matching workloads meets your expectations, assign the specified labels.
Assign labels to matching workloads immediately
Perform these steps to immediately assign labels to the workloads that match your labeling rules.
Note
In certain use cases, it may be preferable to assign labels immediately as described in this procedure rather than using the Apply Rules when triggered option.
Go to Policy Objects > Labels.
Make sure the Workloads that match criteria side panel is open (see Find and Review Matching Workloads).
From the Workloads that match criteria side panel, click Assign. The message Labels have been assigned to _ workloads appears.
To assign labels to workloads programmatically, see Schedule Label Assignments.
Schedule Label Assignments
If you aren't assigning labels immediately as described in the Assign labels to matching workloads immediately procedure, perform these steps to specify when you want to assign labels.
Click Apply Rules and then select Schedule Label Assignment.
In the Recurring Rule Application dialog box, move the slider(s) to On to enable one or both of the following options:
Apply rules when triggered. Enable this option if you want labels to be assigned automatically to the matching workload(s) whenever a VEN is activated. Note the following about using this option.
Note
Four-hour pause between searches. Every four hours, Rule Based Labeling searches for VENs in your environment that were activated within the past four hours. If the search finds such VENs, labels are assigned to the VEN's host workloads if the workloads' conditions match any of your labeling rules. Labels are not re-assigned to previously-labeled workloads because the search ignores VENs that were activated more than four hours previously.
Activating multiple VENs over a brief period of time. If your organization uses a tool to automate VEN activation for multiple VENs within a brief time period and you've enabled the Apply rules when triggered option, be aware of the following:
Your tool activates VENs according to the cadence you configured.
Activation of the first VEN triggers Rule Based Labeling to search your environment for matching workloads.
After Rule Based Labeling finds the first matching workload and assigns labels to it, further search for matching workloads and label assignment is halted for four hours, which you may not have expected.
When the four-hour pause has ended, Rule Based Labeling resumes its search for matching workloads and assigns labels to them according to your labeling rules.
To avoid waiting four hours as described above, you can assign labels to the remaining matching workloads immediately by performing the steps in Assign labels to matching workloads immediately. The subsequent search that occurs after four hours still runs but ignores the workloads to which labels were already assigned. Labels are not overwritten.
Apply rules regularly. Enable this option if you want Rule Based Labeling to assign labels automatically according to a schedule. Click through the Date and Time options to configure a schedule.
Click Done.
Edit a Labeling Rule
You can edit a rule's condition and label(s). To learn more about rule components, see Terminology.
To add a statement to an existing rule:
Go to Policy Objects > Labels.
Click the Labeling Rules tab.
Click the Edit icon for the rule you want to edit.
Click the down arrow to activate the Condition selectors.
Specify the statement you want to add.
If needed, add or remove label(s) in the Label field.
Click Save.
To delete a value from an existing rule:
Go to Policy Objects > Labels.
Click the Labeling Rules tab.
Click the Edit icon for the rule you want to edit.
On the condition you want to delete, click the X to delete it.

If needed, edit label(s) in the Label field.
Click Save.
To edit a value in an existing condition:
Note
To change a value in an existing condition, you must delete the original condition and then re-add it, specifying the value you want. You can't directly edit a value in an existing condition and preserve it.
For example, if you want to change the IP range
10.13.0.26-10.13.8.26
to . . .
10.13.0.26-10.92.8.26
. . . you must add the new range as a new condition and also delete the original condition.
Click the Edit icon for the rule you want to edit.
Click the down arrow to activate the Condition selectors.
Add the new statement.
Delete the original value.
If needed, edit label(s) in the Label field.
Click Save.
Enable/Disable Labeling Rules
The Enable/Disable options allow you to generate different matching results by excluding or including one or more labeling rules from the workload matching process.
Go to Policy Objects > Labels.
Click the Labeling Rules tab.
Select one or more labeling rules in the list of rules.
Click Enable or Disable.
To see the effect of the enable/disable option you selected, re-run the workload matching process.
Reorder Labeling Rules
When labeling rules are assigned, evaluation begins from the top of the list in ascending order (Rule 1, then Rule 2, etc), with Rule 1 having the highest precedence.
To change the precedence of a rule, change its rule number in the list of rules. Note that this will also reorder other rules in the list and change their precedence accordingly.
Go to Policy Objects > Labels.
Click the Labeling Rules tab.
Click the Edit icon for the rule you want to move. The rule number becomes an editable field.
Enter the new rule number in the field.
Click Save.

Note
Note that reordering rules changes the precedence of other rules.
The former Rule 3 becomes Rule 1 with the highest precedence.
The former Rule 1 moves to become Rule 2.
The former Rule 2 moves to become Rule 3.

Remove Labeling Rules
Go to Policy Objects > Labels.
Click the Labeling Rules tab.
Select one or more labeling rules in the list of rules.
Click Remove.
Export a Workload-Label-Review List
You can export a CSV file showing the workloads that match your rules and the label(s) that will be assigned to those workloads. This is helpful when you have a large number of rules and workloads.
Go to Policy Objects > Labels.
Click the Labeling Rules tab.
Click Apply Rules and then click Review and Assign Labels.
On the Workloads that match criteria side panel, click Export.
The generated CSV file is downloaded to your Downloads folder with a filename similar to
Workload_Label_Review_(month_day_year).Open and review the CSV file.

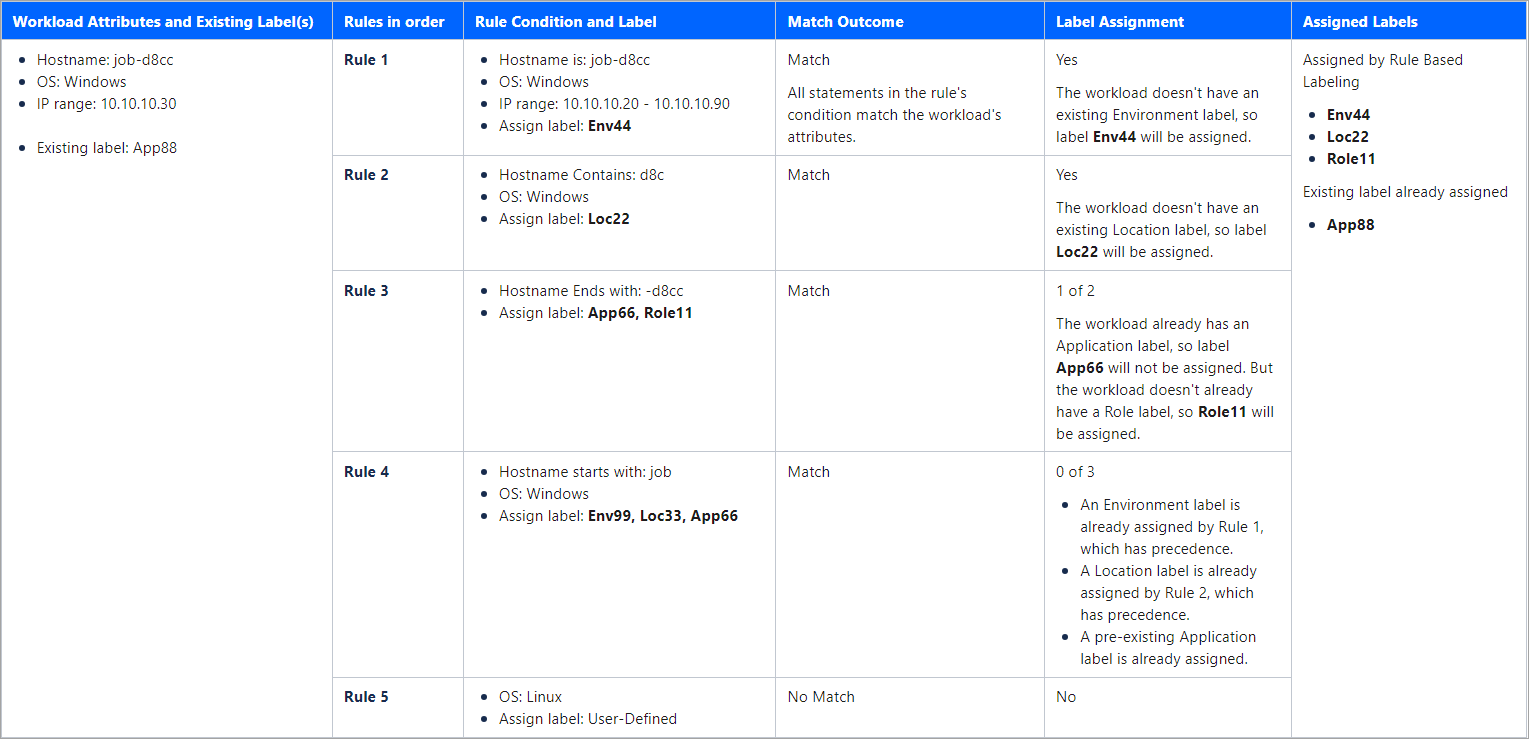
How Label Matching Works
This section provides a detailed example of the Rule-Based Labeling feature's label matching logic. It also presents a brief list of terms used throughout this document.
When you click Review and Assign Labels to generate a list of workloads that match your labeling rules, workloads are evaluated against the conditions defined in the rules.
A match occurs if all of the statements in a rule's condition match a workload's attributes.
Terminology
Rule: Rules consist of a condition and one or more label(s). If a workload matches the rule's condition, it is assigned the corresponding label(s), provided the workload has not already been assigned a label of the same type.
Condition: Conditions are the user-defined criteria that workloads must match to be eligible for label assignment. A condition consists of one or more statements connected by AND, ensuring that workloads must satisfy all statements of the condition to match the rule.
Statement: Statements define the specific workload attributes, operators, and values that are evaluated. Multiple values within a statement are considered using OR, allowing you to specify match criteria flexibly.
Precedence: Rules are numbered, with Rule 1 having the highest precedence. A workload is evaluated against the rules in order, ensuring that rules with the labeling criteria most important to you are considered first.
Matching Logic
Labeling Rule Examples
This section provides several detailed examples of adding labeling rules.
Keep in mind the following as you add labels:
The operator you select and the particular values you enter in the Values field allow you to control the granularity of the labeling rule.
When you include multiple statements in a condition, Rule-Based Labeling automatically inserts an AND between the statements.
When you specify multiple values in a statement, Rule-Based Labeling automatically inserts an OR between the values.
Example 1. Hostname Rule to match workloads that contain part of a specified host name
Select Hostname in the Attribute field.
Select contains in the Operator field.
Enter AWS in the Values field.
Click Close.
Select one or more labels in the Label field.
Click Save.
Example 2. OS Rule to match workloads running a specific operating system
Note
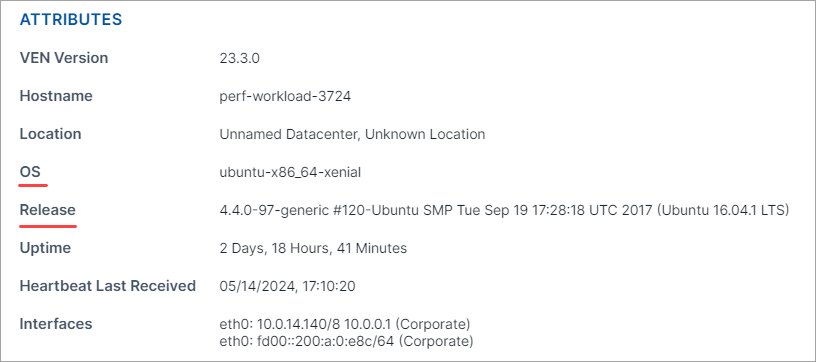
You can configure OS labeling rules to match all or part of the workload's OS version or release by selecting the Starts with, Contains, or Ends with operator and entering the details. To find details, go to Servers & Endpoints > Workloads and click the workload. On the Summary tab, go to the Attributes section of the workload's details page.
Select OS in the Attribute field.
Select an Operator.
Select Linux in the Value field.
Click Close.
Select one or more labels in the Label field.
Click Save.
Example 3. IP Address Rule to match workloads within a specific IP address range:
Select IP Address in the Attribute field.
Select is in in the Operator field.
In the Value field, enter a narrow range such as
10.2.0.0 - 10.2.200.0.Click Close.
Select one or more labels in the Label field.
Click Save.
Example 4. CIDR Block Rule to match workloads within a specific CIDR block:
Select IP Address in the Attribute field.
Select is in in the Operator field.
In the Value field, enter a CIDR block. For example:
10.2.20.0/24Click Close.
Select one or more labels in the Label field.
Click Save.
Example 5. Rule with multiple attributes, each with a single value:
Specify a hostname:
Select Hostname in the Attribute field.
Select contains in the Operator field.
Enter details in the Values field.
Specify an operating system:
Select OS in the Attribute field.
Select contains in the Operator field.
Select an operating system in the Values field.
Specify an IP address:
Select IP Address in the Attribute field.
Select is in in the Operator field.
In the Values, field enter an IP range or CIDR block.
Specify a listening port and/or protocol:
Select Port/Protocol in the Attribute field.
In the Operator field, select is for a specific port/protocol; select is in to specify a range.
In the Values field, enter either a specific port/protocol or a range as appropriate.
Specify a process path:
Select Process in the Attribute field.
In the Operator field, select an appropriate operator.
In the Values field, enter all or part of a process path according to your selected operator.
Click Close.
Select one or more labels in the Label field.
Click Save.