About the Policy Generator
The Policy Generator simplifies the Illumio policy creation process by recommending the optimal security policy for your App Groups. Use it to accelerate security workflows and reduce errors while creating a security policy.
Overview of Policy Generator
The Policy Generator uses network traffic to recommend and generate micro-segmentation policies for every workload and application, regardless of its location. It can generate rules for applications running on physical devices, virtualized platforms, and behind network devices, both on-premises and in the cloud.
The Policy Generator supports the creation of DNS-based rules across all wizards, including intra-scope, extra-scope, and IP lists. You can edit the proposed virtual services and add wildcards.
Application owners use the Policy Generator to write the following types of rules for the applications they manage:
Intra-scope rules
Extra-scope rules
Rules using IP lists.
For a selected App Group, the Policy Generator provides:
A workflow to create a policy that controls internal and external traffic.
A way to assess your current rule coverage, which represents the number of detected connections that are controlled by rules, divided by the total number of connections.
You can increase your rule coverage by creating rules for detected connections that are not controlled by rules. The Policy Generator proposes rules for connections that are not currently allowed by the existing rules and displays the consolidated flow count for each new proposed rule to help ensure the maximum impact on rule coverage.
Note
The Policy Generator calculates rule coverage automatically every 24 hours or after creating a draft policy.
You can rewrite rules as your datacenter needs change, and the Policy Generator will show you the before and after effects of those rules.
A way to assess your current rule coverage, which represents the number of detected connections that are controlled by rules, divided by the total number of connections.
The first time you use the Policy Generator for an App Group, it creates a new draft policy with the title of the selected App Group. When you use the Policy Generator to create additional rules, they are added to the existing policy that the Policy Generator created. You can review the proposed rules and customize them before you save them as a draft policy. For Windows, the Policy Generator detects and suggests rules based on Windows processes and services. You can edit the service before saving it.
When an App Group has multiple destinations communicating with a specific source, the Policy Generator consolidates all the destinations into a single rule for improved readability and better scalability.
On the Summary tab of the Policy page, any policy created with Policy Generator has the default description “Automatically generated using the Illumio Policy Generator” and the value of illumio_policy_generator for the External Data Set field. The value for the External Data Reference is the App Group name.
Policy Generator Prerequisites and Limitations
The following prerequisites and limitations bind the Policy Generator:
You cannot add Role-level rules until Role labels have been added to all workloads in the App Group.
When some workloads in an App Group do not have Role labels, you can still write an App Group-level rule using Policy Generator to allow all the workloads to communicate with each other.
Rule coverage is updated one App Group at a time.
Create Intra-scope Rules with the Policy Generator
From the PCE web console menu, choose Policies > Start Policy Generator.
Click on the dropdown menu Select an App Group to build Rules, and choose one of the App groups.
The Policy Generator displays the latest calculated coverage for each type of rule (Intra-scope, Extra-scope, and IP Lists).
Click the refresh icon to recalculate Rule coverage.
Select a workload you want to work with, such as Intra-scope.
Click the Start with Intra-Scope button.
The Intra-Scope Rule Configuration page appears.
In the Choose Intra-Scope Rule Configuration section, select a granularity level for the rules.
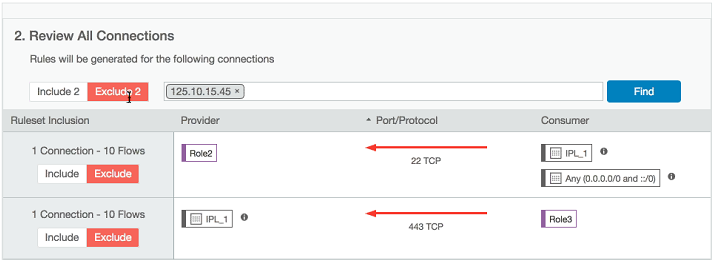
The detected connections, including details such as source, port/protocol, and destination, appear in the Review All Connections section.
Rule Configuration
Connections Displayed
App Group Level
Microsegmentation: Allow all Workloads to talk across all Services
Role Level - All Services
Divide Workloads by Role and allow them to talk on all Services.
Role Level - Specified Services
Nanosegmentation: Divide Workloads by Role and specific Services.
Auto Level
Vulnerability Mitigation: Eliminate or reduce the exposure of vulnerable ports
Note
The Policy Generator displays a truncated list of ports and protocols when the App Group has more than four types of ports or protocols. To display the remaining ports or protocols in a modal window, click the + More link.
(Optional for Role level) To exclude a connection from the proposed rules, click Exclude. The row is grayed out to indicate that no rules will be proposed for this connection, and the amount of rule coverage decreases. To include an excluded connection, click Include.
Note
At least one connection must be included to continue.
Click Next.
The proposed rules appear on the Preview page.
(Optional) To edit a service for a rule, click the pencil icon beside the service. The Edit Service dialog box appears.
Select a service from the drop-down list or create a new one. You can select services that have a broader range of ports. The list includes every service that matches that port and protocol. When you’ve added a service that has multiple ports and protocols or ranges, they all appear in the list.
Select Apply Changes to all matching ports to allow the service to be used in other rules that match this service. You are prompted to allow the Policy Generator to merge rules. To cancel the merge, reload the page and start over.
When you create a process-based service, the connection appears as if it’s not covered.
To accept the proposed rules, click Save and OK.
The Policy Generator's Successful message appears, which displays the number of new rules and services.
The rules are added to a draft policy. Click Continue with App Group to add extra-scope rules or rules using IP lists for the same App Group. On the last step of the Policy Generator, you can return to the App Group to add or append to the rules.
Note
You must provision the rules to apply them to workloads. See Provisioning.
Create Extra-scope Rules with the Policy Generator
When you create extra-scope rules, the Policy Generator displays all traffic that originates from a different App Group and is targeted at the selected App Groups. The Policy Generator displays all App Groups that the selected App Groups communicate with. You can choose which connections to cover with rules.
Follow the steps as explained in Create Intra-scope Rules with Policy Generator.
Create Rules Using IP Lists with the Policy Generator
Policy Generator creates rules that use IP lists as intra-scope rules.
When using IP lists to create rules, the Policy Generator defines a connection as a role on a port and protocol to an IP address. For example, when you have five IP addresses that are included in an IP list, the Policy Generator displays five connections.
From the PCE web console menu, choose Policies > Start Policy Generator.
The Select App Group page appears. The page displays the date and time when the Policy Generator last calculated the coverage for each type of rule. Click the refresh icon to recalculate rule coverage.
Click the refresh icon to recalculate Rule coverage.
The Policy Generator displays the latest calculated coverage for each type of rule (Intra-scope, Extra-scope, and IP Lists).
Click on the dropdown menu Select an App Group to build Rules , and choose one of the App groups.
Click on the dropdown menu Select an App Group to build Rules , and choose one of the App groups.
Click the Start with IP Lists button.
The IP List Selection page appears.
Select the IP lists for which you want to write rules and click Next.
The Configure IP List page appears.
Tip
To view the IP addresses configured in a list (not the IP addresses in the traffic), expand an IP list by clicking the arrow icon in the Name column.
To write rules that cover all connections, select the "Any IP" list. This list encompasses all connections, as it includes all IP addresses.
Each IP address can be part of more than one IP list, and you can choose which list to write your rules to.
When you choose overlapping IP lists, you can write overlapping rules.
When an IP address appears in more than one IP list, the rule will be included in all those IP lists.
You can write rules for inbound and outbound connections, or both. For example, you can write permissive rules for outbound traffic and specific rules for inbound traffic.
Select whether to configure rules by App Group or by role:
App Group Level: All workloads in the specified App Group can communicate with all workloads in the other App Groups
Role Level: Specified workloads in the App Group can communicate with specified workloads in the other App Groups
Select the permitted services for the rules:
All Services: Workloads can communicate over all services
Specified Services: Workloads can communicate over specified services
It creates a rule for any device to which those IP lists apply.
Tip
To display the IP addresses of the traffic for each port and protocol, hover over the info (i) icon in the Destination column.
To filter connections by IP address, port number, protocol, role, or label, use the search field above the list of connections. You can use the search field to find and exclude specific traffic.
To quickly include or exclude all traffic, use the Include and Exclude buttons by the search field. You can exclude all traffic, then selectively include specific connections.
To preview the rules proposed by Policy Generator, click Next.
The IP List Rule Preview page appears.
(Optional) To edit the service for a rule, click the pencil icon.
The Edit Service dialog box appears.
Select a service from the drop-down list or create a new one. You can select services that have a broader range of ports. The list includes every service that matches that port and protocol. When you’ve added a service that has multiple ports and protocols or ranges, they all appear in the list.
Select Apply Changes to all matching ports to allow the service to be used in other rules that match that service. You are prompted to allow the Policy Generator to merge rules. To cancel the merge, reload the page and start over.
When you create a process-based service, the connection will appear as if it’s not covered.
To accept the proposed rules, click Save and OK.
The Policy Generator's Successful message appears, which displays the number of new rules and services. The rules are added to a draft policy.
Segment Multiple App Groups with the Policy Generator
You can apply nano-segmentation (also known as ringfencing) on multiple App Groups using the Policy Generator. Nano-segmenting app groups enables all workloads to communicate across all services within each App Group.
When segmenting App Groups, the Policy Generator creates one policy per App Group. The policy includes a rule that covers traffic for all workloads to all workloads on all services.
From the PCE web console menu, choose Policy Generator.
The Select App Group page appears. The page displays the date and time when the Policy Generator last calculated the coverage for each type of Rule. Click the refresh icon to recalculate rule coverage.
In the Select App Group drop-down menu, select Segment Multiple App Groups from the bottom of the list.
The Choose App Groups page appears.
Select the App Groups to segment and click Next.
Tip
To recalculate rule coverage for an App Group, hover over the Last Calculated column and click the refresh icon. The column displays the time at which the rule coverage was calculated.
The column indicates whether the policy for the group has been edited since the last calculation, prompting you to recalculate it.
To quickly select App Groups using different criteria, click the arrow icon to the right of the Name column:
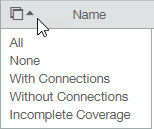
The Choose App Groups page displays all your App Groups regardless of their percentage of rule coverage or whether they have connections. For example, the page displays App Groups that have 100% rule coverage and groups with zero connections.
To accept the proposed rules, click Save and OK.
The Policy Generator's Successful message appears, which displays the number of new rules. The rules are added to a draft policy.