Work with Labeling Rules
This section describes how to add, remove, reorder, edit, and enable/disable labeling rules. It also includes procedures for finding and matching workloads and exporting a list of labeling rules to a CSV file.
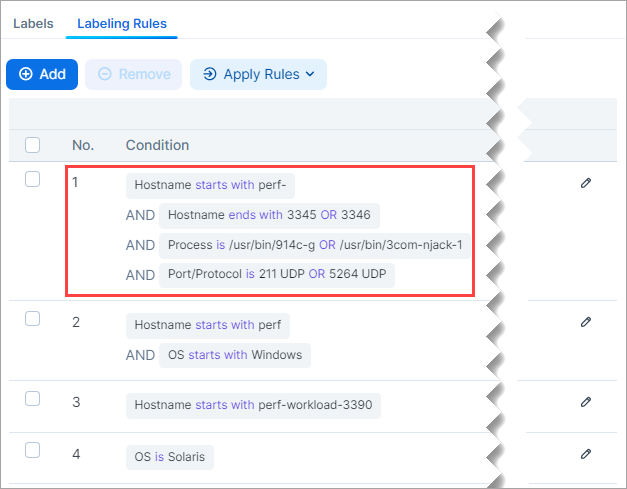
Add a Labeling Rule
Labeling rules work by identifying workloads in your environment that match conditions you specify and then assigning one or more labels to those workloads.
(Optional) To determine the workload attributes you want your labeling rule to match, it may help to go to Servers & Endpoints > Workloads and examine the workloads in your environment.
Go to Policy Objects > Labels.
Click the Labeling Rules tab.
Click Add.
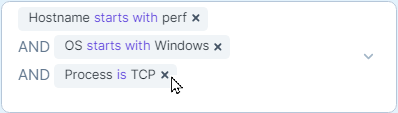
Specify the matching condition. (For terminology and matching logic, see How Label Matching Works.)
Select an attribute.
Select an operator.
Specify one or more values.
Select one or more labels in the Label field.
(Not available in all releases) Select Overwrite if you want to replace existing labels of the same type. For example, if a labeling rule is set to assign a Location label to matching workloads, any Location label(s) that may have been assigned previously to these workloads will be overwritten by the new Location label if Overwrite is selected. Otherwise, the existing label is preserved. This behavior applies to labels of any type.
Caution
Label changes are likely to result in a change to your security policy. Make sure you've thought through potential policy changes before you select the Overwrite option.
Click Save.
Find and Review Matching Workloads
This procedure describes how to search your environment for workloads that match the rule conditions.
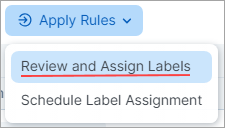
Go to Policy Objects > Labels.
Click Apply Rules and then choose Review and Assign Labels.
The Workloads that match criteria side panel opens showing the workloads in your environment that match your rules (if any).
Note
Depending on the number of workloads that match labeling rules, it may take several minutes for the PCE to load the workloads that match your rules. You can close the Workloads that match criteria side panel while the load process continues in the background. A progress message appears on the main page while the operation is underway. When matching and loading has finished, a notification appears wherever you are in the PCE user interface.
Review the list to ensure it includes the workloads you want your rules to match. If the list doesn't include the workloads you intended, click Close, recheck the condition(s) you specified in the rule(s), and then modify the rules if necessary. You may need to return to the Workloads page and re-examine the workloads to make sure you've specified the correct workload attributes in your rule(s).
If the list of matching workloads meets your expectations, assign the specified labels.
Assign labels to matching workloads immediately
Perform these steps to immediately assign labels to the workloads that match your labeling rules.
Note
In certain use cases, it may be preferable to assign labels immediately as described in this procedure rather than using the Apply Rules when triggered option.
Go to Policy Objects > Labels.
Make sure the Workloads that match criteria side panel is open (see Find and Review Matching Workloads).
From the Workloads that match criteria side panel, click Assign. The message Labels have been assigned to _ workloads appears.
To assign labels to workloads programmatically, see Schedule Label Assignments.
Schedule Label Assignments
If you aren't assigning labels immediately as described in the Assign labels to matching workloads immediately procedure, perform these steps to specify when you want to assign labels.
Click Apply Rules and then select Schedule Label Assignment.
In the Recurring Rule Application dialog box, move the slider(s) to On to enable one or both of the following options:
Apply rules when triggered. Enable this option if you want labels to be assigned automatically to the matching workload(s) whenever a VEN is activated. Note the following about using this option.
Note
Four-hour pause between searches. Every four hours, Rule Based Labeling searches for VENs in your environment that were activated within the past four hours. If the search finds such VENs, labels are assigned to the VEN's host workloads if the workloads' conditions match any of your labeling rules. Labels are not re-assigned to previously-labeled workloads because the search ignores VENs that were activated more than four hours previously.
Activating multiple VENs over a brief period of time. If your organization uses a tool to automate VEN activation for multiple VENs within a brief time period and you've enabled the Apply rules when triggered option, be aware of the following:
Your tool activates VENs according to the cadence you configured.
Activation of the first VEN triggers Rule Based Labeling to search your environment for matching workloads.
After Rule Based Labeling finds the first matching workload and assigns labels to it, further search for matching workloads and label assignment is halted for four hours, which you may not have expected.
When the four-hour pause has ended, Rule Based Labeling resumes its search for matching workloads and assigns labels to them according to your labeling rules.
To avoid waiting four hours as described above, you can assign labels to the remaining matching workloads immediately by performing the steps in Assign labels to matching workloads immediately. The subsequent search that occurs after four hours still runs but ignores the workloads to which labels were already assigned. Labels are not overwritten.
Apply rules regularly. Enable this option if you want Rule Based Labeling to assign labels automatically according to a schedule. Click through the Date and Time options to configure a schedule.
Click Done.
Edit a Labeling Rule
You can edit a rule's condition and label(s). To learn more about rule components, see Terminology.
To add a statement to an existing rule:
Go to Policy Objects > Labels.
Click the Labeling Rules tab.
Click the Edit icon for the rule you want to edit.
Click the down arrow to activate the Condition selectors.
Specify the statement you want to add.
If needed, add or remove label(s) in the Label field.
Click Save.
To delete a value from an existing rule:
Go to Policy Objects > Labels.
Click the Labeling Rules tab.
Click the Edit icon for the rule you want to edit.
On the condition you want to delete, click the X to delete it.
If needed, edit label(s) in the Label field.
Click Save.
To edit a value in an existing condition:
Note
To change a value in an existing condition, you must delete the original condition and then re-add it, specifying the value you want. You can't directly edit a value in an existing condition and preserve it.
For example, if you want to change the IP range
10.13.0.26-10.13.8.26
to . . .
10.13.0.26-10.92.8.26
. . . you must add the new range as a new condition and also delete the original condition.
Click the Edit icon for the rule you want to edit.
Click the down arrow to activate the Condition selectors.
Add the new statement.
Delete the original value.
If needed, edit label(s) in the Label field.
Click Save.
Enable/Disable Labeling Rules
The Enable/Disable options allow you to generate different matching results by excluding or including one or more labeling rules from the workload matching process.
Go to Policy Objects > Labels.
Click the Labeling Rules tab.
Select one or more labeling rules in the list of rules.
Click Enable or Disable.
To see the effect of the enable/disable option you selected, re-run the workload matching process.
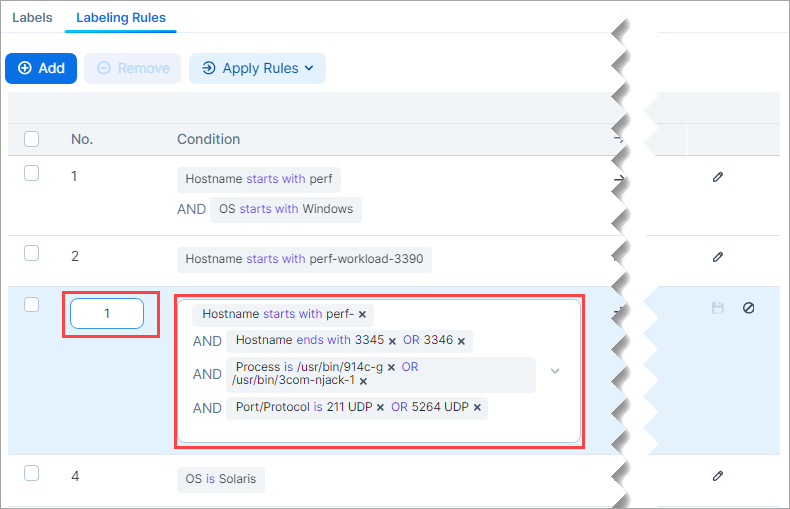
Reorder Labeling Rules
When labeling rules are assigned, evaluation begins from the top of the list in ascending order (Rule 1, then Rule 2, etc), with Rule 1 having the highest precedence.
To change the precedence of a rule, change its rule number in the list of rules. Note that this will also reorder other rules in the list and change their precedence accordingly.
Go to Policy Objects > Labels.
Click the Labeling Rules tab.
Click the Edit icon for the rule you want to move. The rule number becomes an editable field.
Enter the new rule number in the field.
Click Save.
Note
Note that reordering rules changes the precedence of other rules.
The former Rule 3 becomes Rule 1 with the highest precedence.
The former Rule 1 moves to become Rule 2.
The former Rule 2 moves to become Rule 3.
Remove Labeling Rules
Go to Policy Objects > Labels.
Click the Labeling Rules tab.
Select one or more labeling rules in the list of rules.
Click Remove.
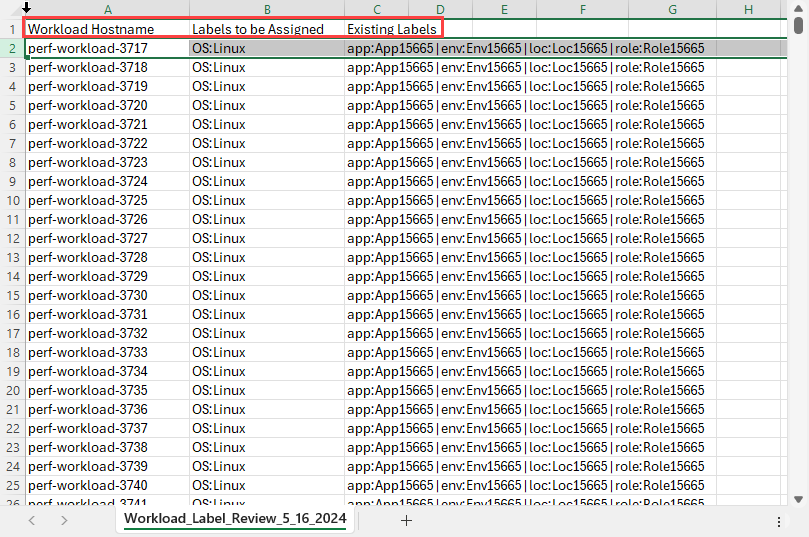
Export a Workload-Label-Review List
You can export a CSV file showing the workloads that match your rules and the label(s) that will be assigned to those workloads. This is helpful when you have a large number of rules and workloads.
Go to Policy Objects > Labels.
Click the Labeling Rules tab.
Click Apply Rules and then click Review and Assign Labels.
On the Workloads that match criteria side panel, click Export.
The generated CSV file is downloaded to your Downloads folder with a filename similar to
Workload_Label_Review_(month_day_year).Open and review the CSV file.