CLI Tool Commands for Resources
This section describes how to use the CLI Tool with various PCE resources.
View Workload Rules
You can view a specific workload's rules with the following command:
ilo workload rule_view --workload-id UUIDWhere:
UUID is the workload's UUID. See About the Workload UUID for information.
In the example below, the workload's UUID is as follows:
2ca0715a-b7e3-40e3-ade0-79f2c7adced0
Example View Workload Rules
ilo workload rule_view --workload-id 2ca0715a-b7e3-40e3-ade0-79f2c7adced0
+------------+-------+
| Attribute  | Value |
+------------+-------+
|  providing |  []   |
+------------+-------+
Using
+---------------------+----------------------------------------------------------------------------------------
| Ports And Protocols | Rulesets                                                                                                                                                                                                                                                        | Href                                       | Name         |
+---------------------+----------------------------------------------------------------------------------------
| [[-1, -1, nil]]     | [{"href"=>"/api/v2/orgs/28/sec_policy/8/rule_sets/1909", "name"=>"Default", "secure_connect"=>false, "peers"=>[{"type"=>"ip_list", "href"=>"/api/v2/orgs/28/sec_policy/8/ip_lists/188", "name"=>"Any (0.0.0.0/0)", "ip_ranges"=>[{"from_ip"=>"0.0.0.0/0"}]}]}] | /api/v2/orgs/28/sec_policy/8/services/1153 | All Services |
+---------------------+----------------------------------------------------------------------------------------
200, OK
View Report of Workload Services or Processes
The following command lists all running services or processes on a workload:
ilo workload service_reports_latest --workload-id UUIDWhere:
UUID is the workload's UUID. See About the Workload UUID.
In the example, the workload's UUID is as follows:
2ca0715a-b7e3-40e3-ade0-79f2c7adced0
Example Workload Service Report
ilo workload service_reports_latest --workload-id 2ca0715a-b7e3-40e3-ade0-79f2c7adced0
+-----------------+---------------------------+
| Attribute       | Value                     |
+-----------------+---------------------------+
|  uptime_seconds |  1491                     |
|  created_at     |  2015-10-20T15:13:00.681Z |
+-----------------+---------------------------+
Open Service Ports
+----------+---------+-------+--------------+-----------------+---------+------------------+
| Protocol | Address | Port  | Process Name | User            | Package | Win Service Name |
+----------+---------+-------+--------------+-----------------+---------+------------------+
| udp      | 0.0.0.0 | 5355  | svchost.exe  | NETWORK SERVICE |         | Dnscache         |
...
| tcp      | 0.0.0.0 | 135   | svchost.exe  | NETWORK SERVICE |         | RpcSs            |
+----------+---------+-------+--------------+-----------------+---------+------------------+
200, OK
View Host and System Inventory
You can use the following commands to get a quick source of information for troubleshooting or when working with Illumio Customer Support. Using these commands is a quicker and less detailed alternative to running a PCE support report.
To show host inventory for the "local" node:
$ illumio-pce-env show host-inventory
To show system inventory for the PCE:
$ illumio-pce-env show system-inventory
To show host inventory for all PCE nodes and also the PCE system inventory:
$ illumio-pce-env show inventory
Use the list Option for Resources
Many resources take the list option. This section details some of its uses.
Default List of All Fields
The default list command displays all fields associated with the resource:
ilo resource list
List Only Specific Fields
With the --field option, specify the fields to display:
ilo resource list --field CSV_list_of_fieldnamesFor example, to display a list of labels with only the href, key, and value fields, use the --field option with those fields as comma-separated arguments.
Example List with Selected Fields
ilo label list --fields href,key,value
+---------------------+------+-----------------+
| Href                | Key  | Value           |
+---------------------+------+-----------------+
| /api/v2/2/labels/1  | role | Web             |
| /api/v2/2/labels/2  | role | Database        |
...
| /api/v2/2/labels/48 | loc  | Asia            |
+---------------------+------+-----------------+
Nested Resource Fields and Wildcards
Some resources have hierarchical, nested fields. For example, the workload resource includes the following hierarchy for the agent field:
agent/config/log_traffic
A field named agent
That has a field named
configThat has a field named
log_traffic
To list nested fields, separate the hierarchy of the field names with a slash to the depth of the desired field.
To see all nested fields of one of a resource's fields, use the asterisk (*) wildcard.
Examples
The following example displays all fields under the agent/config field.
Example of All Nested Fields with Wildcard (*)
ilo workload list --field agent/config/*
+-------------+------------------+-------------+
| Log Traffic | Visibility Level | Mode        |
+-------------+------------------+-------------+
| false       | flow_summary     | illuminated |
| false       | flow_summary     | idle        |
+-------------+------------------+-------------+
You can combine individual field names, nested field names, and the * wildcard.
Example: Combination of Individual fields, Nested fields, and Wildcard
ilo workload list --fields href,hostname,agent/config/*,agent/status/uid,agent/status/status
+----------------------------------------------------------+-----------------------------+-------------+-------
| Href                                                     | Hostname                    | Log Traffic | Visibility Level | Mode        | Uid                                  | Status |
+----------------------------------------------------------+-----------------------------+-------------+-------
| /api/v2/1/workloads/527b8aca-97aa-43b9-82e1-29b17a947cdd | hrm-web.webscaleone.info    | false       | flow_summary     | illuminated | 0ffd2290-e26a-4ec6-b241-9e2205c0b730 | active |
| /api/v2/1/workloads/4a8743a4-14ee-40d0-9ed2-990fe3f0ffb1 | hrm-db.webscaleone.info     | false       | flow_summary     | illuminated | 145a3cc8-01a8-4a52-97b8-74264ad690e4 | active |
+----------------------------------------------------------+-----------------------------+-------------+----
...
Linux: Save Fields for Reuse
On Linux, to easily reuse specific fields, create a display configuration file in YAML format and set the environment variable ILO_DISPLAY_CONFIG to point to that file. You no longer need to specify specific fields on the list command line.
Examples
Configure the workloads list command to display only the href, hostname, all agent configuration fields, and agent version:
Example Command to Save to List Configuration File
ilo workload list --fields href,hostname,agent/config/*,agent/status/agent_version
Add the field names to a display configuration file in the following YAML format:
Example YAML Layout of Display Configuration File
workload:
  fields:
    - href
    - hostname
  agent:
    config:
      fields:
        - '*'
    status:
      fields:
        - agent_version
Set the Linux environment variable ILO_DISPLAY_CONFIG to the path to the YAML file:
Example ILO_DISPLAY_CONFIG environment variable
$ export ILO_DISPLAY_CONFIG=~/ilo_display/display_config.yaml
List of All Workloads
To view all details for all workloads, use the following command:
ilo workload list
About the Workload UUID
To view an individual workload, you need the workload's identifier, called the UUID, or Universal Unique Identifier.
The UUID is shown in the list of all workloads described in List of All Workloads. The UUID is the last word of the value of the workload's href field, as shown in bold in the following example:
/api/v2/orgs/28/workloads/2ca0715a-b7e3-40e3-ade0-79f2c7adced0View Individual Workload
To see the details about an individual workload, use the following command:
ilo workload read -workload-id UUIDWhere:
UUID is the workload's UUID. See About the Workload UUID for information.
The details of an individual workload are grouped under major headings:
Workload > Interfaces
Workload > Labels
Workload > Services
Services > Open Service Ports
Agent > Status
Example List of Individual Workload
ilo workload read --workload-id 2ca0715a-b7e3-40e3-ade0-79f2c7adced0
+--------------------------+-----------------------------------------------------------------------------------
| Attribute                | Value
+--------------------------+-----------------------------------------------------------------------------------
|  href                    |  /orgs/1/workloads/2ca0715a-b7e3-40e3-ade0-79f2c7adced0
|  deleted                 |  false
...
Workload -> Interfaces
+------+------------------+------------+-------------------------+------------+------------+-------------------
| Name | Address          | Cidr Block | Default Gateway Address | Link State | Network Id | Network Detection Mode
+------+------------------+------------+-------------------------+------------+------------+-------------------
| eth0 | 10.0.0.16        | 8          | 10.0.0.1                | up         | 1          | single_private_brn
...
Workload -> Labels
+-------------------+
| Href              |
+-------------------+
| /orgs/1/labels/37 |
...
Workload -> Services
+-----------------+---------------------------+
| Attribute       | Value                     |
+-----------------+---------------------------+
|  uptime_seconds |  69016553                 |
...
Services -> Open Service Ports
+----------+---------+------+--------------+------+---------+------------------+
| Protocol | Address | Port | Process Name | User | Package | Win Service Name |
+----------+---------+------+--------------+------+---------+------------------+
| 17       | 0.0.0.0 | 123  | ntpd         | root |         |                  |
...
Workload -> Agent
+-----------+--------------------------------------------------------------------------------+
| Attribute | Value                                                                          |
+-----------+--------------------------------------------------------------------------------+
|  config   |  {"log_traffic"=>true, "visibility_level"=>"flow_summary", "mode"=>"enforced"} |
|  href     |  /orgs/1/agents/16                                                             |
...
Agent -> Status
+-----------------------------+---------------------------------------+
| Attribute                   | Value                                 |
+-----------------------------+---------------------------------------+
|  uid                        |  db482b06-41c6-4297-a60c-396de13576ad |
|  last_heartbeat_on          |  2016-12-07T04:07:03.756Z             |
...
200, OK
List Draft or Active Version of Rulesets
A security policy includes a ruleset, IP lists, label groups, services, and security settings. Before changes to these items take effect, the policy must be provisioned on the managed workload by setting its state to active with the CLI Tool or provisioning it with the PCE web console.
To view a ruleset and provisioning state, use the following command:
ilo rule_set list --pversion stateWhere state is one of the following values:
Draft: Any policy item that has not yet been provisioned.
Active: All policy items that have been provisioned and are enabled on workloads.
The provisioning states are listed in the Enabled column:
True: The policy is provisioned.
Empty: The policy is a draft.
Example Draft Versions of Rulesets
ilo rule_set list --pversion draft
+-------------------------------------------------+------------------------------+---------+-------------+-----
| Href                                            | Created By                   | Name    | Description | Enabled |
+-------------------------------------------------+------------------------------+---------+-------------+-----
| /api/v2/orgs/28/sec_policy/draft/rule_sets/2387 | {"href"=>"/api/v2/users/74"} | foo1    |             | true
| /api/v2/orgs/28/sec_policy/draft/rule_sets/1909 | {"href"=>"/api/v2/users/0"}  | Default |             | true    ...
200, OK
The state of the policy is stored in the agent/status/status field. See Nested Resource Fields and Wildcards for information.
Import and Export Security Policy
You can export and import security policy to and from the PCE using the CLI Tool. Importing and exporting security policy is particularly useful for moving policy from one PCE to another to avoid recreating policy from scratch on the target PCE. For example:
You can test the policy on a staging PCE and then move it to your production PCE.
You can move the policy from a proof-of-concept PCE deployment to your production PCE.
Export and Import Policy Objects
You can use the CLI Tool to export or import the following objects in the PCE:
Labels:
labelsLabel groups:
label_groupsPairing profiles:
pairing_profilesIP lists:
ip_listsServices:
servicesRulesets and rules:
rule_sets
About Exporting Rules
You can export rules for workloads, virtual services, or virtual servers.
Illumio recommends that you base your security policy rules on labels for flexibility. Do not tie the rules to specific individual workloads, virtual services, or virtual servers.
Virtual servers and virtual services are not exported.
The CLI Tool policy export does not include such references. A warning is displayed on export when you have rules tied to individual workloads, virtual services, or virtual servers. Attempts to import such rules fail, and the reason for the failure is displayed.
Example: Failed Attempt to Export Rules for Workload
WARNING: rule /orgs/1/sec_policy/active/rule_sets/3/sec_rules/39 contains non-transferrable providers: workload /orgs/1/workloads/a51ae67d-472a-44c3-984e-d518a8e95aee
Unable to proceed, please verify input
Workflow for Security Policy Export/Import
Authenticate to the source PCE.
Export the policy to a file. Syntax summary:
ilo sec_policy export --file someExportFilenameAuthenticate to the target PCE.
Import the saved policy. Syntax summary:
ilo sec_policy import --file someImportFilename
Output Options, Format, and Contents
All exported policy is written to standard output. To write to a file, use the --file option.
The exported policy is in JSON format.
By default, all supported policy objects are exported. You can export a subset of policy by specifying one or more resource types with the –resource option (labels, label_groups, pairing_profiles, ip_lists, services, or rule_sets).
When a subset of policy items is exported (such as only labels), all referenced resources are also exported.
See also About Exporting Rules for information.
Exported Rulesets
With the -- rule_set option, you can export multiple rulesets.
By default, only the most recently provisioned, active policy is exported. To export the current draft policy or a previous policy, use the -–pversion state option. See List Draft or Active Version of Rulesets for information.
For a single ruleset, make sure the --pversion state you specify matches the provisioned state of the ruleset. In the following example, the state is draft:
ilo sec_policy export --pversion draft --rule_set /orgs/1/sec_policy/draft/rule_sets/1
Effects of Policy Import
All imported policies are read from standard input unless you import from a file with the --file option.
You can import policy files multiple times. Each import affects only a single copy of a resource.
All imported policies are set in the draft provisioned state. After the import, you must explicitly provision the active state.
Non-transferrable policy rules (that is, rules tied to specific workloads, virtual servers, and bound services), the import aborts with a warning. See About Exporting Rules for information.
Policy items already on the target PCE are updated by imported resources whose names match existing resources' names. Services do not have to have the same names. Services match if they have the same set of ports and protocols.
An import does not delete resources. For example, if you export policy from PCE-1 to PCE-2, delete a resource “R” from PCE 1, and then export and import again, resource “R” is still present on PCE 2. You must explicitly delete resource “R” from PCE2.
Upload Vulnerability Data
This section describes how to use the ilo commands to upload vulnerability data to the PCE for analysis in Illumination.
After uploading the data, you can use Vulnerability Maps in the PCE web console to gain insights into the exposure of vulnerabilities and attack paths across your applications running in data centers and clouds. See the "Vulnerability Maps" topic in the Visualization Guide for information.
Add the License for Vulnerability Data Upload
An Illumio Segmentation for Data Centers Vulnerability Maps license is required to upload vulnerability data into the Illumio PCE. For information about obtaining the license, contact Illumio Customer Support.
You are provided with a license file named license.json. After you have obtained your license key, store it in a secure location.
Note
Before adding the license, you must first authenticate to the PCE.
To add the license, you must be the organization owner or a be a user who has owner privileges.
Use the following command to inform the PCE of your valid license:
ilo license create --license-file "path_to_license_file/license.json" --feature "feature_name" [debug [v | verbose] trace]
Where:
What | Required? | Description |
|---|---|---|
| Yes | The quoted path to the Example: |
| Yes | The quoted string |
| No | Enable debugging |
| No | For verbose logging |
| No | Enable API trace |
Vulnerability Data Upload Process
On upload, the CLI Tool associates a workload's IP addresses with corresponding vulnerabilities identified for that workload.
Using API to Download Vulnerability Data
Starting from the release of CLI 1.4.0, Qualys supports API downloads with some minor differences in options.
For the release CLI 1.4.1, it is suggested that users use an API key instead of a login session while using Qualys API download.
For the release CLI 1.4.2 for Tenable, the most reliable way to provide authentication is through API keys instead of username/password. If customers observe any authentication issues while using Tenable SC API upload, they are advised to use API keys.
There are 2 ENV variables to set up the Tenable SC API keys which are used for authentication:
TSC_ACCESS_KEY
TSC_SECRET_KEY
The API connects directly to the cloud instance of Tenable or Qualys and the vulnerability tool then scans new vulnerabilities and downloads them into the PCE.
Users can also set up cron jobs that run in the desired intervals and check the state of the vulnerability scanner.
Qualys and Tenable scanners work in a similar way, using the username and password and similar options.
Automating Vulnerability Imports from Tenable-SC
Users of Illumio vulnerability maps can automate the import of vulnerabilities from tenable-sc using a script.
Illumio CLI supports the API username and password as environment variables or a cmd line switch (such as --api-password).
The ILO-CLI tool was updated to add a switch for --api-user.
Kinds of Vulnerability Data Uploads
There are two kinds of upload: non-authoritative and authoritative.
Non-authoritative: This is the default. A non-authoritative upload:
Appends incoming data to any previously loaded records
Accumulates records for the same workloads without regard to duplicates.
You can repeat the non-authoritative upload as many times as you like until you are satisfied with the results.
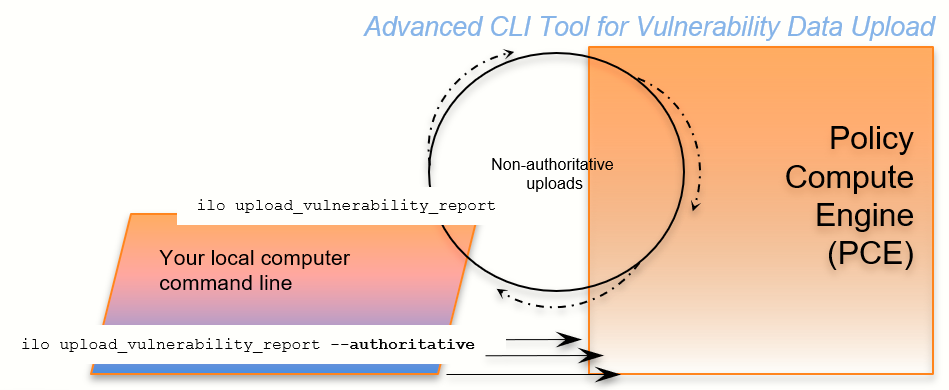
Authoritative: You indicate authoritative data with the -authoritative option. An authoritative upload:
Overwrites any previously uploaded records for workloads matched to the incoming records.
Eliminates duplicate records.
Adds new records not previously written by other uploads.
You can repeat the authoritative upload as many times as you like until you are satisfied with the results.
After either kind of upload, you can examine the uploaded data with the CLI Tool or the PCE web console. See “Vulnerability Maps” in the Visualization Guide for information.
Supported Vulnerability Data Sources
The CLI Tool works with vulnerability data from the following sources.
Nessus Professional™
Qualys®
Tenable Security Center
Tenable.io
Rapid7©
Note
Before uploading Rapid7 data to the PCE, export the data from Rapid7 to Qualys format with Qualys XML Export.
Vulnerability Data Formats
In the CLI 1.4.0, 1.4.1 and 1.4.2 releases, Illumio supports the following report formats:
For tenable-io: API, CSV
For tenable-sc: API, CSV
For nessus-pro: XML
For qualys: API, XML
Common Vulnerabilities and Exposures (CVE)
Vulnerabilities are defined by Common Vulnerabilities and Exposures (CVE), with identifiers and descriptive names from the U.S. Department of Homeland Security National Cybersecurity Center.
Vulnerability Scores
Illumio computes a vulnerability score, which measures the vulnerability of your entire organization. The score is displayed by the ilo vulnerability list command for all vulnerabilities or individual vulnerabilities via the vulnerability identifier.
Vulnerability Identifier
An uploaded vulnerability has an identifier, as shown in the example below. The vulnerability identifier is tied to a specific CVE. You use this identifier with --reference-id option to examine specific uploaded vulnerabilities. See Example – List Single Uploaded Vulnerability for information.
The following are examples of vulnerability identifiers.
Nessus Professional: nessus-65432
Qualys: qualys-23456
Rapid7: qualys-98765. Because Rapid7 data is first exported from Rapid7 in Qualys format, it is given a Qualys identifier when uploaded to the PCE.
Vulnerabilities for Unmanaged Workloads
You can upload vulnerabilities for unmanaged workloads. However, unmanaged workloads do not have any vulnerability score or associated CVE. This information becomes available if the unmanaged workload is later changed to managed.
Prerequisites for Vulnerability Data Upload
Before uploading vulnerability data, ensure you are ready with the following requirements.
An Illumio Vulnerability Maps license is required to upload vulnerability data to the PCE. See Add the License for Vulnerability Data Upload for information.
XML-formatted vulnerability data files from one of the supported sources.
Authenticated CLI-tool access to the target PCE.
Authenticated access and necessary permissions in the PCE web console for working with vulnerability maps.
Vulnerability Data Upload CLI Tool Syntax
The key argument and options for uploading vulnerability data are as follows. For readability, this syntax is broken across several lines.
ilo upload_vulnerability_report
--input-file path_to_datafile.xml [path_to_datafile.xml]...
--source-scanner [nessus-pro|qualys|tenable-sc|tenable-io]
--format xml
[--authoritative]
[ --api-user ApiServerUserName --api-server SourceApiServer:port ]
Where:
What | Required | Description |
|---|---|---|
NoteThis is available in CLI Tool 1.4.4. | No | Use this to enable the proxy between tenable and CLI. Use this command to enable the proxy:
Use this command if you do not want to enable the proxy:
|
| Yes | Location of one or more data files to upload. The path to the data file can be either an absolute path or a relative path. If more than one data file is listed (bulk upload), separate the file names with space characters. |
| No | Enable debugging |
| No | For uploading authoritative vulnerability data. The default command is without the |
| No | DEBUGGING ONLY: Workload Cache file - use this if available |
| Yes | Indicates the source of the scan. Note for rapid data:
|
| Yes | Report format. Allowed values are:
See also |
| Yes for Tenable with | API server FQDN. Allowed formats are |
| Yes for source API server authentication | The user name for authenticating to the SourceApiServer. You are always prompted to enter your password. |
| Yes for Qualys and Tenable | Appropriate page size if API supports pagination. The default page is 1000. |
| Yes for Qualys and Tenable | Disable certificate verification for API. |
| Yes only for Tenable io | Tenable IO deployment is on-premise. |
| Yes only for Tenable sc | Tenable SC input is exported from the mitigated vulnerabilities analysis view. |
| Yes for Qualys | Qualys users can select scan data to process after a specific date, in ISO 8601 format. When the optional |
| No | Qualys API users can select vulnerabilities with defined severity levels to include in their reports. Users can filter based on severity and avoid severity levels 1 and 2, which are often very informational and noisy. Example: For Windows, be sure to include quotes around the severity levels: Example: NOTE: This option was added in Release 1.4.1 |
| No | Verbose logging mode |
| No | Enable API trace mode. |
Using the ILO Command with Windows Systems
Windows systems take up to four options with the ILO command for the vulnerability data upload. Users who choose to use more optional parameters must set api-server, username, and password as the environmental variables to use other options in the command.
Work with Vulnerability Maps in Illumination
See "Vulnerability Maps" in Visualization Guide for information.
Vulnerability Data Examples
Example – Upload Non-Authoritative Vulnerability Data
In this example, the --source-scanner nessus-pro option indicates that the data comes from Nessus Professional. On Windows, provide the absolute path to the data file. This Windows example is broken across several lines with the PowerShell line continuation character (`).
C:\Users\donald.knuth> ilo upload_vulnerability_report `
--input-file C:\Users\donald.knuth\Desktop\vuln_reports\nessus3.xml `
--source-scanner nessus-pro --format xml

Elapsed Time [0.05 (total : 0.05)] - Data parsing is done.
Elapsed Time [1.08 (total : 1.13)] - Got workloads. Workload count: 5.
Elapsed Time [0.0 (total : 1.13)] - Built workload interface mapping. Total interfaces : 11.
Elapsed Time [4.57 (total : 5.7)] - Imported Vulnerabilities..
Elapsed Time [0.0 (total : 5.7)] - Detected Vulnerabilities are associated with vulnerability and workload data..
Elapsed Time [0.83 (total : 6.53)] - Report Imported.

Summary:
Processed the report with the following details :
Report meta data =>
Name          : Generic
Report Type   : nessus
Authoritative : false
Scanned IPs   : ["10.1.0.74", "10.1.0.223", "10.1.0.232", "10.1.0.221", "10.1.0.11", "10.1.0.82", "10.1.0.43", "10.1.0.91", "10.1.0.8", "10.1.1.250"]

Stats :
   Number of vulnerabilities           => 19
   Number of detected vulnerabilities  => 31

Done.
Example – Upload of Rapid7 Vulnerability Data
The syntax for uploading vulnerability data from Rapid7 is identical to the syntax for uploading vulnerability data from Qualys. On Windows, you use the --format qualys option and the absolute path to the data file. This Windows example is broken across several lines with the PowerShell line continuation character (`).
Rapid7 data exported in Qualys format.
Before uploading to the PCE, Rapid7 vulnerability data must have been exported in Qualys format from Rapid7 with Qualys XML Export.
C:\Users\edward.teller> ilo upload_vulnerability_report `
--input-file C:\Users\edward.teller\Desktop\vuln_reports\rapid7.xml `
--source-scanner qualys --format xml
...
Done.
Example – Upload Authoritative Vulnerability Data
In this example, the prompt shows this is an authoritative upload.
To proceed, you must enter the word YES in all capital letters.
C:\Users\jrobert.oppenheimer> ilo upload_vulnerability_report --input-file dataDir/authoritativedata.xml --authoritative --source-scanner qualys --format xml

Using /home/centos/.rvm/gems/ruby-2.4.1
Authoritative scan overwites the previous entries for all the ips within this scan. There is no ROLLBACK
Are you sure this is an authoritative scan? (YES | NO)
YES
Elapsed Time [11.86 (total : 11.86] - Data parsing is done.
Elapsed Time [0.27 (total : 12.13] - Got workloads. Workload count: 3.
Elapsed Time [0.0 (total : 12.13] - Built workload interface mapping. Total interfaces : 6.
Elapsed Time [3.02 (total : 15.15] - Imported Vulnerabilities..
Elapsed Time [0.0 (total : 15.15] - Detected Vulnerabilities are associated with vulnerability and workload data..
Elapsed Time [0.84 (total : 16.0] - Report Imported.
Summary:
Processed the report with the following stats -
    Number of vulnerabilities           => 14
    Number of detected vulnerabilities  => 48
Done.
Example – List Single Uploaded Vulnerability
This example uses a single Qualys vulnerability identifier to show the associated vulnerability. The value passed to the --reference-id option is shown as qualys-38173. See Vulnerability Identifier for information.
$ ilo vulnerability read --xorg-id=1 --reference-id=qualys-38173
...

| Attribute | Value |
+-------------+----------------------------------------------------------------+
| href | /orgs/1/vulnerabilities/qualys-38173 |
| name | SSL Certificate - Signature Verification Failed Vulnerability
| score | 39 |
| cve_ids | [] |
| created_at | 2018-11-05T18:16:56.846Z |
...
Example – List All Uploaded Vulnerabilities
This example highlights the vulnerability identifier, the CVE identifiers, and the description of the CVE. See Common Vulnerabilities and Exposures (CVE) and Vulnerability Identifier for information. The layout of the output is the same for all supported vulnerability data sources.
Nessus Professional
C:\Users\werner.heisenberg> ilo vulnerability list --xorg-id=1
...
| Href | Name | Score | Description | Cve Ids | Created At | Updated At | Created By | Updated By |
---------------------+--------------------------+----------------------+-----------------------+
| /orgs/1/vulnerabilities/nessus-18405 | Microsoft Windows Remote Desktop Protocol Server Man-in-the-Middle Weakness | 51    |             | ["CVE-2005-1794"]                  | 2018-11-07T03:15:39.410Z | 2018-11-07T03:15:39.410Z | {"href"=>"/users/1"} | {"href"=>"/users/1"} |
...
Qualys
C:\Users\isaac.newton> ilo vulnerability list --xorg-id=1
...
| Href | Name | Score | Description | Cve Ids | Created At | Updated At | Created By | Updated By |
---------------------+--------------------------+----------------------+-----------------------+
| /orgs/1/vulnerabilities/qualys-38657 | Birthday attacks against TLS ciphers with 64bit block size vulnerability (Sweet32) | 69 | | ["CVE-2016-2183"] | 2018-07-27T18:16:57.166Z | 2018-08-08T22:30:32.421Z | {"href"=>"/users/1"} | {"href"=>"/users/16"} |
...
Rapid7
Because Rapid7 vulnerability data must be in Qualys format before upload, the output is the same as for Qualys data, including the vulnerability identifier (qualys-38657 in the example above) and CVE. See Common Vulnerabilities and Exposures (CVE) and Vulnerability Identifier for information.
Example – View Vulnerability Report
The Report Type column identifies the source of the scan; in this example, Qualys.
C:\Users\gracemurry.hopper> ilo vulnerability_report list --xorg-id=1
...
| Href | Report Type | Name | Created At | Updated At | Num Vulnerabilities | Created By | Updated By |
+-----------------------------------------------------+-------------+----------------------+--------------------------+----------------------
| /orgs/1/vulnerability_reports/scan_1502310096_09344 | qualys  | NewAuthoritativeScan | 2018-08-08T22:30:34.877Z | 2018-08-08T22:30:34.877Z | 62 | {"href"=>"/users/16"} | {"href"=>"/users/16"} |
...
Example - Upload a Qualys Report Using API
upload_vulnerability_report --source-scanner  qualys --format api
--api-server qualysguard.qg3.apps.qualys.com  --api-user um3sg
--scanned-after 2021-09-20