Onboarding Illumio Console and Setting Up Passkeys
The topics in this section describe how to onboard Illumio Console from Illumio.com, AWS Marketplace, and Azure Marketplace.
Important
Passkeys are only supported for new users. You cannot enable passkey support for existing Illumio accounts. This feature will be available for existing users in an upcoming release.
Requirements for Implementing Passkeys
The following topics describe the supported browsers, operating systems, and authentication types that are supported for passkey authentication.
Supported Browsers for Passkeys
The following browsers provide the Passkeys API interface:
Chrome 108+ and Chromium-based browsers with the corresponding version, such as Microsoft Edge, Opera, Brave, and so forth
Safari 16.1+
Firefox 122+
Note
Your operating-system settings and security controls also define the support for passkeys.
Supported Operating Systems
macOS: macOS Ventura (13.0) and later
Windows: Windows 10 (version 22H2) and later
Android: Android 9 and later
iOS: iOs 16 and later
Supported Authentication Types
iCloud Keychain
Touch ID
Face ID
Google Password Manager
Windows Hello (PIN, fingerprint, facial recognition)
Edge Profile
QR Code flow supported with the "Use your phone or tablet" (for Android and iPhone)
Security Key (such as YubiKey)
This topic describes how to onboard Illumio Console from the AWS Marketplace.
Before You Begin
Make sure that you have the following before you onboard:
Permissions to subscribe to Illumio Breach Containment Plaform from AWS Marketplace. See AWS Marketplace Manage Subscriptions.
IAM permissions to onboard AWS accounts. See Permissions for Onboarding AWS.
Onboarding Illumio Console from AWS Marketplace
Within Amazon Console, navigate to AWS Marketplace, click Discover products, and search for Illumio Breach Containment Platform.
On the Illumio Breach Containment Platform page, click View purchase options.
Select the appropriate options for Contract configuration and Pricing details.
On the Subscribe to... page, click the vendor's website link under Offer details.
In the AWS Marketplace sign up pane, enter your information and click Continue.
Illumio creates your tenant and validates your Insights subscription with AWS. Do not close the browser window during this process.
Click Continue in the Account Configured Successfully pane.
Click Create a Passkey in the Create a Passkey pane.
If you would prefer to use a password, click Create a password instead link. Illumio will create an account and you will receive an email with instructions about how to set up your password.
Onboarding Illumio Console from Azure Marketplace
This topic describes how to onboard Illumio Console from AWS Marketplace and how to set up passkeys.
Before You Begin in Azure Marketplace
Make sure that you have the following before you onboard:
Have the Billing Account/Profile Owner or contributor role for your cloud account to subscribe to Illumio Console?
Have Owner or Administrator privileges to onboard your Cloud resources to Illumio Console?
Onboarding Illumio Console from Azure Marketplace
Within Azure Marketplace, search for Illumio Platform.
Click Get it now in the Illumio Platform Breach Containment tile.
Grant Microsoft the permission to use or share your account information and consent to their terms, and click Continue.
Click Subscribe on the Illumio Breach Containment Platform page.
On the Subscribe to... page, under Project details, click the Create new link under the Resource group field to create a new resource group. A resource group is a container that holds related resources for an Azure solution.
Under SaaS details, enter a name for your Illumio instance.
Select the Plan, Contract duration, and Auto renew options and then click Review and Subscribe.
On the Subscription progress page, click Configure account now. You will be directed to a page from a third-party application, Ibex Labs.
Fill out the form and click Submit.
You will receive an email from Azure Marketplace.
Within the email from Microsoft Azure, click Configure account.
Setting Up Your Free Trial of Illumio Console for AWS
Start your free trial from the Free Trial Insights page.
Log into Illumio Console, navigate to Cloud > Onboarding, and click + Add AWS.
Fill in the required fields and click Next.
Set up a service account and click Next.
Click Save and Confirm.
After you have added your AWS account, navigate to Onboarding and click Flow Log Access.
Select your service account, enter the service account token, and click Done.
Setting Up Your Free Trial of Illumio Console for Azure
Start your free trial from the Free Trial Insights page.
Log into Illumio Console, navigate to Cloud > Onboarding, and click + Add Azure.
Select Easy onboarding and click Continue.
Click Log in with Azure to connect your Azure cloud resources.
Log in with Azure and Review Your Permissions
Sign into your Azure account with your Azure credentials.
On the Permissions Requested pane, click Consent on behalf of your organization, and click Accept. This allows the Illumio application's Service Principal to gain just-in-time access privileges as the user who is logging in.
API Name
Claim Value
Permission
Azure Resource Manager
user_impersonation
Access Azure Resource Manager as organization users
Microsoft Graph
offline_access
Maintain access to data you have given Illumio access to
Microsoft Graph
openid
Sign users in
Microsoft Graph
profile
View a user's basic profile
Microsoft Graph
User.Read
Sign in and read a user profile
In the Finish Your Azure integration pane, under Integration Scope, select a tenant or subscription to onboard. You can select multiple subscriptions from the Subscriptions drop-down list.
Check the Enable VNET Flow Logs check box.
Select Read or Write permissions.
(Optional): Configure tags and centralize flow storage. Click View More Settings (Optional) in the Enable VNET Flow Logs pane.
Configure tags for new flow logs and storage accounts. Adding tags helps you meet compliance requirements and enhances searches for new resources. To add a tag, click + Add Tag, enter values in the Tag Key and Tag Value fields, and click Apply Changes. You can create multiple tags for resources.
See Use tags to organize your Azure resources and management hierarchy.
To centralize flow logs, click the Centralize Flow Logs tab, select the subscription where you want to centralize your flow logs, and click Apply Changes.
Click Confirm and Continue.
Permission Type
Permission Name
Notes
Read
Reader-role (Azure-owned role)
This role gives Illumio Console permission to read data or resources from your subscription or tenant. This role allows the viewing of all resources but does not allow modification.
Write
Illumio Network Security Administration (Illumio-created custom role)
Allows Illumio to manage Network Security Groups and Azure Firewalls in your Azure environment.
Flow
Storage blob data reader
Allows Illumio to read the contents of storage accounts in your Azure environment.
Set Up Flow Log Access
Within Illumio Console, navigate to Onboarding and click Flow Log Access.
Select the Azure account to grant access to and click Grant Access.
Select your service account, provide the service account token, and click Done.
Reinviting Users to Illumio Console
Important
Note the following:
You must have Owner privileges to be able to reinvite users to Illumio Console.
This feature is available only for users who have not activated their accounts.
Within the Console application, navigate to Access > Users and search for the user name.
Click the Re-Invite button and then click Re-Invite User in the confirmation dialog box.
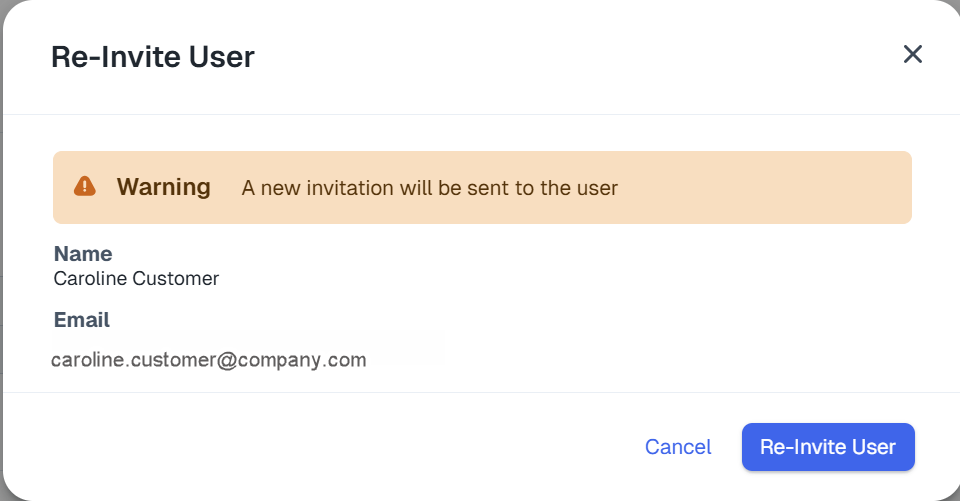
The user will receive an email to reinvite them to Illumio Console.
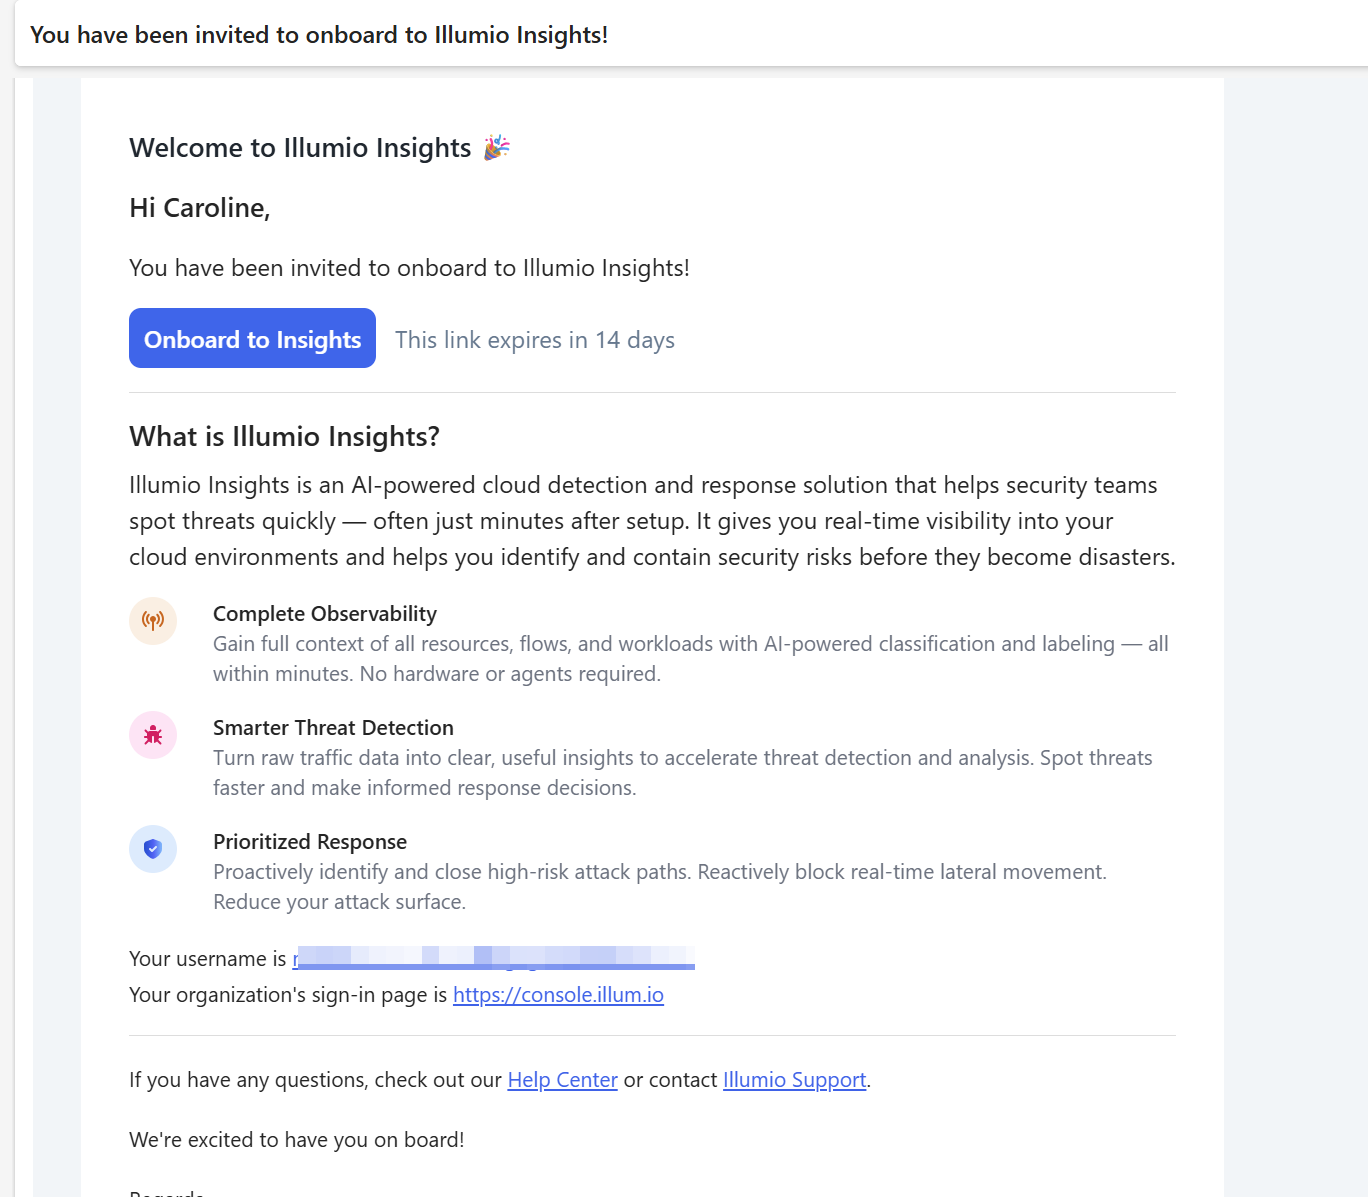
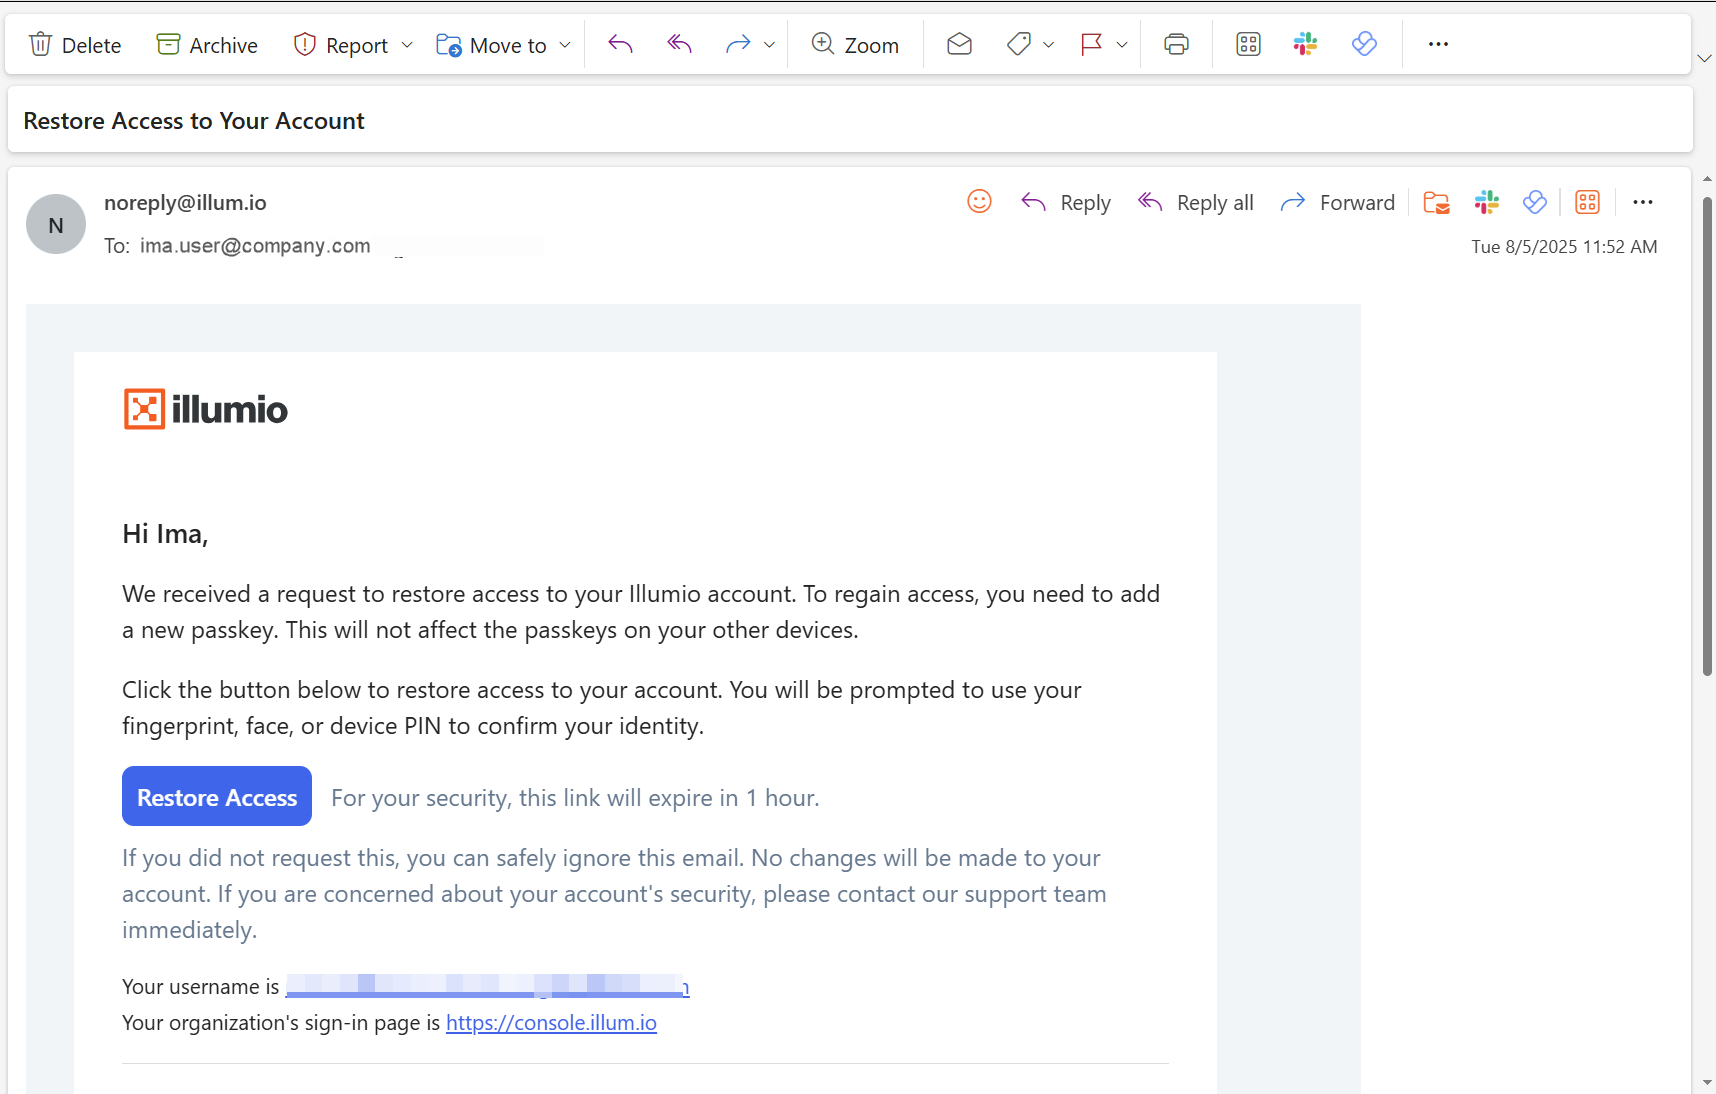
Restoring User Access to Illumio Console
To enable a user to recover their access to Illumio Console, use the Restore Access button.
Note
You must have the Owner role in Illumio Console to be able to restore user access.
Within Illumio Console, navigate to Access > Users and search for the user whose access you want to restore.
Click Restore Access and then click Send Email in the Restore Access confirmation dialog box.

The user will receive an email like the following:
Troubleshooting Passkeys
The following topics describe how to troubleshoot issues related to creating passkeys.
Creating a Passkey Fails
If creating a passkey fails, the following pane will display:
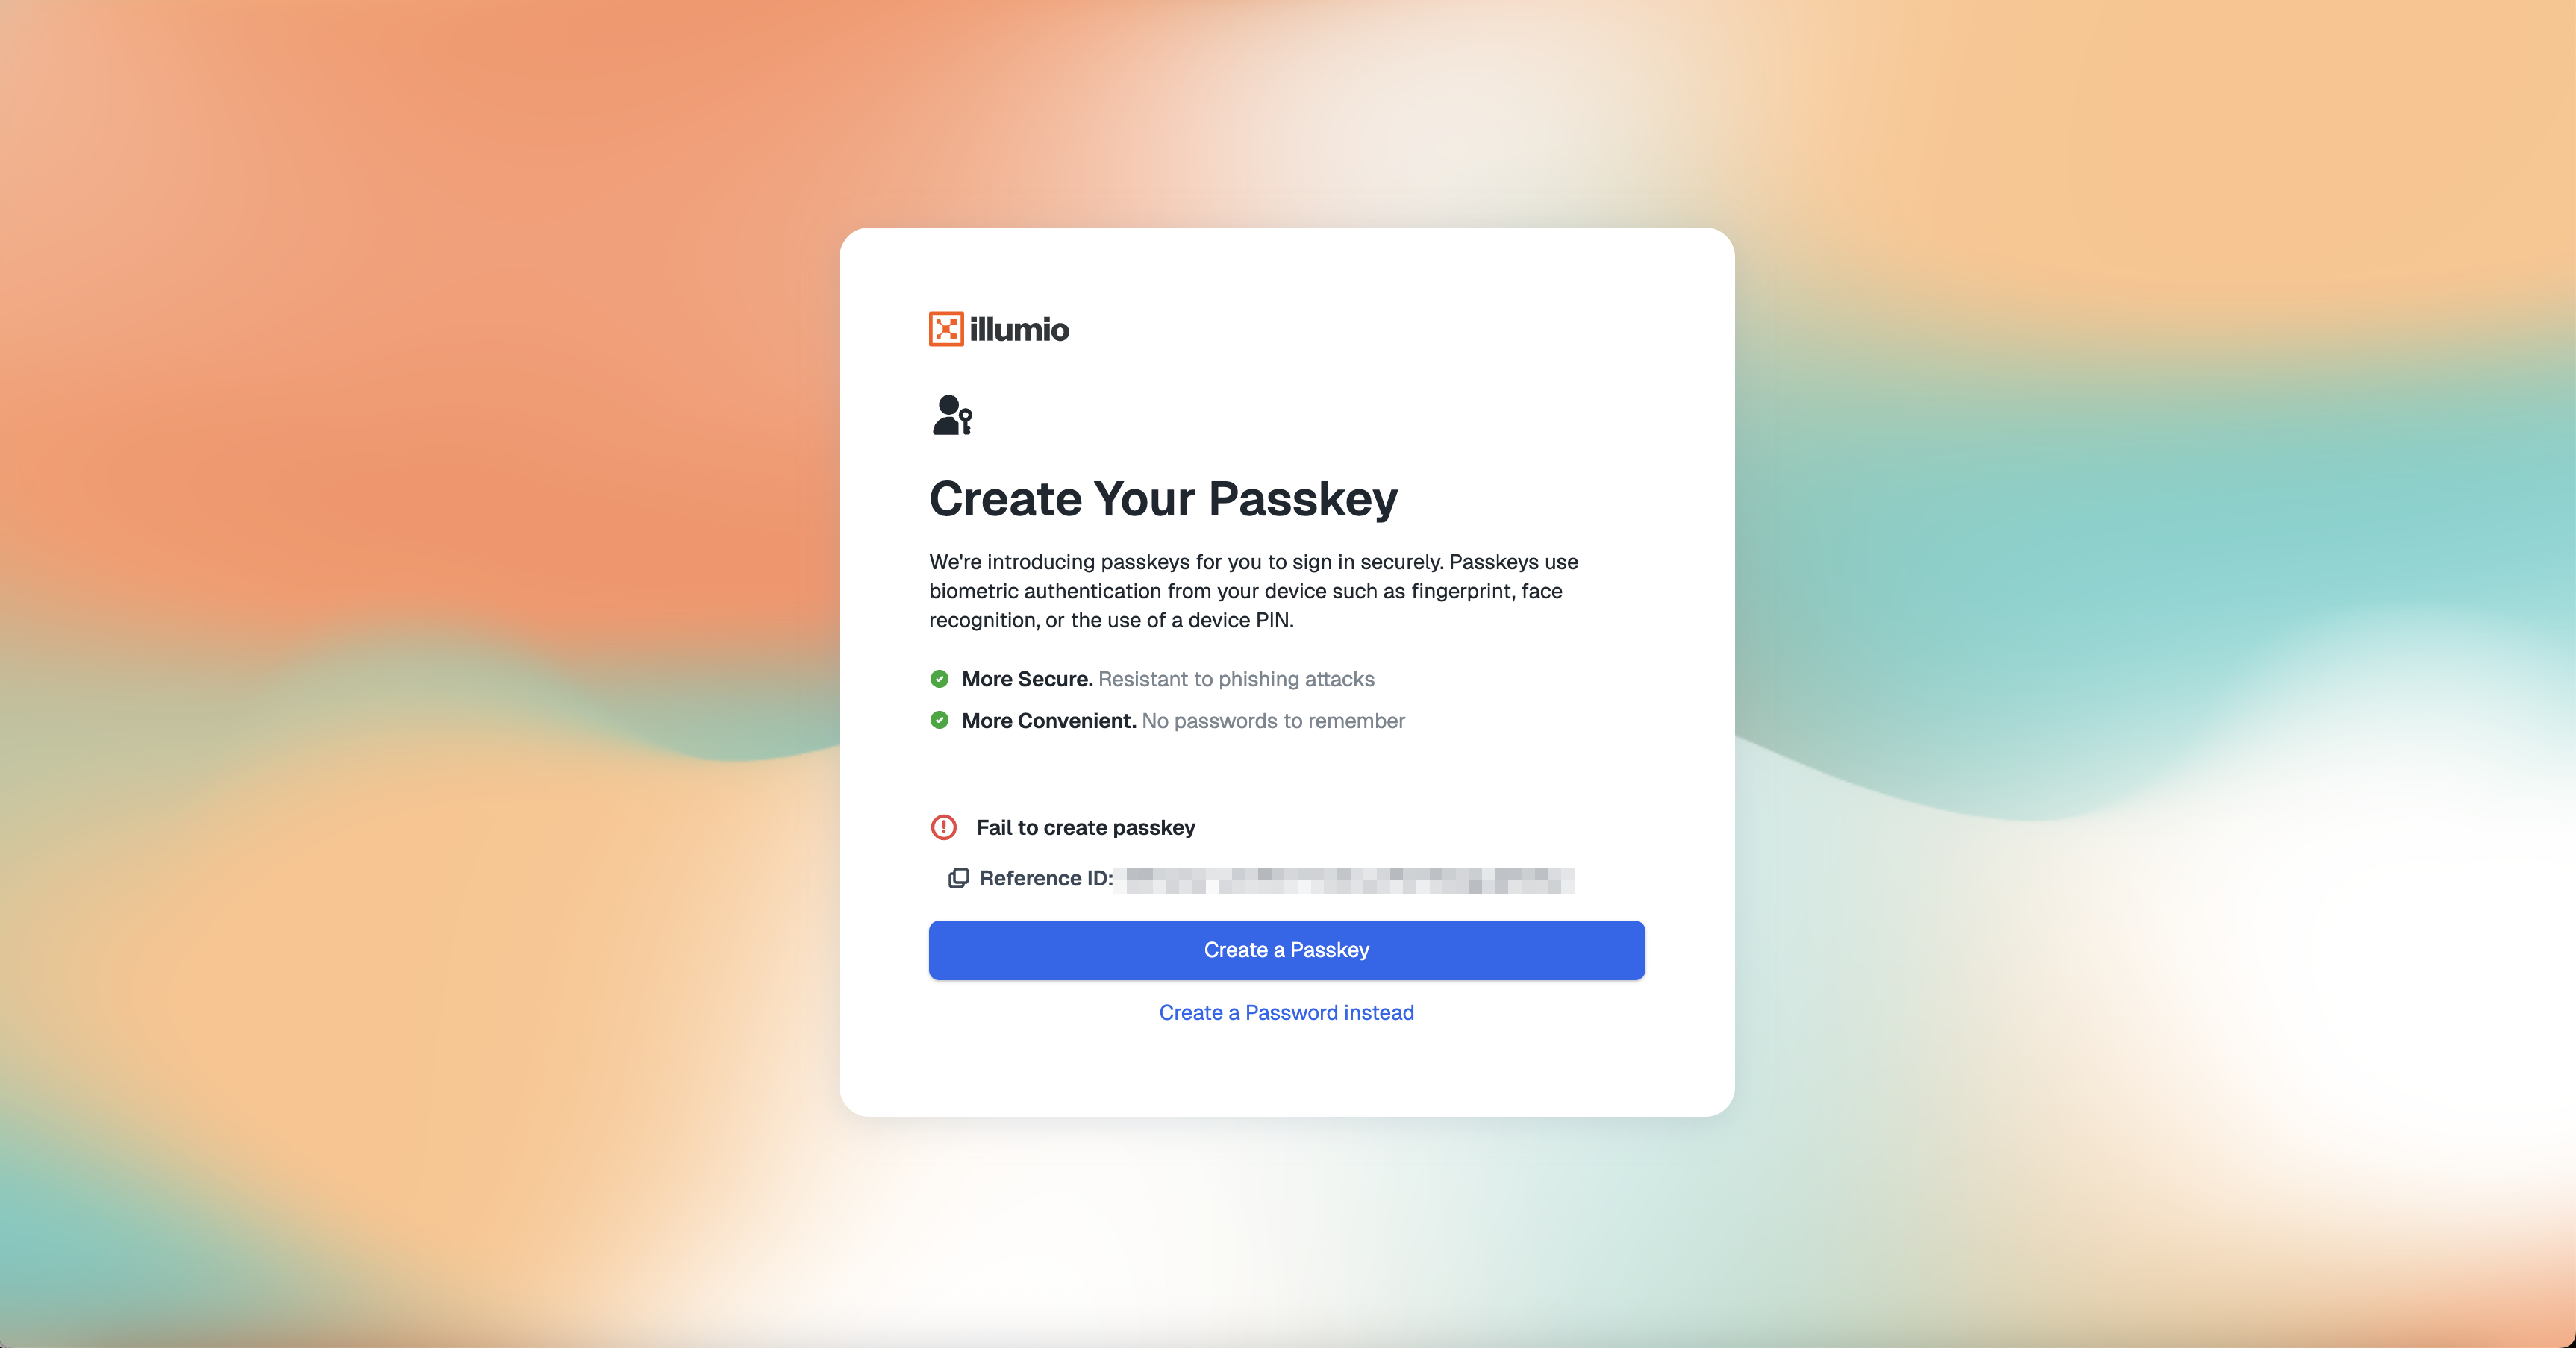
After you click Create a Password instead, you will receive an email with instructions for setting your password.
Windows Hello Is Disabled
Windows provides biometric options to secure user passkeys on their devices. However, either the user or corporate security rules can disable these options in the OS settings.
Windows Hello is the default option and the most integrated method for using passkeys on Windows devices, but it is not required to use a web browser. You can authenticate with passkeys using other methods that do not use Windows Hello's biometrics or PIN verification.
If Windows Hello is not configured, no authentication device is working, and there is no external security key such as YubiKey available, you may not be able to configure a passkey. In this case, you need to use the fallback password option.
Use the following procedure to configure Windows Hello:
On your Windows machine, navigate to Settings and click Accounts.
Click Sign-In Options:
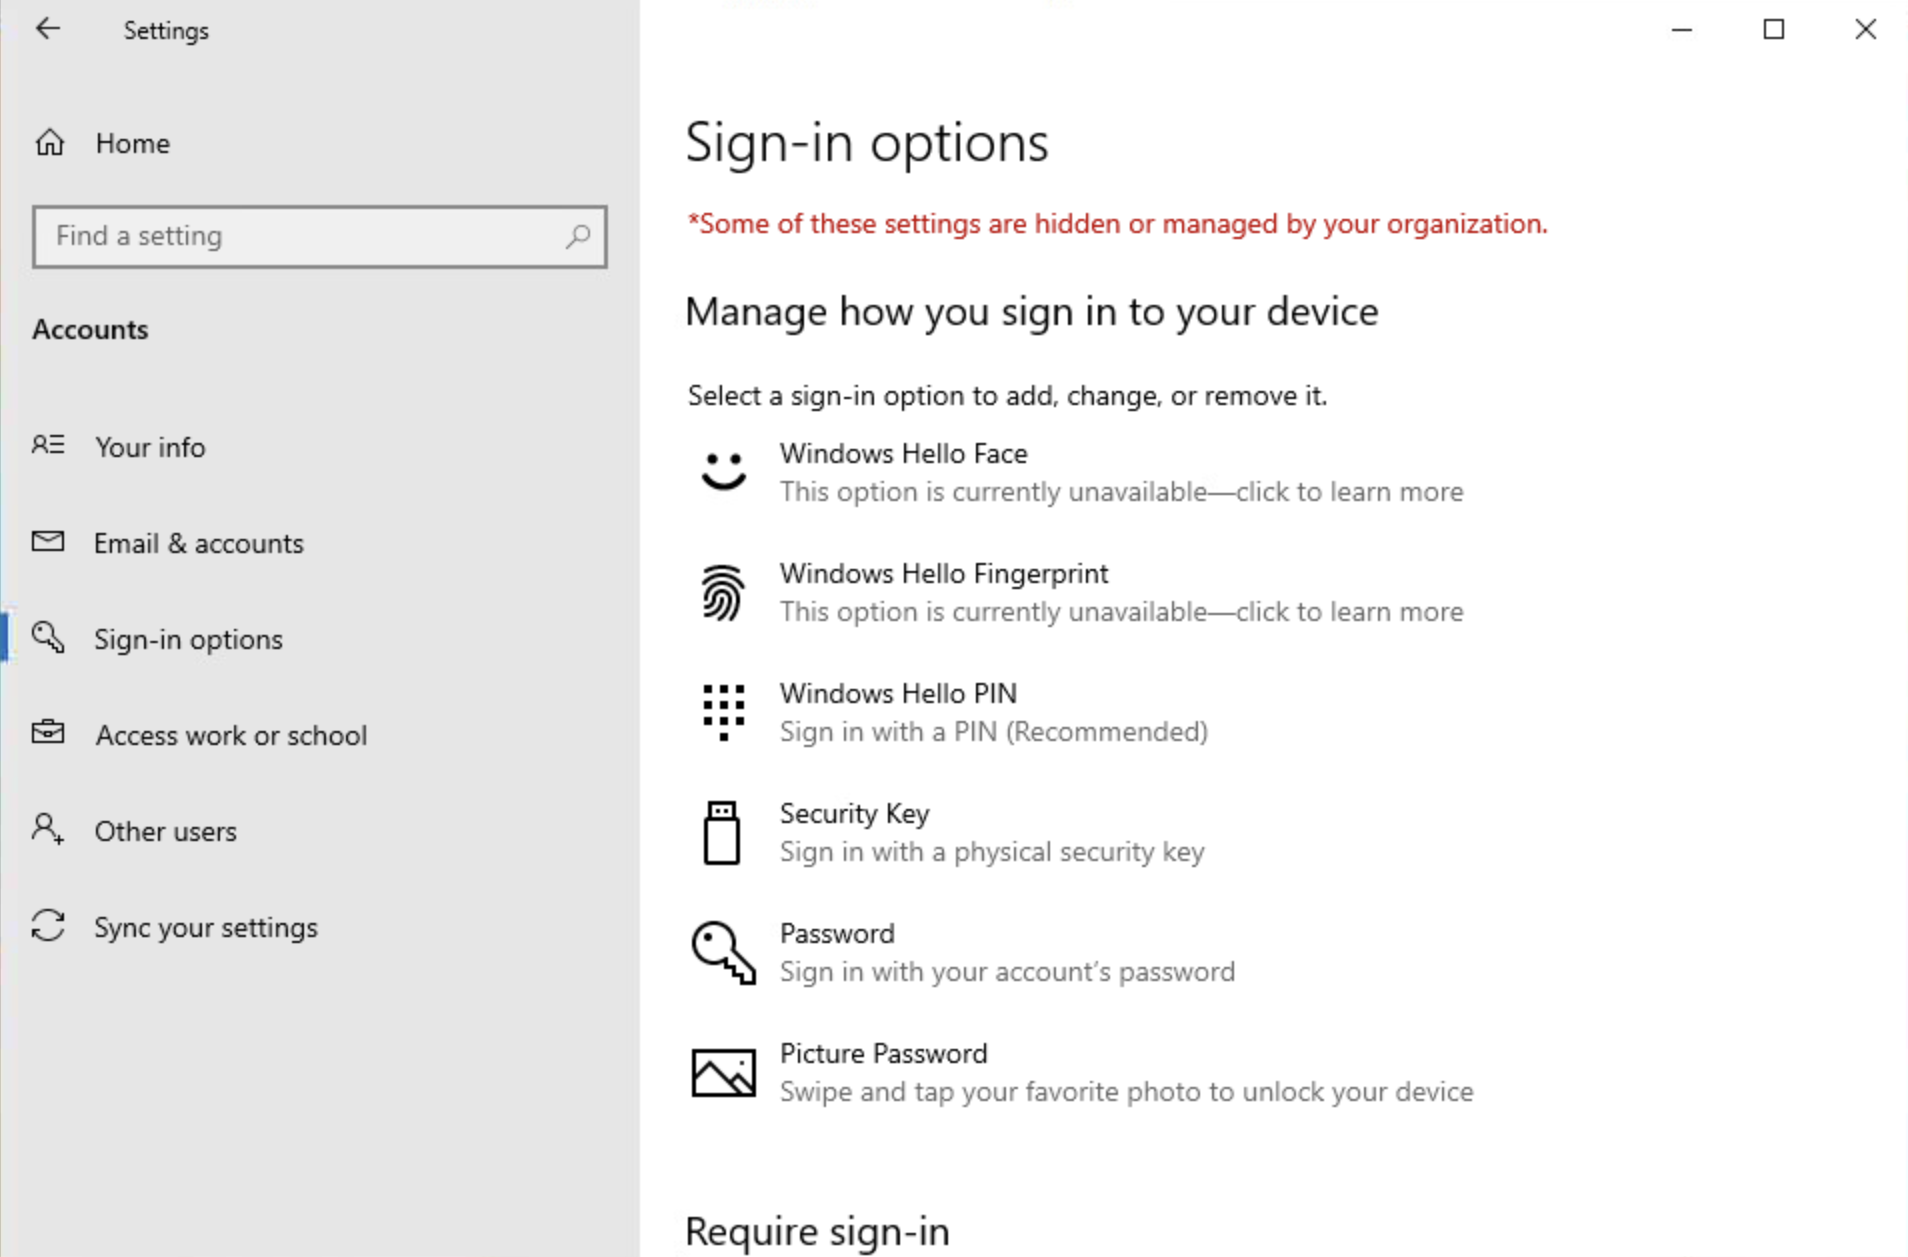
Select a sign-in option from the list displayed.
After you complete these steps, you should be able to create a passkey in Illumio Console using the sign-in option that you selected.
Biometrics Options Unavailable on Remote Desktop
If you are using Remote Desktop, you may not be able to select biometric options when you are trying to create a passkey.
My Passkey Isn't Available on My Other Device
For passkeys to sync, you must be signed into the same account on both authentication devices.
If you are using an Apple device, check that you are signed in with the same Apple ID on your iPhone and your Mac and that the Password App (formerly called iCloud Keychain) is enabled for both.
If you are using a Google or Android device, check that you are signed into the same Google Account on both devices and that sync is enabled.
Note
Passkeys that are stored in Windows Hello or a specific browser profile will not sync to other devices.
Logging In on a Different Computer
Use the QR code method to log in on a public computer.
On the login page, enter your email.
When the passkey prompt appears, look for an option like "Use a different device" or "Use phone or tablet".
A QR code will display on the screen.
Scan the QR code with your personal phone that is synced with the device account where you created your passkey, like Apple ID or Google Account (as documented in My Passkey Isn't Available on My Other Device.
Approve the sign-in request on your phone using your Face ID, fingerprint, or PIN.
You will be logged into the computer and your passkey will remain on your phone.