Define a deployment
For an explanation of how Illumio Segmentation for the Cloud uses deployments and why they are helpful despite not being required, see Deployments and Applications
Prerequisites
Before you define a deployment, you must have onboarded one or more public cloud accounts and give Illumio Segmentation for the Cloud time to synchronize with them so that you can configure the correct boundaries for the deployment.
See Onboarding AWS Cloud.
See Onboarding Azure.
See Onboarding OCI.
Before defining a deployment, review your Inventory and Map topology to understand how your cloud resources are used and how they are communicating.
See Cloud Map Overview and Inventory.
Define a Deployment (Optional)
Select Application Discovery > Application Definitions.
If necessary, select the Deployments tab.
If you haven't defined any cloud deployments, the page contains a button to add your first deployment.
Click Add.
From the Environment field, select an existing label or create a new one.
By default, Illumio Segmentation for the Cloud includes Environment labels for “Production,” “Staging,” and “Development.” If you select a label that already has a deployment defined for it, Illumio Segmentation for the Cloud displays a message that the selected label is already assigned to a deployment. Click the red X at the end of the field to clear the value.
To create a new Environment label, simply type the name in the field and select it from the drop-down list when it appears.
(Optional) Provide a description so that other members of your organization understand how you define the deployment's boundaries.
Click Add to open the resource type drop-down menu and define the deployment scope.
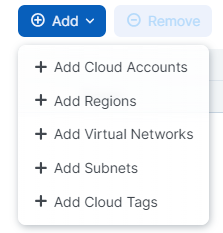
When you select an item from the resource drop-down menu, the Add Deployment Stacks dialog box opens.
In the Includes field, select the resource to use from the pre-populated drop-down list. The list includes resources that Cloud discovered after you onboarded your cloud accounts.
You can select multiple resources of that type. Click Add. Those resources are added to the list under the Deployment Stack.
You can continue defining the deployment stack with other resource types by selecting from the Add drop-down list, then selecting the specific resources. The types of resources you've already included are unavailable in the list. For example, if you already created a row for subnets and specified several, the subnets type is grayed out in the list.
Click Save.
The new deployment appears in your list of deployments.
Edit a Deployment
Select Application Discovery > Application Definitions.
If necessary, select the Deployments tab.
If you have defined any cloud deployments and wish to modify one, select it.
Click Edit.
The Deployment Edit page appears.
From the Environment field, select an existing label or create a new one.
By default, Cloud includes Environment labels for “Production,” “Staging,” and “Development.” If you select a label that already has a deployment, Cloud displays a message indicating that the selected label is already assigned to a deployment. Click the red X at the end of the field to clear the value.
To create a new Environment label, simply type the name in the field and select it from the drop-down list when it appears.
To change the resource types used to define the deployment scope, click Add to open the Deployment Stack resource drop-down menu.
When you select an item from the resource drop-down menu, the Add Deployment Stacks dialog box opens.
To change the resource being used, select the Includes field to open the pre-populated drop-down list. The list includes resources that Cloud discovered after you onboarded your cloud accounts.
You can select multiple resources of that type. When finished adding resources, click Add.
The dialog box closes, and those resources are added to the list under the Deployment Stack.
You can continue editing the deployment stack with other resource types by selecting from the Add drop-down list, then selecting the specific resources.
The types of resources you've already included are unavailable in the list. For example, if you already created a row for subnets and specified several, the subnets type is grayed out in the list.
Click Save.
Delete a Deployment
Important
Before you can delete a deployment, you must ensure that none of your application definitions are running in that deployment. Cloud won't let you delete a deployment that is in use by any ruleset. (Each deployed application features a ruleset).
Select Application Discovery > Application Definitions.
The Application Definitions page appears, and the Application Definitions tab is selected.
Select the Deployments tab.
Select the deployment you want to delete, then click Remove.
You can remove multiple deployments.
Verify that you are deleting the correct deployment and click Remove.
Note
Illumio supports deployment creation including using GCP labels.
Illumio recognizes GCP labels under Illumio cloud tags. This means that when you use the tag-to-label mapping feature for GCP, cloud tags appear in the dropdown menu with the relevant prefix that indicates it is a GCP tag or label. For example, cloud tags for GCP may have values such as label/gcp-key:gcp-value.
Illumio supports GCP resource manager tags and labels at this time. Because GCP label values are optional, you may occasionally see empty tag values.
Define an Application
After you've defined your deployments, you can create any application definitions that rely on them. You do not need a deployment defined to define an application.