Inventory
Search and browse all resources onboarded by Illumio Segmentation for the Cloud in its Inventory page.
This topic describes the Illumio Segmentation for the Cloud Inventory feature, and provides a general example of how you would use it. For instructions on how to use the search function in the Inventory page, see the pop-ups in the GUI.
For information about the Inventory Details pages for your resources, see Inventory Details.

Supported Resource Types
See Illumio visibility for resource types.
For a list of resources against which you can write policy, see Policy enforcement and resource types.
Searching Your Inventory Resources
This feature provides a quick way to quickly search your inventory resources. Some parameters show only those values that are relevant to your other parameter selections. Selecting specific parameters (cloud, region, resource type, regions and categories) helps you craft effective queries. For example, if you select "cloud = AWS", and then open the region parameter, you see only AWS regions listed. This gives you regions in the context of your cloud selection.
You can search your inventory by the following parameters:
Cloud
Account ID
Account Name
Region
Resource Type (for example, Azure Firewall, EC2, Subnet, OCI, compute instance, and more
Resource Group
Resource Name
Resource State (This reflects updates from the CSP. Frequent state changes may experience delayed refreshes, but updating any of these other parameters triggers an immediate refresh.)
VPC/VNET ID
Subnet ID
Cloud Tags
Labels (for example, <application name>, VPC deployments, and more.)
Categories (for example, databases, containers, and more.)
IP Address (Note that if you type an IP address, the numerals appear in the search bar before they appear in the value field in search menu. Only valid IPs are returned, so users do not have to type full length valid addresses. This is limited to IPv4 and IPv6.)
Resources Use Cases and Example
Illumio Segmentation for the Cloud discovers your resources when cloud onboarding is done. This feature lets you search through a table of your discovered resources. Such a search lets you confirm general expectations of what resources you have and what is in a given region, or display information about a specific type of resource.
Filtering by an AWS EC2 Instance
For example, suppose you are interested in reviewing a particular virtual machine, like an AWS EC2 instance. The following steps illustrate how you would do that.
The first part of the sequence might be to filter by Resource Type and select AWS::EC2::Instance:
This filter would return a list of EC2 instances. Depending on how you customize your columns, you might see:
Cloud type
Resource name
Resource state
Account ID
In addition the the above, other general properties of the Inventory table may display, again depending on your column customization. You can also choose one of the preset column customizations, including Cloud Details, Labels and Cloud Tags, and Security Controls.
The next step in the sequence would be to click one of the entries in the Name and ID column. In the case of an EC2 instance or VM, you see additional information, beyond the general information, listed in the Attached Resources tab. That tab displays the following information:
NICs
Security Groups
Subnets
Traffic
Selecting an ID column entry in a heading shows details for that entry such as its state or creation date.
Similarly, selecting a database category and then a CSP, like AWS, would give you a list of list of all the AWS databases in the Illumio Segmentation for the Cloud environment.
Filtering by an Azure Firewall
Note
Illumio Segmentation for the Cloud does not support Classic Azure Firewall.
For this example, suppose you are interested in reviewing a particular Azure Firewall. The following steps illustrate how you would do that.
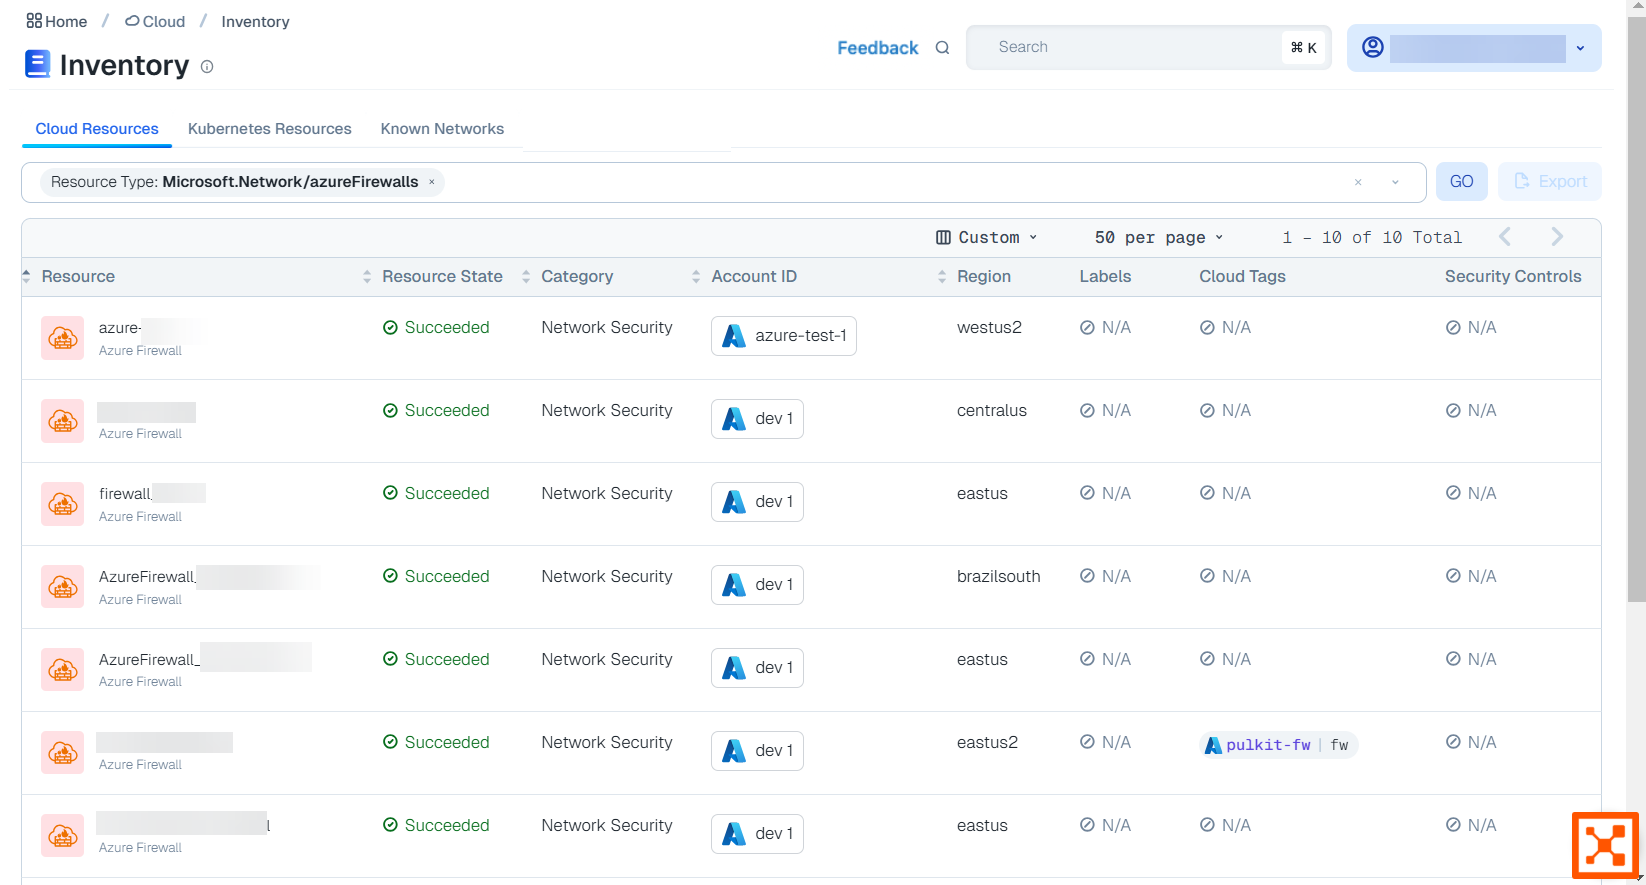
The first part of the sequence might be to filter by Resource Type and select Microsoft.Network/azureFirewalls:
This filter would return a list of Azure Firewalls instances. Depending on how you customize your columns, you might see:
Resource
Resource state
Region
The next step in the sequence would be to click one of the entries in the Resource column.
The Detail page opens on the Summary tab. In the case of an Azure Firewall, you see additional information beyond Name, ID , Cloud and so on, such as:
Resource Group
Sku Tier
Threat Intel Mode
The next step might be to click the Attached Resources tab. That tab displays the following information:
Virtual Networks
Subnets
Firewall Policy
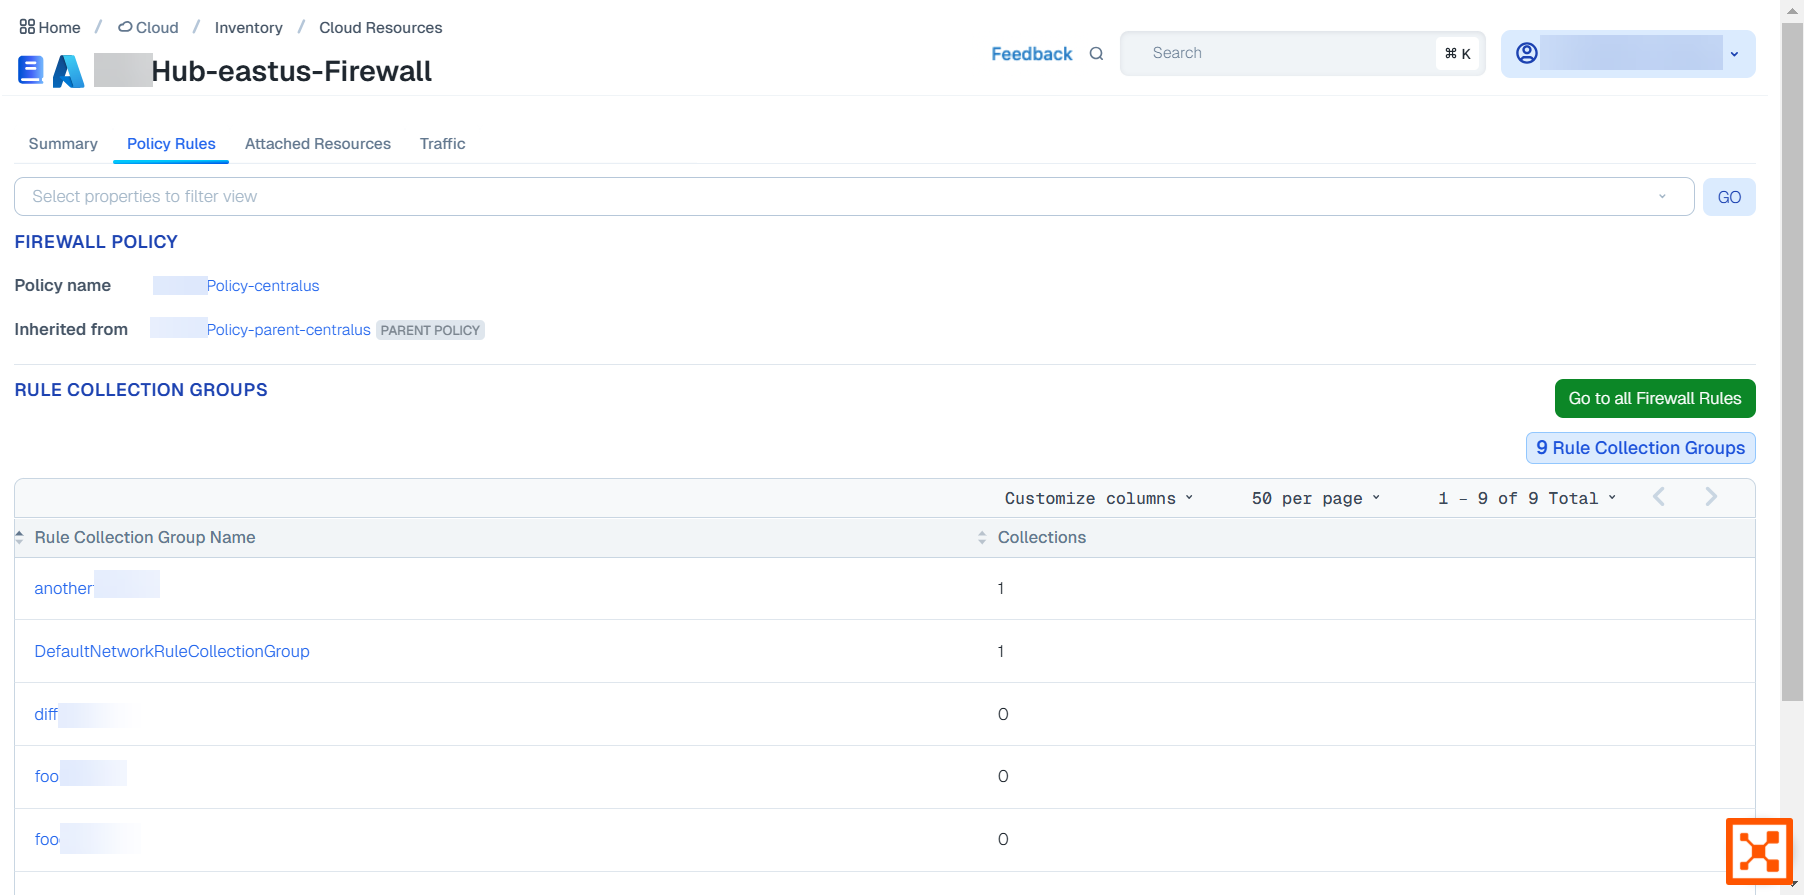
Next, you may want to see the firewall policies that you have. Click on the Policy Rules tab, which shows the top-down Firewall Policy, with the policy listed at the top with its parent policy listed. The first level below that is the Rule Collection Groups.
The first level below that is the Rule Collection Groups.

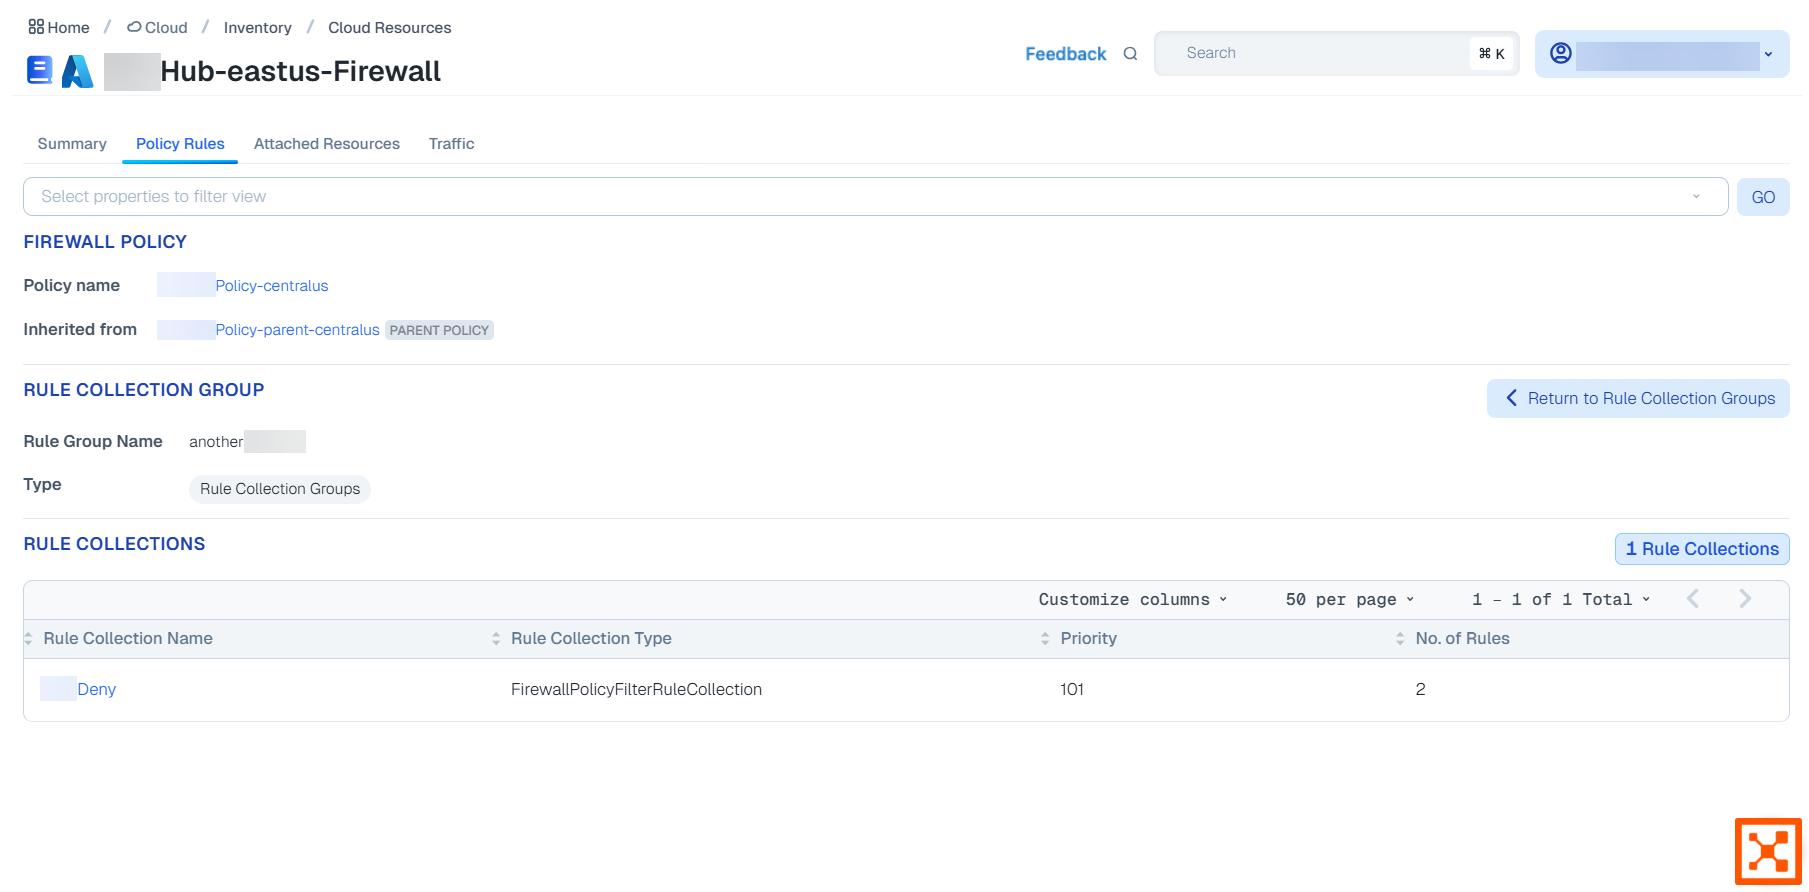
Click a rule collection group to display its details and show the the second level, which is the Rule Collections.

Click a rule collection to display its details and show the third level, which is the Rules. You can then click on a rule, and so on. At each level, you can click Return... to go back up a level.
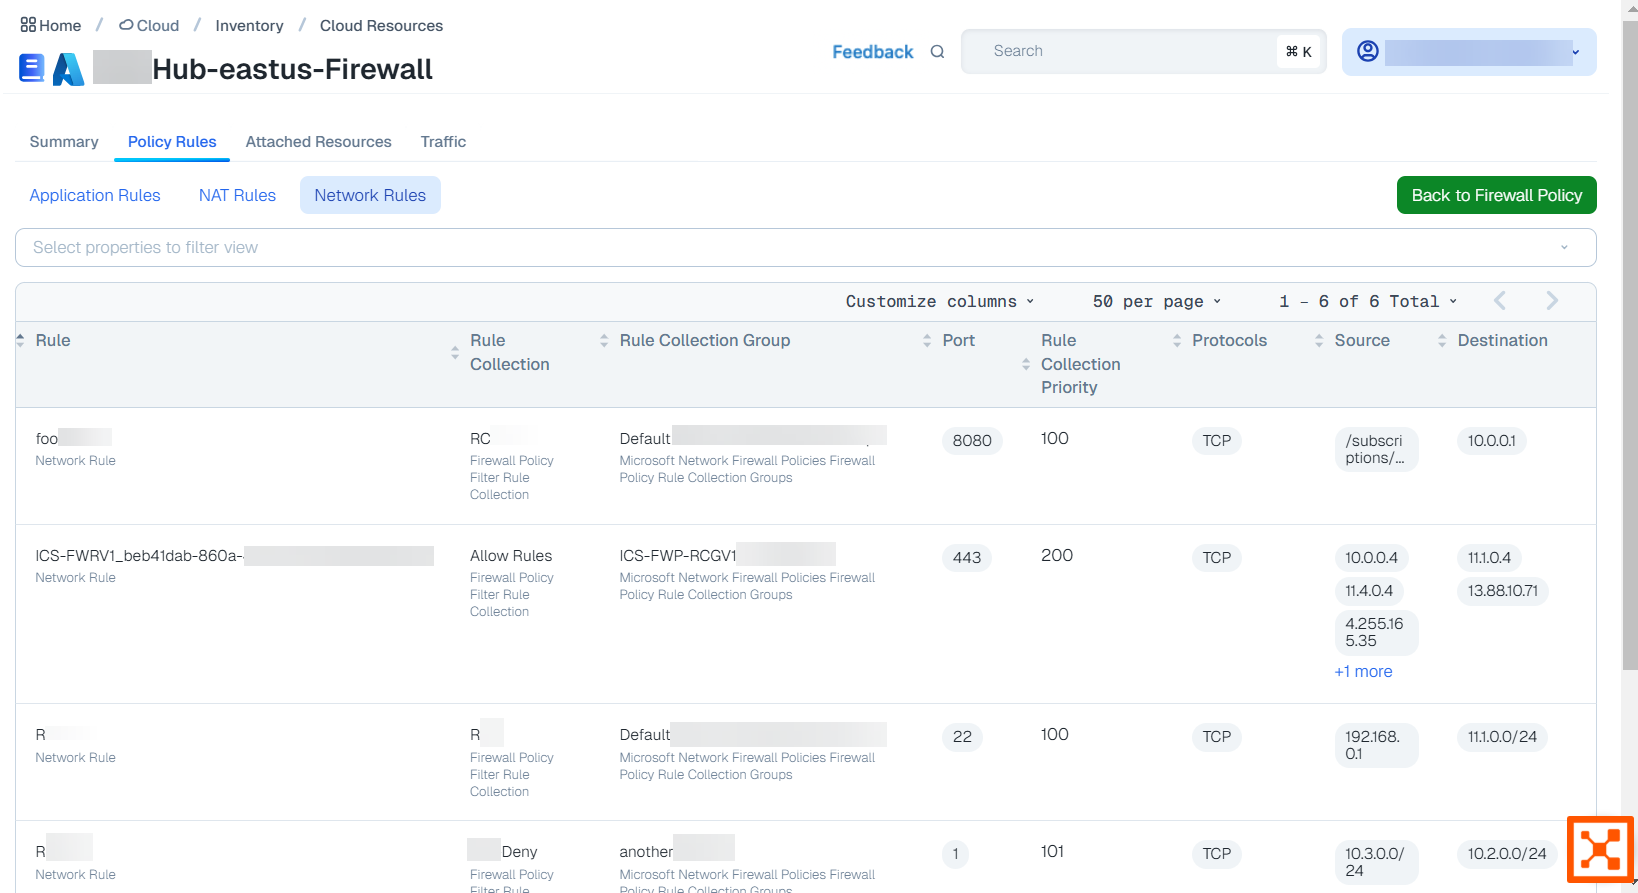
To get an all in one view, from the Rule Collection Groups page, click Go to All Firewall Rules and select one of the rule tabs. In this example, you select the Network Rules tab.
The columns show the rules with their parent Rule Collection Groups and Rule Collections.

For more information on Inventory page searching, see the Context-based search section of Search and filtering.
Exporting an Inventory Report
Use this feature to export a list of your resources subject to your search query.
For best results, Illumio recommends viewing videos in Chrome.
Click Export to export the inventory data.
Edit the report name and select the format.
Click the Scheduling Section toggle to the on position to schedule the export unless you want to export the report immediately.
If you choose to schedule your report, select your recurrence and time.
Click Save when done.
Go to the Generated reports page to download the exported report.
Known Networks
The Known Networks tab displays a list of known networks (IP lists). This list populates the options for the Known Networks filter option on the Traffic page. See Search traffic. To add one, follow the in-application help directions.
The Cloud Map also displays known networks as a type of resource.
Tooltips
Hover over items in the following columns to see tooltips summarizing information about them:
Resource (Name, Resource ID, Type, Account ID, CSP, Region, Labels, Last Updated)
Account ID (Account ID, Name, both of which you can copy)
Labels (Type, which you can copy)
Cloud Tags (Cloud Tag, Illumio Label)
Security Controls (Properties of the resource you have, and Policy Sync and Policy Last Applied.)
Note
Last Updated refreshes only when there is a change in the CSP resource. Policy Sync and Policy Last Applied refresh only when there is a change to existing policy.