Work with Labeling Rules
This section describes how to add, edit, enable/disable, and delete labeling rules. It also includes procedures for finding and matching cloud resources and creating a cloud resource Label Review report.
STEP 1: Add a labeling rule
Labeling rules work by identifying cloud resources in your environment that match conditions you specify and then applying one or more labels to those cloud resources.
(Optional) To determine the cloud resource attributes you want your labeling rule to match, it may help to go to Cloud > Inventory and examine the cloud resources in your environment.
Go to Label Management > Labeling Method > Labeling Rules.
Click the Cloud tab.
Click Add.
Specify the matching condition.
Note
To learn about using RegEx operators and Capture Groups in your rules, see Using regex in Cloud Labeling Rules.
Select an attribute.
Select an operator.
Specify one or more values.
Select one or more existing labels in the Label field.
In addition to selecting existing labels from the field, you can also create a new label. If the label you create in this way is an Application label, the label also appears on the Applications page (Cloud > Explore > Applications). Applications created in this way are auto-approved and don't appear on the Application Definitions page. You can click these applications to view rich detail about them.
Click the Label field and enter a unique name for the label.
Click + <your-label-name> (New Label).
In the Type field, select a label type and then click Save.
Your new label is created and added to your rule. Application
Click Save.
Labeling Rules for Cloud supports regular expression pattern matching. Regex operators allow you to define complex patterns to precisely match workloads in your environment. This precision is particularly useful when you're trying to find and label resources that have multiple attributes.
As with all operators, you can use regex match singly or in combination with other operators to search for attributes. You can also use Capture Groups in your Regular Expressions to generate unique, resource-specific labels.
Keep in mind about regex labeling rules
Only one attribute type in a rule can use regex match.
Account Name and IP Address attributes don't support regex match.
When using the asterisk (*) wildcard character, you must precede it with a period.
Tip
While Rule Based Labeling performs some validation of the regular expressions you enter in the Values field, it may help when crafting complex patterns to use an online regex validator such as https://regex101.com/.
Regex pattern matching examples
The following examples show some typical regex matching use cases.
Goal | Attribute | Operator | Values | Resulting Condition |
|---|---|---|---|---|
Find resources with Resource Name that begins with 'Example' (case insensitive) | Resource Name | regex match | ^Example OR ^example | Resource Name regex match ^Example OR ^example |
Find resources with Resource Name formatted as word-word-digit-digit (west-prod-2-0) | Resource Name | regex match | \w+-\w+-\d+-\d+ | Hostname regex match \w+-\w+-\d+-\d+ |
Return results that do not match Resource Name formatted as word-word-digit-digit (west-prod-2-0) | Resource Name | does not match regex | \w+-\w+-\d+-\d+ | Hostname does not match regex \w+-\w+-\d+-\d+ |
Find resources with Region that match 'us-' followed by a string of any 4 lower-case letters, a dash, and any number of integers (us-east-1) | Region | regex match | us-[a-z]{4}-\d+ | Region regex match us-[a-z]{4}-\d+ |
Find resources with Account ID that contain 'tradeshow' (case insensitive), with or without a preceding '-', ending with any integer (AWS-TradeShow5) | Account ID | regex match | -?(?i)tradeshow\d+ | Account ID regex match -?(?i)tradeshow\d+ |
Customize labels with Capture Groups
Use Capture Groups in your Regular Expressions to generate unique, resource-specific labels. Capture Groups works by automatically "capturing" unique content from a resource's metadata and creating customized labels tailored to each individual resource.
Example
Suppose you have a series of resources with these Resource Names: workstation-01, workstation-02, workstation-03 . . . workstation-50.
Standard Regex Pattern Matching: Using the regex pattern
workstation-\d+allows Cloud Labeling Rules to find all resources with Resource Names that contain theworkstation-followed by any number of digits.Capture Group: By placing parentheses around the "unique" part of the expression,
(\d+), the feature preserves the unique string (the digits 01, 02, 03, etc.) as a variable. The feature automatically adds the variable to the label value that you will later assign to matching resources when you apply labels, resulting in resource-specific labels like ws-01, ws-02, and ws-03 rather than a single static value for all matched resources.
Note
While the following examples use Application labels and Resource Names, the concepts apply to any available label type and all resource attributes with the exception of Account Name and IP Address.
Define the Regex Pattern and Capture Group
In Cloud Labeling Rules, click Add.
In Attributes, select Resource Name.
In Operator, select regex match.
In Regex Pattern, enter
workstation-(\d+).workstation-: Matches literal characters within the Resource Name.
(\d+): The parentheses create the capture group. The \d+ identifies the sequence of digits following the hyphen. The tool "captures" this specific numeric string in a temporary variable: $(1). The variable instructs the feature to "paste" whatever it found in the parentheses directly onto the label for that specific resource.
In Capture Groups Detected, click $(1). Notice that $(1) populates the Label Value field.
Configure the Label Assignment
In Label type, select a label (Application in this example).
In this example, we'll add
ws-(for workstation) to the Label Value to make more identifiable.Click Apply.
Save the rule.
Goal | Attribute | Operator | Regex | Variable | Condition | Label Value |
|---|---|---|---|---|---|---|
Find all resources whose Resource Name contains | Resource Name | regex match | workstation-(\d+) | $(1) | Resource Name regex match workstation-(\d+) |  |
Result
The feature processes the labeling rule and automates label mapping as follows:
Input (Resource Name) | Unique String Captured by Variable $(1) | Output (Application Label) |
|---|---|---|
workstation-01 | 01 |  |
workstation-02 | 02 |  |
workstation-03 | 03 |  |
STEP 2: Review matches and apply labels to cloud resources
Note
Keep in mind the following about matching resources and applying labels:
Depending on the number of cloud resources that match labeling rules, it may take several minutes for the cloud resources that match your rules to appear in the slide-out. You can close the Apply Rules slide-out while the load process continues in the background.
Applying labels to matching resources is "all or none." This means that when you are reviewing matching resources on the slide-out panel, you can't selectively apply labels to only a subset of those resources.
If a matched resource already has a label of the same type as one specified in the rule, that label isn't applied to the resource (that is, the existing label isn't overwritten). However, any labels in the rule that are of different types from those already on the resource are applied to the resource. For example, if a rule includes three labels and a matched resource already has one of those label types, the other two are still applied.
Here's how to search your environment for cloud resources that match the rule conditions.
Go to Label Management > Labeling Method > Labeling Rules.
Click the Cloud tab.
Click Apply Rules.
The Apply Rules slide-out opens showing the cloud resources in your environment that match your rules (if any).
Review the list provided in the slide-out to ensure it includes the cloud resources you want your rules to match. If the list doesn't include the cloud resources you intended, you can recheck the condition(s) you specified in the rule(s) and then modify the rules if necessary. You may need to return to the Cloud > Inventory page and re-examine the cloud resources to make sure you've specified the correct cloud resource attributes in your rule(s).
If the list of matching cloud resources meets your expectations, click Apply in the slide-out to apply the specified labels. Pending appears while the feature is processing. Yes appears when a rule's labels have been applied to resources.
Additional cloud labeling procedures
Learn how to perform these routine tasks.
Enable/disable labeling rules
The Enable/Disable options allow you to generate different matching results by excluding or including one or more labeling rules from the cloud resource matching process.
Go to Label Management > Labeling Method > Labeling Rules.
Click the Cloud tab.
Select one or more labeling rules in the list of rules.
Click Enable or Disable.
To see the effect of your change, re-run the cloud resource matching process.
Edit a labeling rule
You can edit a rule's condition and label(s).
Note
The following behavior could affect your policy:
If you remove a label from a rule and save the change, the label is also removed from any cloud resources to which the label may have been applied by means of the same rule.
If you edit an existing rule to add a label and click Apply Rule, it may take some time for the change to appear in the Apply Rules slide-out. Try closing and later reopening the slide-out to see the change. The label you added to the rule is applied to matching resources when you click Apply on the slide-out.
Add a statement to an existing rule:
Go to Label Management > Labeling Method > Labeling Rules.
Click the Cloud tab.
Click the Edit icon for the rule you want to edit.
Modify the rule.
Click Save.
Delete a value from an existing rule:
Go to Label Management > Labeling Method > Labeling Rules.
Click the Cloud tab.
Click the Edit icon for the rule you want to edit.
Click the X to delete values and/or labels.
Click Save.
Edit a value in an existing condition:
Note
To change a value in an existing condition, you must delete and then re-add the original condition, specifying the value you want. You can't directly edit a value in an existing condition and preserve the change.
Click the Edit icon for the rule you want to edit.
Add the new statement.
Delete the original value.
If needed, edit label(s) in the Label field.
Click Save.
Delete a labeling rule
Note
Keep in mind when deleting a labeling rule:
If you select the option Delete label mappings created by this rule when deleting a rule, the labels applied to matching resources by means of that rule are also removed from those resources, and this could affect your policy.
To remove a label from a cloud resource after the rule is deleted, you can use API-based workflows, available upon request.
Deleting a labeling rule permanently removes it for future use and can't be undone. Alternatively, you can disable a rule to stop it from applying labels to cloud resources and re-enable it later if desired.
You can only delete one rule at a time (deleting rules in bulk is not supported).
Go to Label Management > Labeling Method > Labeling Rules.
Click the Cloud tab.
Click the trash can icon for labeling rule you want to delete.
(Optional). If you want to remove labels that the rule applied to cloud resources previously, select the option Delete label mappings created by this rule. See the Note above about what to expect when removing labels from rules.
Export a cloud resource Label Review report
You can export a CSV report that details the cloud resources that match your rules and the label(s) applied to those cloud resources. Reviewing the report is helpful when dealing with a large number of rules and cloud resources.
Go to Label Management > Labeling Method > Labeling Rules.
Click the Cloud tab.
Click Apply Rules to open the slide-out.
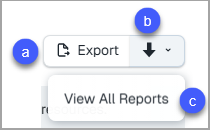
Click:
Export to generate the report.
The down arrow to send the report to Cloud > Explore > Reports.
View All Reports to go to the Reports page.
Open and review the report.
