Using Annotations
Note
Illumio annotations operate differently in CLAS-mode clusters (optionally available starting in Illumio Core for Kubernetes version 5.0.0) than in previous legacy (non-CLAS) environments.
The initial portion of this topic describes how to use annotations in legacy non-CLAS clusters. After this initial portion, in the latter part of this topic, you can find information about using annotations in CLAS-mode clusters, described in the section Using Annotations in CLAS.
When assigning labels, you can assign no labels, some labels, or all labels to the namespace. If there is a label that is not assigned, then you can insert annotations in the Deployment configuration (or application configuration) to assign labels. If there is a conflict between a label assigned via the Container Workload Profile and the annotations in the deployment configuration, the label from the Container Workload Profile overrides the Deployment configuration file. This security mechanism ensures that a malicious actor cannot spoof labels and get a preferential security policy based on a different scope. Regardless of how you assign labels, it is not required for Pods or services to have all labels in order for the PCE to manage them.
To manually annotate the different resources created in a Kubernetes namespace or OpenShift project, use the steps described in the sections below.
Deployments
Edit the Deployment configuration file:
Navigate to
spec: > template: > metadata: > annotations:. Ifannotations:does not exist, create anannotations:section underneathmetadata:.The annotation can support any Illumio label key fields, including user-defined label types, as well as the standard set of predefined Illumio labels:
com.illumio.role:com.illumio.app:com.illumio.env:com.illumio.loc:
Fill in the appropriate labels.
Save the file and exit.
Propagate your changes to all Pods.
Services
Edit the Deployment configuration file:
Navigate to
metadata: > annotations:. Ifannotations:does not exist, create anannotations:section underneathmetadata:.The following Illumio label key fields can be under the
annotations:section.com.illumio.role:com.illumio.app:com.illumio.env:com.illumio.loc:
Fill in the appropriate labels.
Save the file and exit.
Propagate your changes to all Pods.
Important
When using the annotations method, you should redeploy the Pods or services after saving the changes to the configuration files by using the kubectl apply command.
Annotation Examples
Below are examples of namespaces, Pods, and services that use label assignments using either Container Workload Profiles or Container Workload Profiles with annotation insertion.
In the example shown below:
Kubernetes default services or control plane Pods exist within namespaces such as,
kube-system. They will inherit the Application, Environment, and Location labels from what has been configured in the Container Workload Profile(s). Kubelink is part of theillumio-systemnamespace, and because the Role label is left blank on theillumio-systemnamespace, you should assign a Role to Kubelink using annotations in the manifest file.A new
app1namespace that contains two different Deployments or a two-tier application (Web and Database) is deployed. To achieve tier-to-tier segmentation across the application they will need different Role labels. Therefore, a Role label should be inserted into the annotations of each Deployment configuration.
A snippet of the illumio-kubelink Deployment configuration file is shown below, and the "Kubelink" Role label is inserted under the spec: > template: > metadata: > annotations: section:
illumio-kubelink-kubernetes.yml
spec:
  replicas: 1
  selector:
    matchLabels:
      app: illumio-kubelink
  template:
    metadata:
      annotations:
        com.illumio.role: Kubelink
      labels:
        app: illumio-kubelink
    spec:
#      nodeSelector:
#        node-role.kubernetes.io/master: ""
      serviceAccountName: illumio-kubelink
      tolerations:
      - key: node-role.kubernetes.io/master
        effect: NoSchedule
A snippet of the app1's Web Deployment configuration file is shown below, and the "Web" Role label is inserted under the spec: > template: > metadata: > annotations: section:
shopping-cart-web.yml
spec:
  replicas: 3
  revisionHistoryLimit: 10
  selector:
    matchLabels:
      app: webapp1
      tier: frontend
  strategy:
    activeDeadlineSeconds: 21600
    resources: {}
    rollingParams:
      intervalSeconds: 1
      maxSurge: 25%
      maxUnavailable: 25%
      timeoutSeconds: 600
      updatePeriodSeconds: 1
    type: Rolling
  template:
    metadata:
      annotations:
        com.illumio.role: Web
      creationTimestamp: null
      labels:
A snippet of the app1's Database Deployment configuration file is shown below and the "Database" Role label is inserted under the spec: > template: > metadata: > annotations: section:
shopping-cart-db.yml
spec:
  replicas: 2
  revisionHistoryLimit: 10
  selector:
    matchLabels:
      app: redis
      role: slave
      tier: backend
  strategy:
    activeDeadlineSeconds: 21600
    recreateParams:
      timeoutSeconds: 600
    resources: {}
    type: Recreate
  template:
    metadata:
      annotations:
        com.illumio.role: Database
      creationTimestamp: null
      labels:
Below is the final outcome of the label assignment from the example.
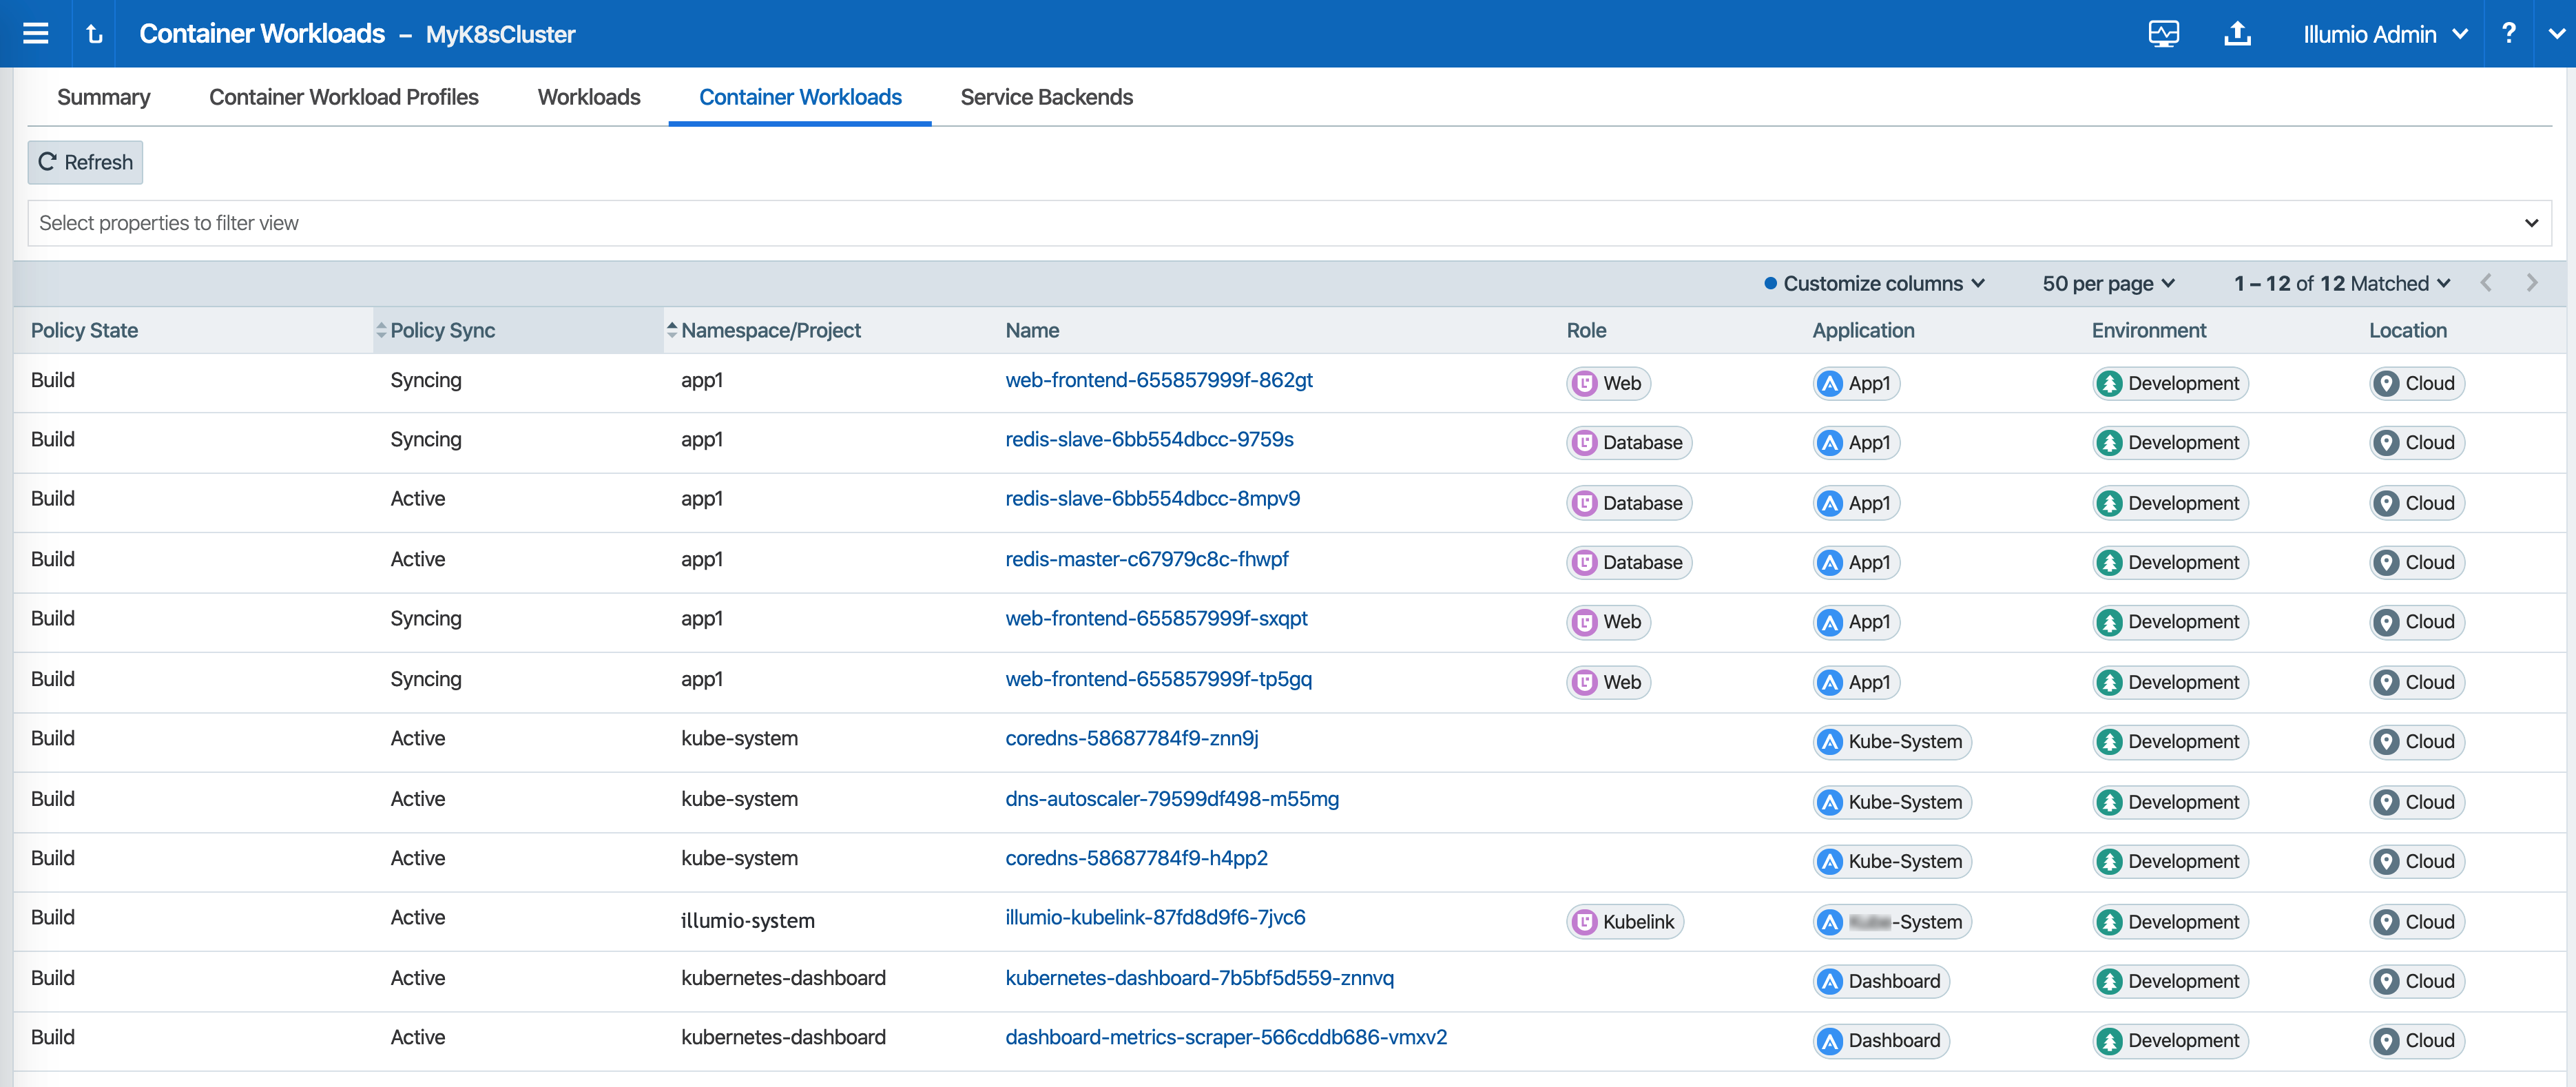
In Illumination Map, the application groups will appear differently if you've assigned labels on resources in the cluster.
DaemonSets and ReplicaSets
The steps described in the above section apply only to services in Kubernetes and OpenShift which are bound to Deployment or DeploymentConfig (existing deployments). This is because Kubelink depends on the Pod hash templates to map resources together, templates that DaemonSet and ReplicaSet configurations do not have. If you discover Pods derived from DaemonSet or ReplicaSet configurations and also discover services bound to those Pods, then Kubelink will not automatically bind the virtual service and service backends for the PCE. The absence of this binding will create limitations with Illumio policies written against the virtual service.
To work around this limitation for DaemonSets and ReplicaSets follow the steps below.
Generate a random uuid using the
uuidgencommand (on any Kubernetes or OpenShift node, or your laptop).Copy the output of the
uuidgencommand.Edit the DaemonSet or ReplicaSet YAML configuration file.
Locate the
spec: > template: > metadata: > labels:field in the YAML file and create thePod-template-hash:field under thelabels:section.Paste the new uuid as the value of the
Pod-template-hash:field.Save the changes.
Repeat steps 1 through 6 for each DaemonSet or ReplicaSet configuration.
The examples below generate a random pod-template-hash value and applies it to a DaemonSet configuration.
$ uuidgen
9e6f8753-d8ac-11e8-9999-0050568b6a18
$ cat nginx-ds.yml
apiVersion: extensions/v1beta1
kind: DaemonSet
metadata:
  name: nginx-webserver
spec:
  template:
    metadata:
      labels:
        app: nginx-webserver
        pod-template-hash: 9e6f8753-d8ac-11e8-9999-0050568b6a18
    spec:
      containers:
        - name: webserver
          image: rstarmer/nginx-curl
          imagePullPolicy: IfNotPresent
          ports:
          - containerPort: 80
Static Pods
Another way of deploying Pods without Deployments or ReplicaSet is by using 'Static Pods'. In this case, a Pod is spun up by not depending on the API server and is managed by an individual node's Kubelet. Static Pods are used to spin up control-plane components such as kube-apiserver, controller-manager, and scheduler. Static Pods are useful if you want a Pod to be running even if the Kubernetes control-plane components fail. Unlike Naked Pods, if a Static Pod is not functional, kubelet spins up a new Static Pod automatically by looking at the manifest file in the /etc/kubernetes/manifests directory.
Services for such Pods can also be created without any selectors. In which case, you need to manually create the EndPoint resources for such services without a selector. For example, the default 'kubernetes' service in the default namespace which binds to the API-Server Pod running on HostNetwork.
If you create Static Pods on an overlay network, you need to create a service without selectors and manually create EndPoint resource to map the Pod to see the Container Workload and the Virtual Service on the PCE. You will not see any bindings or backends for this Virtual Service. In order to bind the Static Pods to the Virtual Service, use the 'com.illumio.service_uids' annotation in the Static Pods manifest and configure the service without selectors and manually create the EndPoints. Once the 'com.illumio.service_uids' annotation is used, you can bind the Container Workloads to its Virtual Service.
Sample code: Place the Static Pod manifest in the /etc/kubernetes/manifests directory
[root@qvc-k8s-027-master01 manifests]#pwd/etc/kubernetes/manifests [root@qvc-k8s-027-master01 manifests]#cat network-tool.ymlapiVersion: v1 kind: Pod metadata: name: nw-tool1 annotations: com.illumio.service_uids: <numerical-value> spec: containers: - name: nw-tool1 image: praqma/network-multitool args: [/bin/sh, -c, 'i=0; while true; do echo "$i: $(date)"; i=$((i+1)); sleep 10; done'] imagePullPolicy: IfNotPresent restartPolicy: Always [root@qvc-k8s-027-master01 ~]#cat nw-tool-endpoint.yamlapiVersion: v1 kind: Endpoints metadata: name: nw-tool-svc namespace: default subsets: - addresses: - ip: <ip-value> ports: - name: http port: 80 protocol: TCP [root@qvc-k8s-027-master01 ~]#cat nw-tool-svc.yamlapiVersion: v1 kind: Service metadata: creationTimestamp: "2020-05-18T18:39:19Z" labels: app: nw-tool name: nw-tool-svc namespace: default resourceVersion: "29308511" selfLink: /api/v1/namespaces/default/services/nw-tool-svc uid: <numerical-value> spec: clusterIP: <ip-value> ports: - name: http port: 80 protocol: TCP targetPort: 80 sessionAffinity: None type: ClusterIP status: loadBalancer: {} [root@qvc-k8s-027-master01 ~]#
Important
In the above code sample, you need to modify the following two values based on your configuration:
uid: <numerical-value>clusterIP: <ip-value>
Using Annotations in CLAS
Illumio annotations in CLAS-mode environments are specified on the Kubernetes Workload, and not on a Pod's template, as is done in legacy non-CLAS environments. This distinction follows from the concept of the Kubernetes Workload in the PCE UI introduced with CLAS-mode, which maps directly to the native Kubernetes concept of a workload resource (that is, Deployments, ReplicaSets, and the like).
Therefore, Kubernetes Workloads on the PCE should be labelled based on the corresponding workload annotations in Kubernetes, instead of on individual pod template annotations in Kubernetes.
This labelling distinction prevents confusion, because Pods from a single Deployment can have different annotations:
#kubectl get pod azure-vote-front-6fd8b9b657-6pv8t -n voting-app -o jsonpath='{.metadata.annotations}' | tr ',' '\n' | grep com.illumio"com.illumio.app":"A-VotingApp" "com.illumio.env":"E-Production" "com.illumio.loc":"Azure" #kubectl get pod azure-vote-front-6fd8b9b657-npppz -n voting-app -o jsonpath='{.metadata.annotations}' | tr ',' '\n' | grep com.illumio"com.illumio.app":"A-VotingApp" "com.illumio.env":"Development" "com.illumio.loc":"Amazon" "com.illumio.role":"R-Frontend"}
Migration
Workloads reporting supports both: Pod template annotations and workload annotations. However, the priority is put on workload, if it contains at least one annotation with a com.illumio. prefix.
In the following example, annotations are specified in metadata.annotations: and spec.template.metadata.annotations:. Annotations specified in metadata.annotations: are prioritized.
The resulting annotations mapped to labels are: app=A-VotingApp and env=E-Test (no merging between the sets of annotations occurs).
apiVersion: apps/v1
kind: Deployment
metadata:
  annotations:
    com.illumio.app: A-VotingApp
    com.illumio.env: E-Test
  name: test-deployment
  labels:
    app: nginx
  spec:
    replicas: 2
    selector:
      matchLabels:
        app: test-pod
      template:
        metadata:
          annotations:
            com.illumio.loc: Amazon
            com.illumio.env: test-env
          labels:
            app: test-pod
          spec:
            containers:
              - name: test-pod
                image: nginx:1.14.2
                imagePullPolicy: IfNotPresent
                ports:
                  - containerPort: 80