Workloads in the PCE
This section describes how to manage workload using the Workload pages in the PCE web console.
Workload Summary
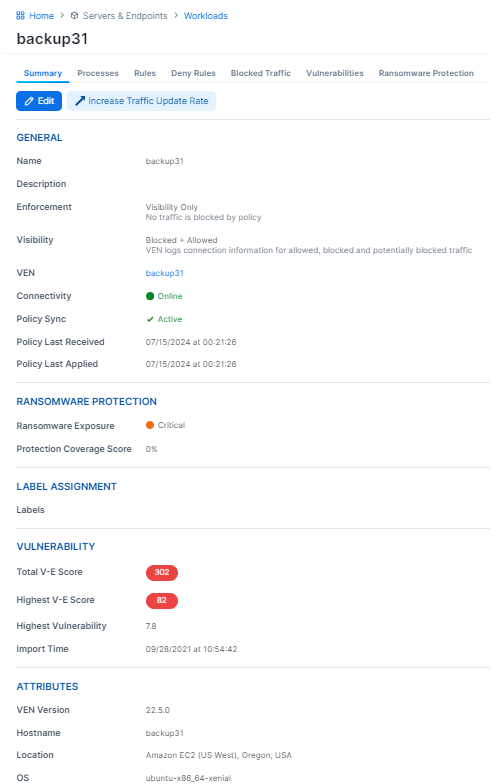
The workload summary displays information about the workload, including the user-specified attributes at the time of pairing and information that the Illumio Core has automatically detected about the workload, specifically:
The name of the workload
A description (if provided)
The workload enforcement state
The visibility that the VEN uses
The dates when the policy was revised and last applied
For the workload's VEN connectivity status, see "VEN-to-PCE Communication" in VEN Administration Guide.
For the workload's VEN policy sync status, see "VEN Policy Sync" in VEN Administration Guide.
Any labels applied to the workload
Workload system attributes (such as VEN version number, hostname, and uptime)
Workload Enforcement States
Policy state determines how the rules affect a workload's network communication. The Illumio Core includes four policy states for workloads. If a workload is unmanaged, the Policy State column is not displayed on the workload list page.
Idle
You can use a pairing profile to pair workloads into the Idle state.
Note
SecureConnect (IPv6 compatibility) is not supported on workloads in the Idle state. When you activate SecureConnect for a rule that applies to workloads that are in both Idle and Non-idle policy states, it can impact the traffic between these workloads.
Visibility Only
Selective Enforcement
Segmentation rules are enforced only for selected inbound services when a workload is within the scope of a Selective Enforcement Rule.
Full Enforcement
Segmentation Rules are enforced for all inbound and outbound services. Traffic that is not allowed by a Segmentation Rule is blocked.
Visibility Level
You can choose from three levels of visibility for workloads. These modes allow you to specify how much data the VEN collects from a workload when in the Full Enforcement state:
Off: The VEN does not collect any information about traffic connections. This option provides no Illumination detail and demands the least amount of system resources from a workload.
This property is only available for workloads that are in the Full Enforcement state.
Blocked: The VEN only collects the blocked connection details (source IP, destination IP, protocol and source port and destination port), including all packets that were dropped. This option provides less Illumination detail but also demands fewer system resources from a workload than high detail.
Blocked + Allowed: The VEN collects connection details (source IP, destination IP, protocol and source port and destination port). This applies to both allowed and blocked connections. This option provides rich Illumination detail but requires some system resources from a workload.
Workload Processes
The Processes tab of the Workload detail page shows the processes currently running on the workload. For each process running on the workload, the following information is listed:
V-E Score
Process name
Process path
Ports used by the process
Protocol (for example, TCP or UDP)
Note
On the Workload Processes tab, when you delete the binary for that process while the process is running, the PCE appends the process name with “(deleted).”
The UDP - PCE UI processes tab shows both server and client UDP processes and ports.
On the Services tab for a workload, both UDP client and server processes show up along with their port numbers. For TCP, only listening ports/processes are presented.
For UDP, only listening ports/processes should be presented. The information is coming from service reports sent by VEN once every 24 hours.
Customers depend on this information to understand the provider processes in their data center and write policies to allow traffic from needed workloads.
Workload Rules
The Illumio Core has two types of rules:
Inbound Rules: Show all the services on the workload and the interface endpoints allowed to communicate with these services.
Outbound Rules: Show all the interface endpoints with which the services on that workload can communicate.
To apply rules to a workload, create a policy and ensure that the policies and workloads share the same labels.
Note
The workload rules are listed against individual IP addresses in an ipset. The PCE limits the size of the returned data.
The PCE web console displays an error message whenever the PCE exceeds a certain number of rules, which is the number of peer-to-peer rules calculated for that workload.
Workloads Blocked Traffic
The Blocked Traffic tab shows you all traffic that attempted to communicate with your workload but was blocked due to policy. For information, see Blocked Traffic.
Filter a View
You can filter by workload name, label, hostname, enforcement, and more.
To filter a view, select a category from the list, such as Labels, and then choose an existing element within that category.
Categories you can filter on are:
Name
Labels
No Label
IP Address
Description
OS
Hostname
Policy Sync
Enforcement
Ransomware Exposure
Connectivity
Policy Last Applied
Policy Last Received
Policy Update Mode
Enforce a Workload Policy State
On the left navigation, go to Servers & Endpoints > Workloads.
Click the link for the workload you want to change the Enforcement state for.
Click Edit.
Select Idle, Visibility Only, Selective, or Full from the Enforcement drop-down list depending on how you want to allow or block traffic connections.
Click Save.
Set Workload Interfaces to Ignored
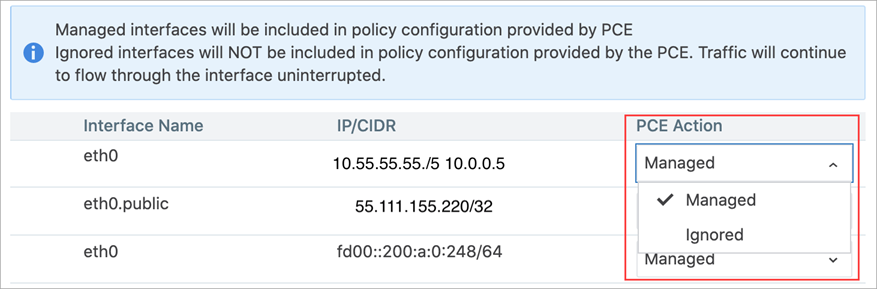
You can set interfaces from Managed to Ignored in the PCE web console. You can use this option when you want the workload to ignore visibility and enforcement on the interconnected interfaces of database clusters such as Oracle RAC.
During pairing, you can set one or more interfaces to Ignored, which causes the first downloaded firewall to ignore those interfaces.
After you set an interface to 'Ignored', that interface is excluded from the policy configuration, and traffic flows uninterrupted through it without any change in latency. You can see which interfaces are marked as Ignored on the Workloads’ Summary page.
On the left navigation, go to Servers & Endpoints > Workloads.
Click a workload to open the details.
Click Edit.
In the Network Interfaces section, change interfaces from Managed to Ignored using the PCE Action drop-down list.
Warning
DO NOT ignore PCE-generated interfaces such as
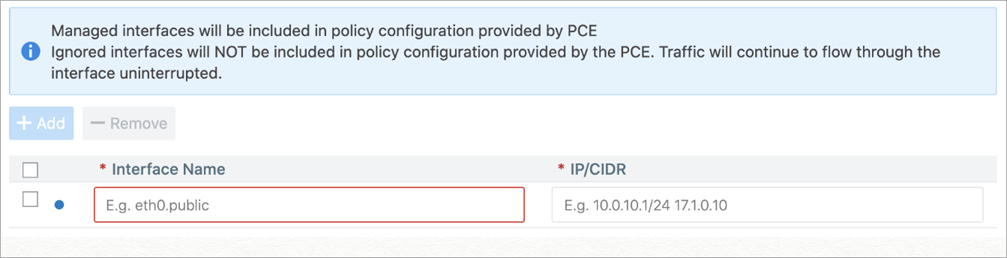
eth123.publicfor cloud workloads.If you are editing an unmanaged workload, you will not have the option to ignore it using the PCE Action drop-down menu. That drop-down menu does not exist for unmanaged workloads.
However, you can still provide information on the Interface Name and the IP/CIDR address.
Click Save.
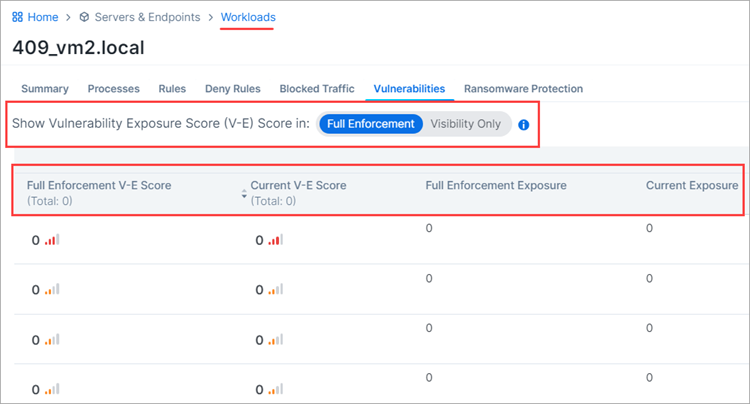
Compare Workload V-E Scores by Enforcement Type
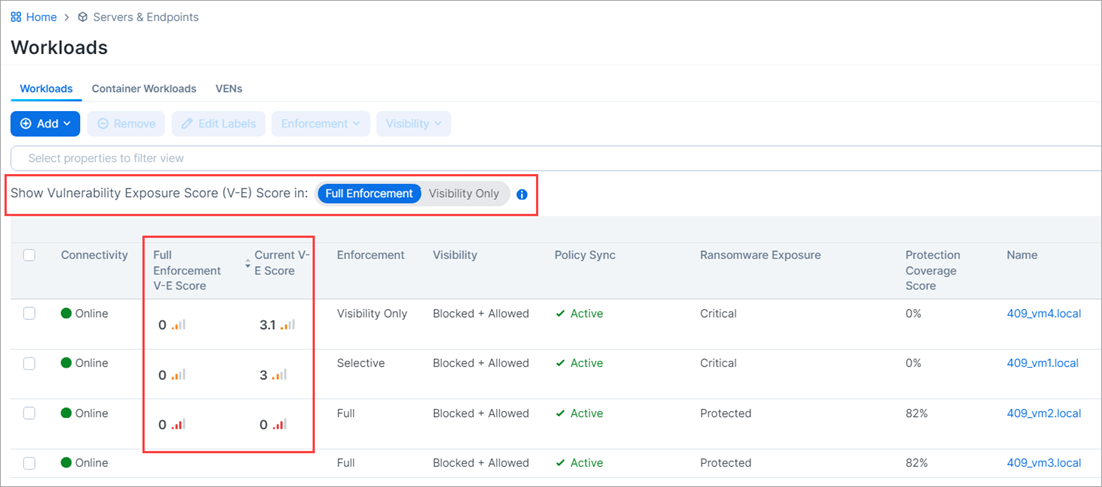
The Show Vulnerability Exposure (V-E) Score tool lets you see how the security of your workloads would change if you were to change their current enforcement mode. Columns in the Workload list and details pages provide a side-by-side comparison of the effect different enforcement modes would have on Vulnerability and Exposure (V-E) scores. A toggle allows you to simulate the switch between Full Enforcement and Visibility Only enforcement modes.
Note
This option allows you to simulate the switch between Full Enforcement and Visibility Only modes. It doesn't change the actual enforcement mode of your workloads.
How it works
The PCE displays V-E scores in the UI based on ransomware and vulnerability statistics it previously calculated and stored in a database.
If the stored data is stale (4 hours or older), the PCE recalculates the statistics and updates the V-E scores in the UI.
Toggling the Full Enforcement/Visibility Only options provides a side-by-side comparison of the effect of the different enforcement modes.
Because the PCE calculates and re-checks for new data periodically, the information in the UI may not immediately reflect the current V-E score.
API responses include the complete vulnerability data set for the different enforcement modes. V-E data for all modes is pre-processed and stored in a database to eliminate the performance impact of frequent recalculation.
A V-E score is the calculated value based on the Vulnerability Score and Exposure Score = ∑ f (VS, ES). It can be shown for an individual vulnerability on a port for a single workload or as a summation of all the V-E Scores for an App Group, role, or workload.
Workload List pages
On Workload list pages, two adjacent columns show the following:
Full Enforcement / Visibility Only V-E Score: Depending on the item's current enforcement mode, this column matches the Current V-E Score column or changes to show a different V-E score obtainable if the actual enforcement mode were changed.
Current V-E Score: The most recently calculated V-E score of the workload.
Workload Details pages
On the Vulnerabilities tab of Workload details pages, four adjacent columns show the following:
Full Enforcement / Visibility Only V-E Score: Depending on the item's current enforcement mode, this column matches the Current V-E Score column or changes to show a different V-E score obtainable if the actual enforcement mode were changed.
Current V-E Score: The most recently calculated V-E score of the workload.
Full Enforcement Exposure: Depending on the item's current enforcement mode, this column either matches the Current Exposure column or changes to show a different exposure score obtainable if the actual enforcement mode was changed.
Current Exposure: The current exposure score of the workload.
Update Workload Labels in Bulk
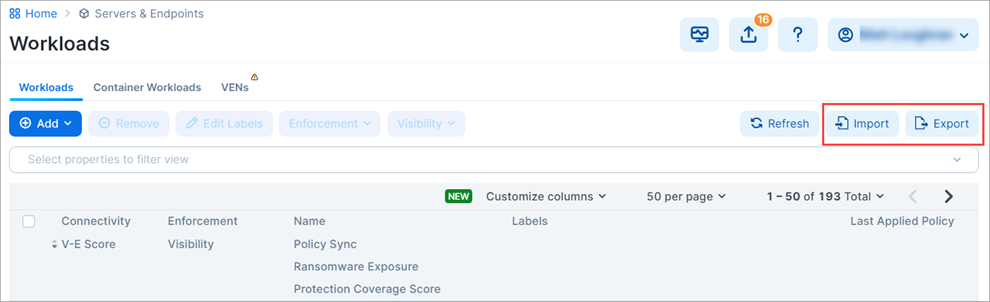
This section describes how to perform bulk operations on labels using the Import / Export feature available on the Workloads List Page. With this feature, you can:
Export a CSV or JSON file containing information about the Illumio labels assigned to your workloads. There's also an option to export other information about your workloads.
Import changes to your workload labels using either the CSV file you exported from the PCE or your own CSV file. You can use the Import feature to do the following:
Create new labels of existing label types and assign them to workloads. (Labels you create using Import are assigned to the workloads you specify in the CSV file. You can't use Import to create an unassigned label.)
Change a label assigned to a workload.
Un-assign a label from a workload.
About the Export File
File format
You can export the file in these formats:
CSV: This format is convenient if you use the same file to import label updates to the PCE. Only CSV files can be imported to the PCE.
JSON: This option simply exports workload data in a JSON file. It can't be imported to the PCE.
Columns
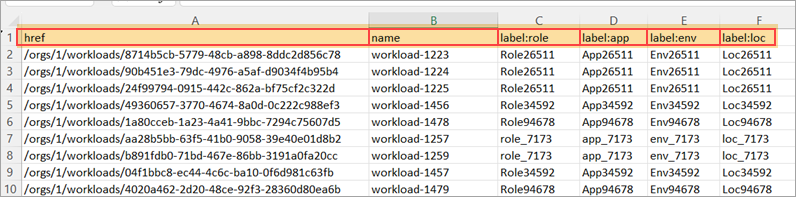
By default, the exported CSV file has the following columns:
Note
The href and hostname columns must occupy the first and second columns from the left, respectively, and column headers should not be changed. Label column headers should not be changed, but the columns can be in any order.
First column:
hrefSecond column:
hostnamelabel: role
label: app
label: env
label: loc
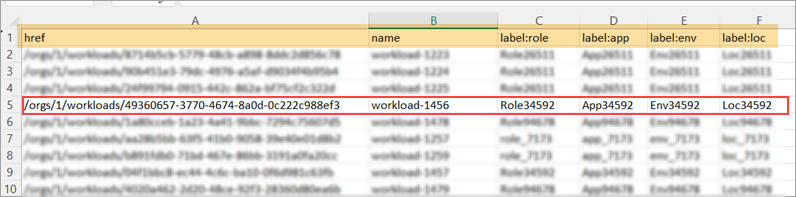
Rows
With the exception of the header row (the top row), each row in the import file corresponds to a workload on the PCE.
CSV file requirements
Whether you're using a file exported from the PCE or your own *.csv file, the file you intend to import to the PCE must meet the following requirements:
The file must be a *.csv format.
The first column header must be href
The second column header must be hostname.
The file doesn't need a label column for every label type defined in the PCE Label Settings (Settings > Label Settings).
If you're attempting to create new labels, ensure they don't already exist in your Illumio instance. If the label already exists, an error will occur, and an error message will appear.
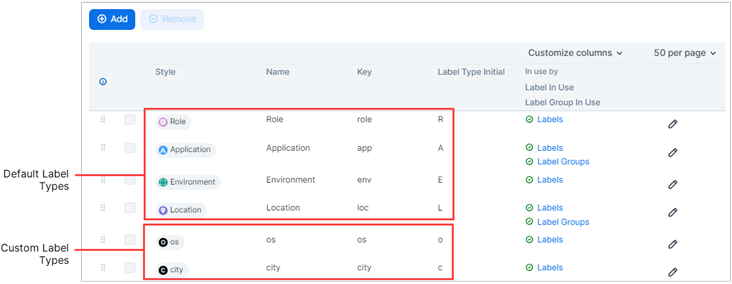
You can include label types other than Role, Application, Environment, and Location if they are already defined in the PCE Label Settings.
Blank cells in the import file are ignored.
Up to 1000 import rows per CSV is supported.
Customizing the file
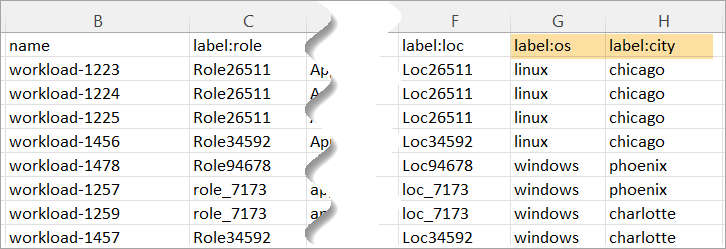
If custom label types are defined in Settings > Label Settings on the PCE, the exported file will include columns corresponding to those Label Types. For example, if your organization defines custom label types for OS and city, the exported file will include corresponding columns.
Procedure
STEP 1: Export Workload Information
Tip
You can skip the Export step if you plan to prepare your own CSV file for importation to the PCE. See Step 1
You can use the Export feature to create and download a file to your local computer for one or both of the following reasons:
Prepare for importing bulk updates. In the exported file, you'll specify the updates you want to make to Workload labels as described in STEP 2: Prepare the CSV file for import. You'll import the file to the PCE as described in Step 3.
Capture workload information. Export data about your workloads in a text file for informational purposes.
In the left navigation, click Servers & Endpoints > Workloads.
On the Workload list page, click Export in the upper right corner.
In the Export Workloads dialog box, configure settings:
Export:
All Workloads: Select if you want the exported file to include all Workloads. If no filters are applied, only this option is available.
Filtered Workloads: This option is available only if one or more filters are applied to the list of workloads. Select if you want the exported file to include only the filtered list of Workloads. Otherwise, select All Workloads.
Columns:
All Columns: Select if you want the exported file to include all columns in the Workload List Page, including hidden columns. Note: While the exported file includes all columns, only updates that you make to data in the label columns will take effect when you import the file to the PCE. Changes to data in other columns, if any, are ignored.
Labeling Columns: Select if you want the exported file to include only the label columns in the Workload List Page.
File Format:
CSV: Select CSV if you plan to use this file to import label updates to the PCE. Only CSV files can be imported to the PCE.
JSON: Not used for updating labels. This option exports workload data in a JSON file. JSON files can't be imported to the PCE.
Click Export. The file is sent to your Downloads folder.
STEP 2: Prepare the CSV File for Import
Here's how to prepare the CSV file to create, assign, update, and unassign labels during import.
Open the CSV file located in your Downloads folder and modify it in any of the following ways:
Assign a new or change an existing label
In the appropriate label column and workload row, enter a label name or change an existing label name for each workload that you want to have the new or a changed label.
Unassign labels
In the appropriate label column and workload row, replace the name you want to un-assign with any combination of alphanumeric or special characters. Later, in STEP 3: Update Workload Labels Using Import, you'll enter the exact string in "Remove the existing label" if the imported label matches the string listed below. Also, un-assigning a label from a given workload doesn't delete the label for use with other workloads in the PCE.
Note
Simply deleting the label name from the CSV file and then importing the file to the PCE does not unassign the label from the workload.
As described in the above step, you must replace the label name in the CSV file with a string that you'll also enter in the Import a CSV to edit workload labels dialog box as described in STEP 3: Update Workload Labels Using Import. If the strings don't match when you perform the import, an error occurs, and the label isn't unassigned.
Save the CSV file.
STEP 3: Update Workload Labels Using Import
The Import feature sends a CSV file to the PCE to update workloads labels on your PCE. You can upload a CSV exported from the PCE (STEP 1: Export Workload Information) or prepare and upload your own CSV file.
Prepare the CSV file for import (STEP 2: Prepare the CSV File for Import).
If you have not already done so, log in to the PCE.
In the left navigation, go to Servers & Endpoints > Workloads.
On the Workload list page, click Import in the upper-right corner.
In the Import a CSV to edit workload labels dialog box, click Choose File and select the CSV file you want to import to the PCE.
Select one or both of the following options:
Create labels if they don't already exist
This option allows you to create new labels of an existing label type and assign them to workloads you specified in the CSV file. Available label types are defined in Settings > Label Settings.
Remove the existing label if the imported label matches the string listed below
This option allows you to unassign a label from workloads you specified in the CSV file in STEP 2: Prepare the CSV File for Import. Enter the exact string in this field that you entered in the CSV file as described in STEP 2. If the strings don't match when you perform the import, an error occurs, and the label isn't unassigned.
Note
Simply entering a string in this field and importing the CSV file to the PCE does not unassign the label from the workload. You must enter the exact string in this field in the CSV file.
If the strings don't match when you perform the import, an error occurs, and the label isn't unassigned. Also, unassigning a label from a given workload doesn't delete the label for use with other workloads in the PCE.
Click Preview Changes.
Review the proposed changes in the Preview Changes message.
(Optional) Click Review if you want to see the impact of your changes before you complete the import process. Any new labels you created appear in the New Labels list. A copy button allows you to copy the details into your buffer.
Click Back to return to the Preview Changes message.
Click Save. The file is imported into the PCE.
Click Refresh to see the label changes reflected in the workloads list.
If you entered a string in the CSV file to remove an existing label, delete the string from the file and then save the file. Otherwise, if you import the file again, the PCE will interpret the string as a label you want to add to a workload.